Database Management System Lab
Database Management System lab
Quick Links
- Experiment 1
- Experiment 2
- Experiment 3
- Experiment 4
- Experiment 5
- Experiment 6
- Experiment 7
- Experiment 8
- Experiment 9
- Experiment 10
MySQL Installation
To install the MySQL software, we must use the MySQL official site and download the latest version from the MySQL Community Server as per the requirement of our system.
- For this installation, we need the downloaded version of the MySQL which we initially done in the system. from the directory where we have the unzipped files, open Window Explorer and double-click on
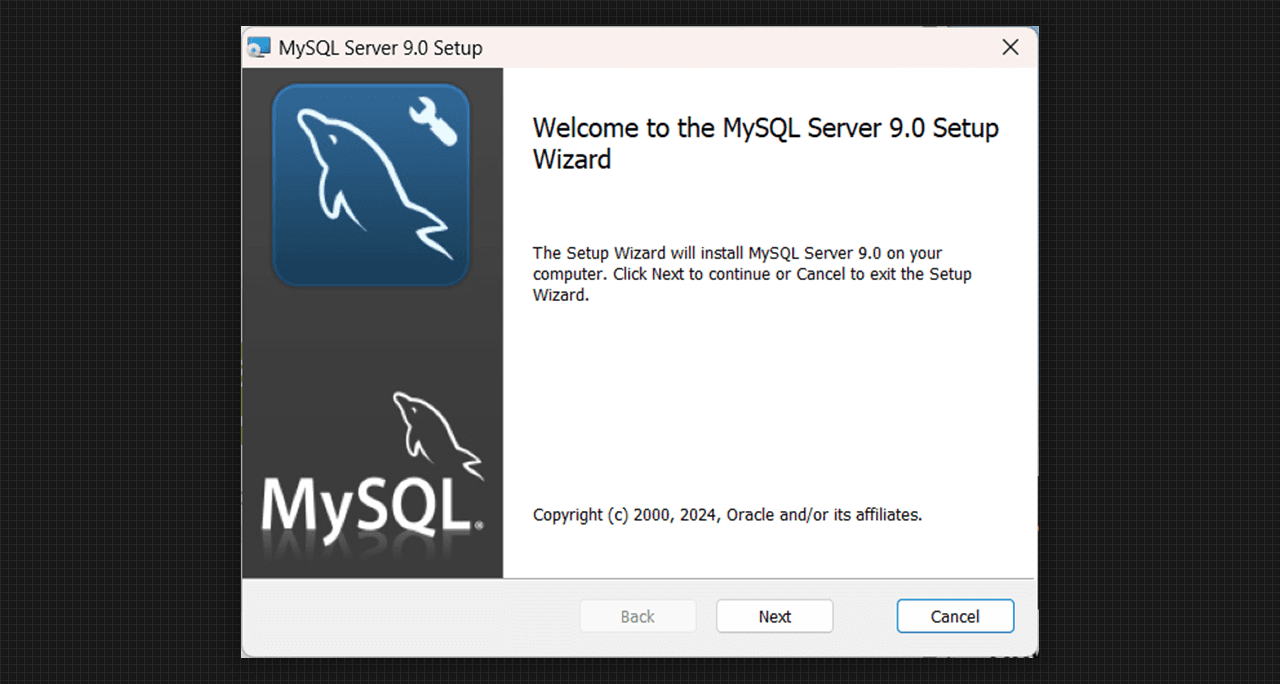
setup.exe. - The product we want to install is MySQL Server 9.0 Setup Wizard.
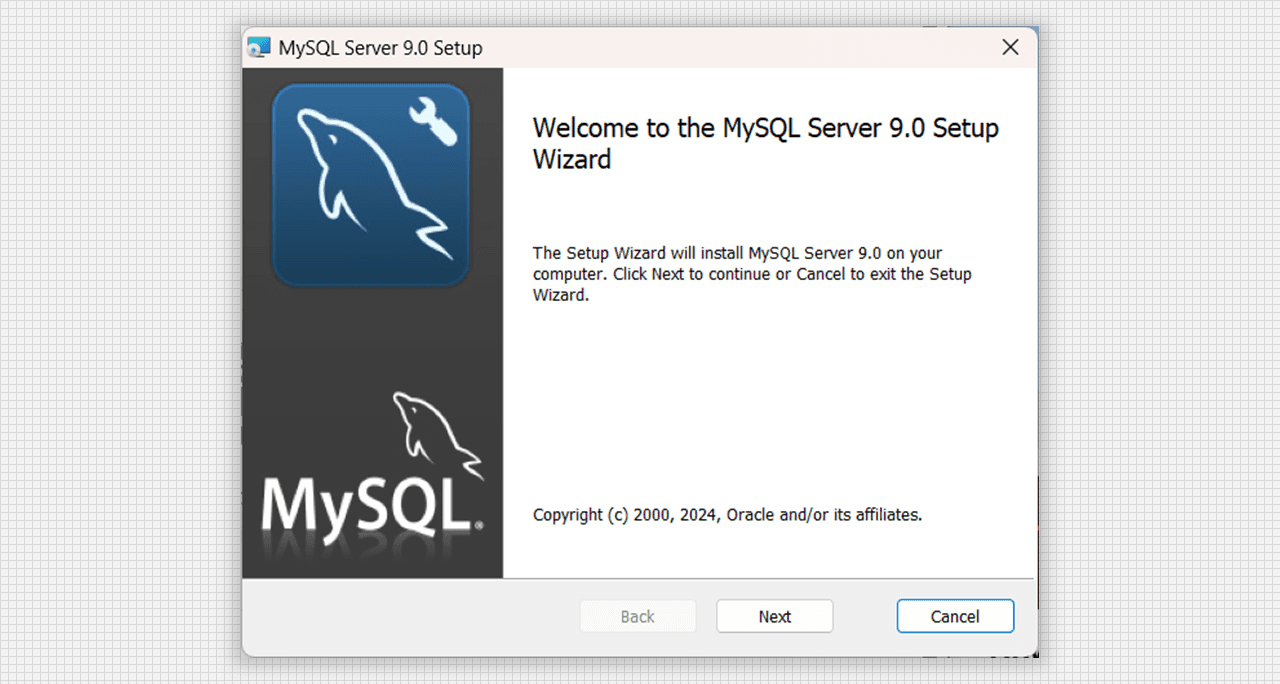
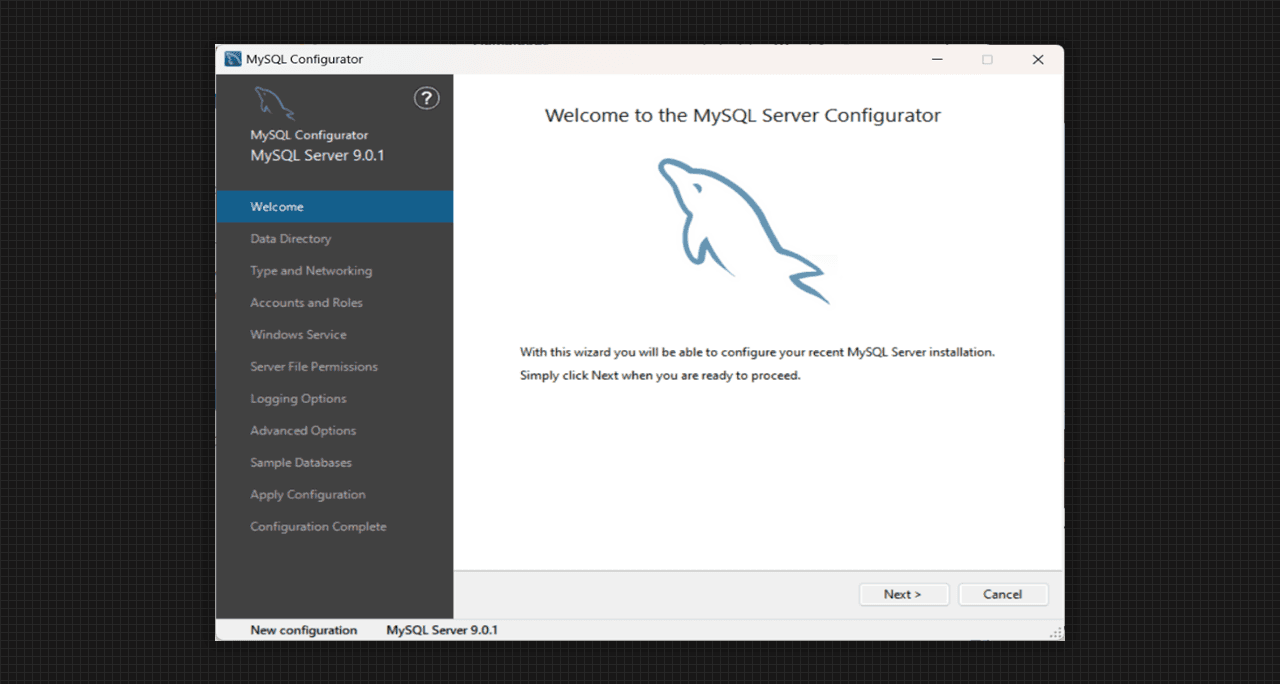
First window of MySQL Server 9.0 Setup
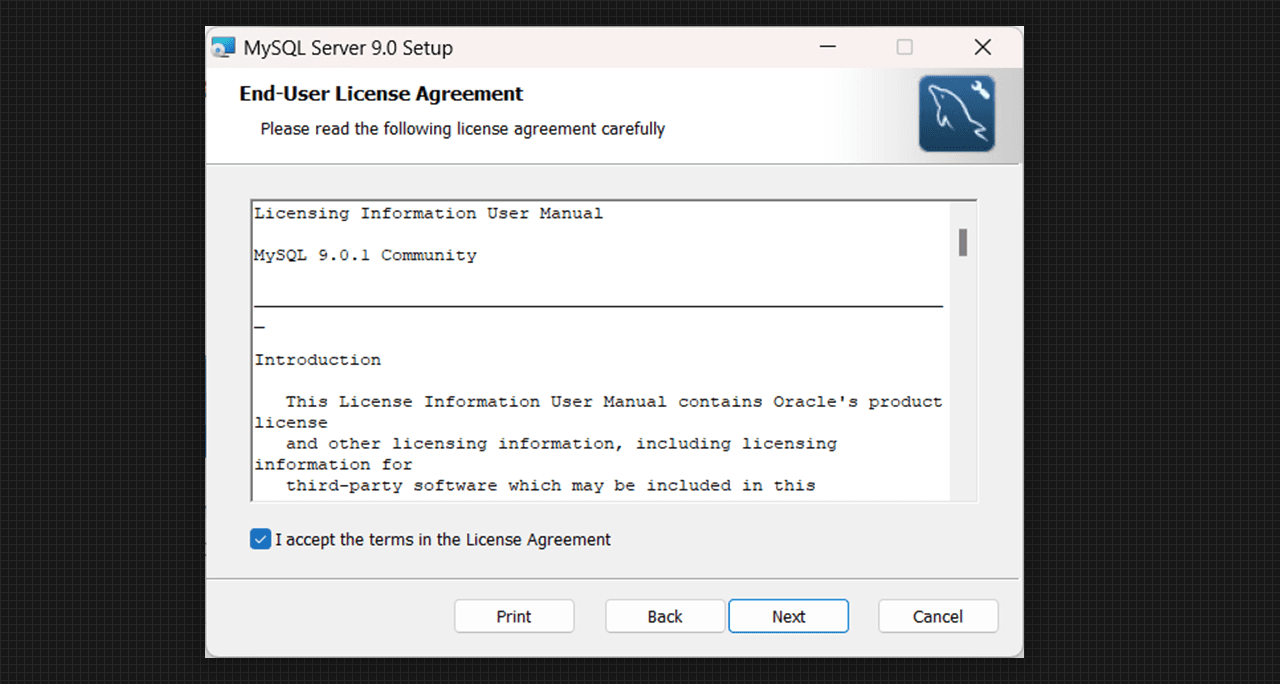
- We can perform a basic installation with some term acceptance which is End-User License Agreement then go to the next step.
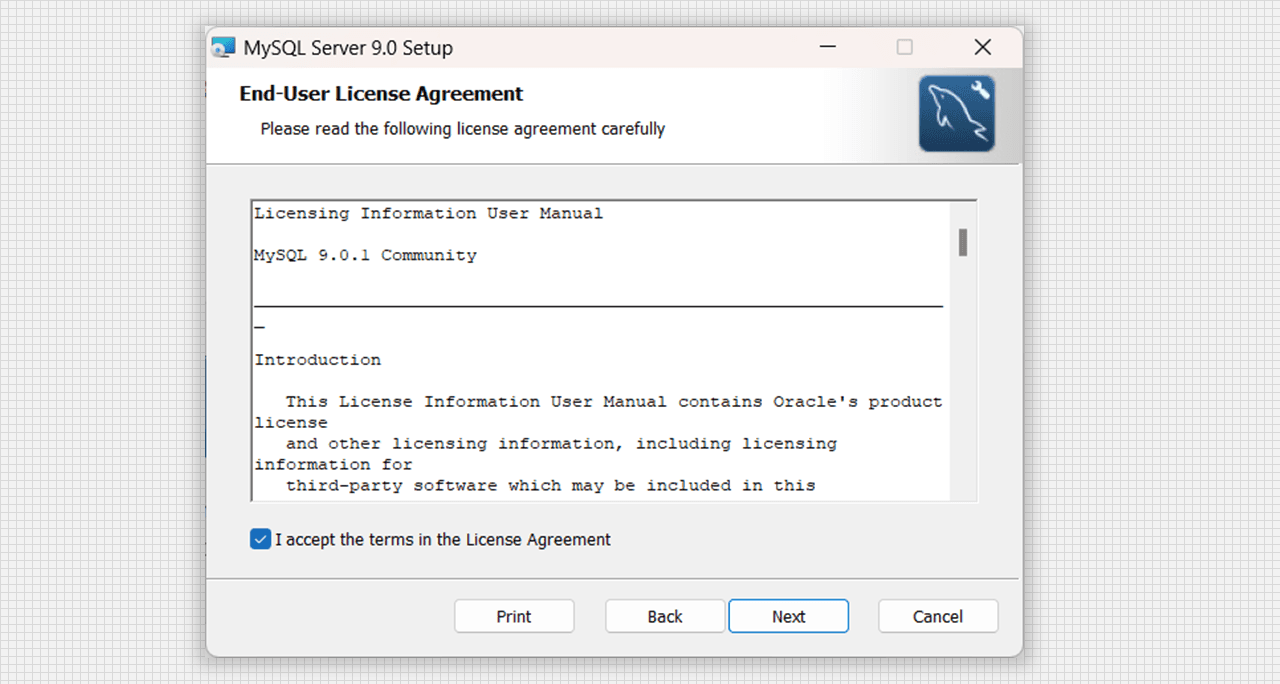
License and Agreement of MySQL Server 9.0 Setup
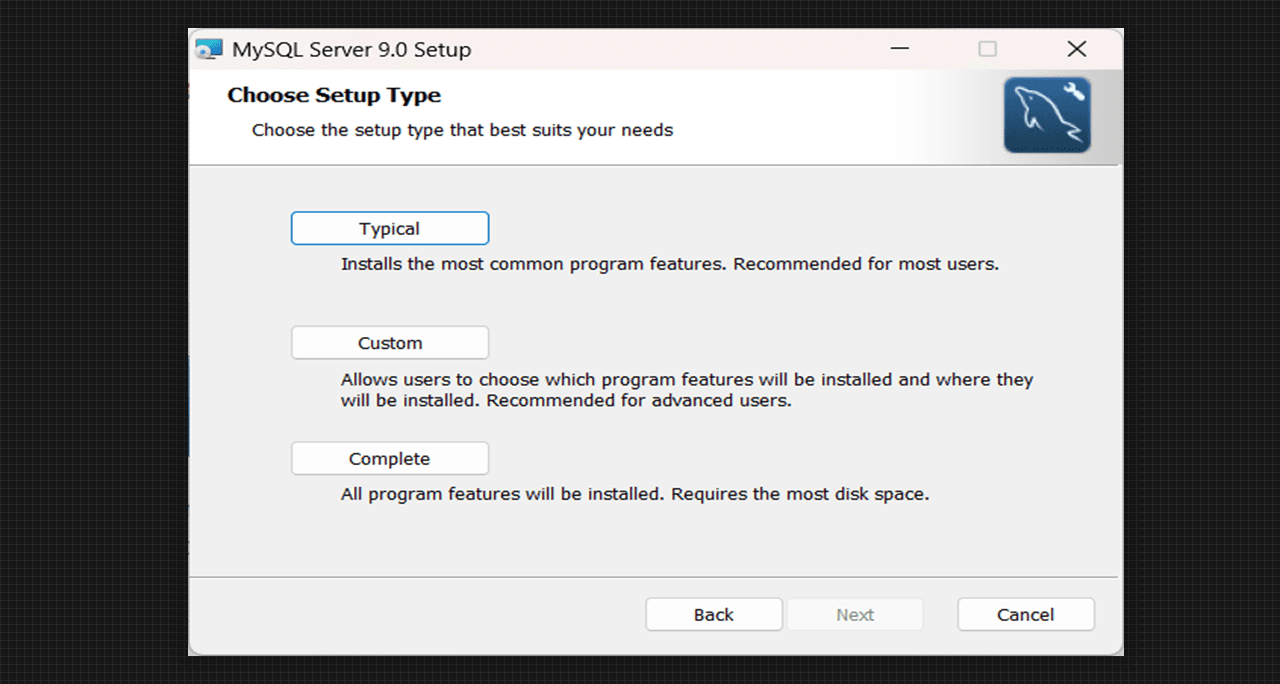
- Now choose the Setup Type as per the requirement, we will go with the Complete Setup Option.
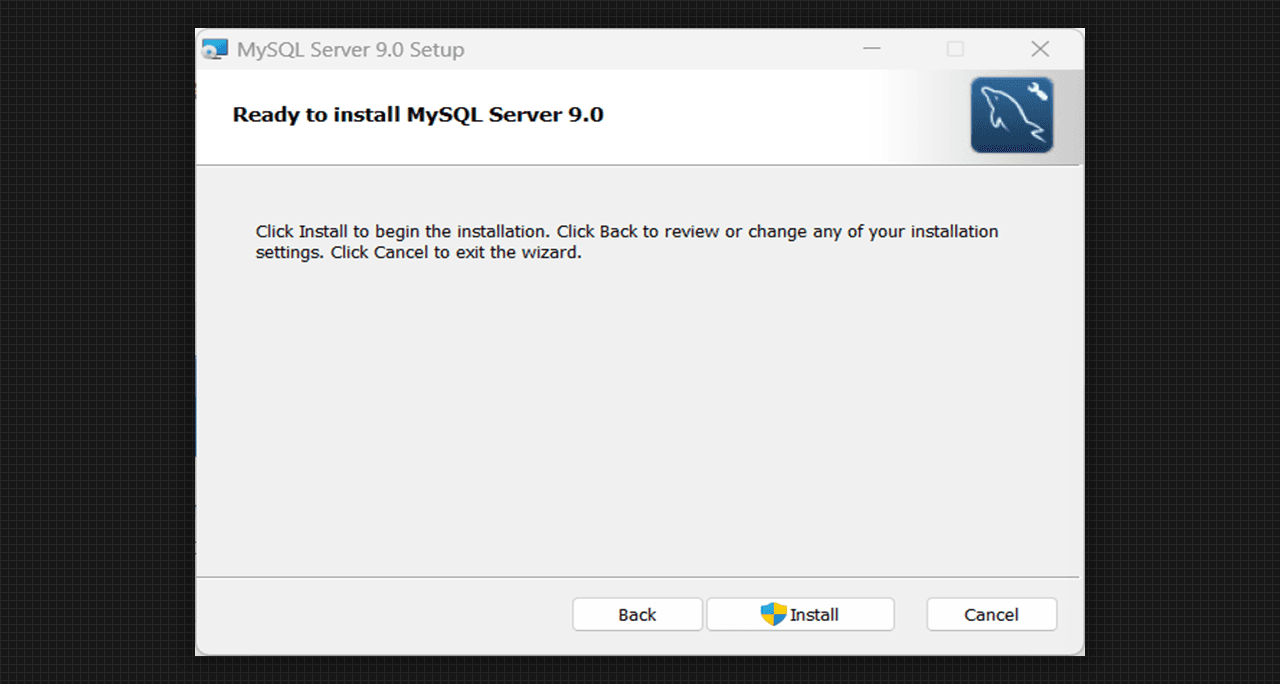
- Installation window has been appeared, now simply click on the Install tab.
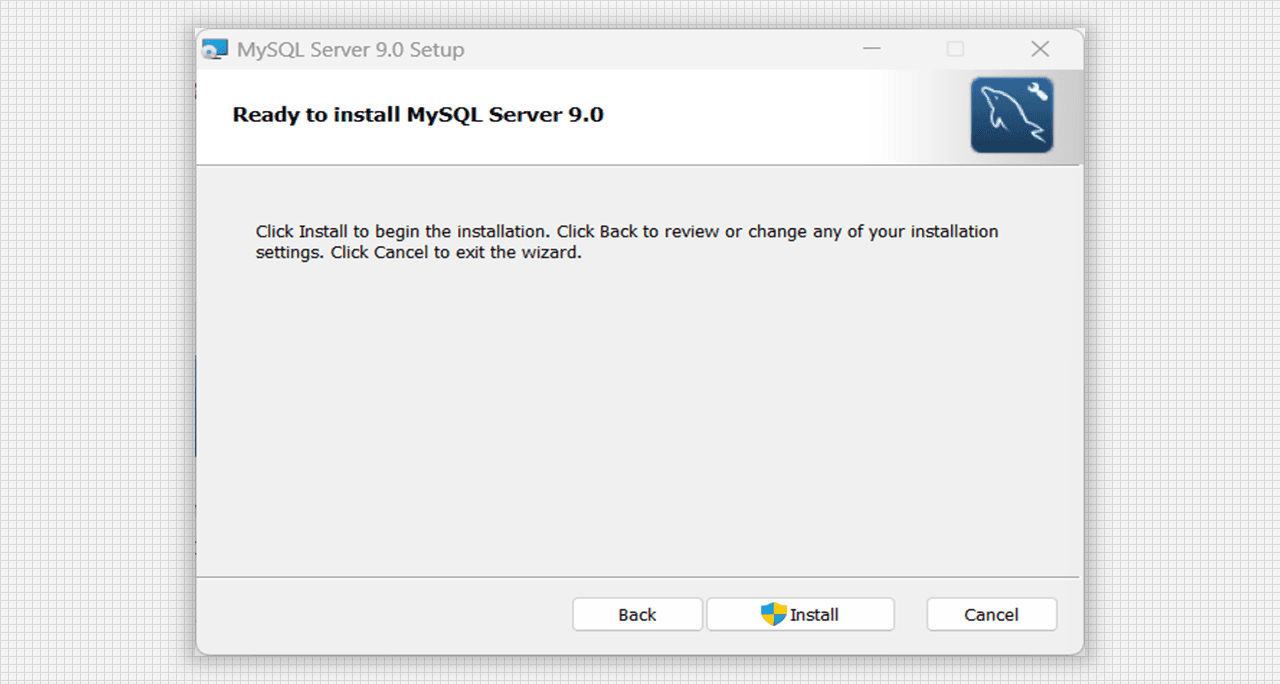
Ready to Install MySQL Server 9.0
- Now our MySQL Server Setup Wizard has been successfully completed. Click on the finish button by giving permission to Run MySQL Configuration with tick icon.
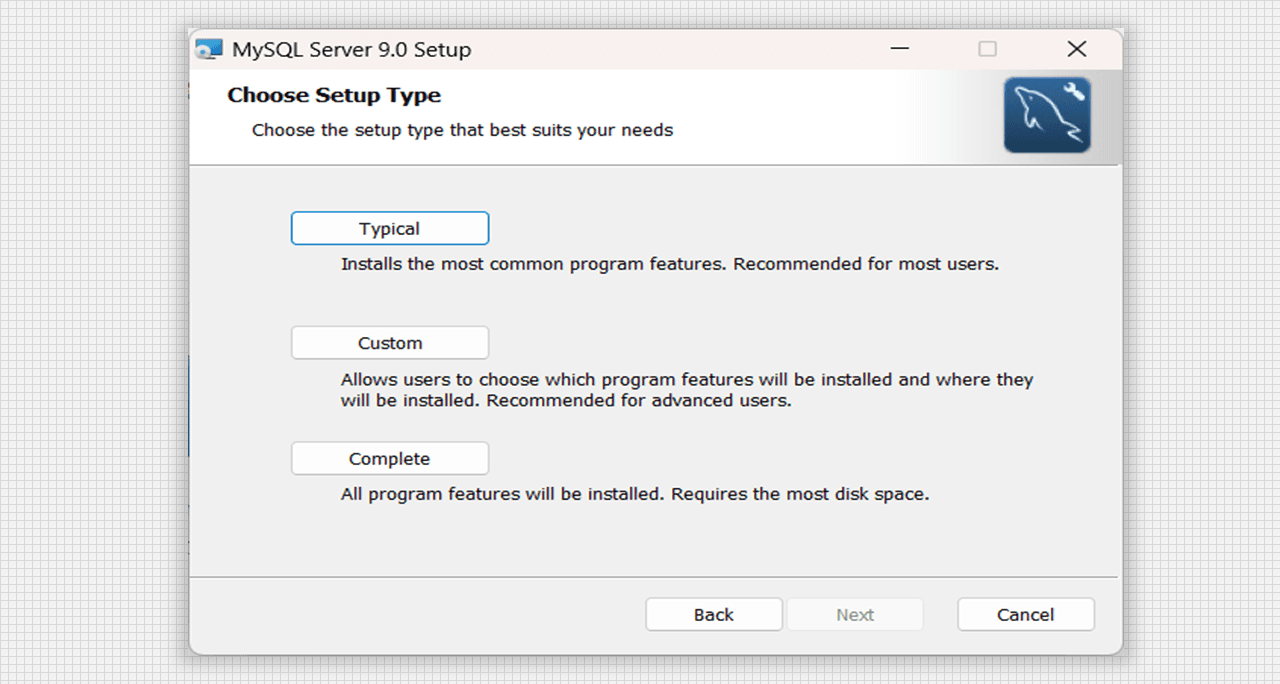
Choose the Setup Type of MySQL Server 9.0
- A new window with the name MySQL Configurator will pop out to our system. Go with the each step for the proper functioning of our SQL Server.
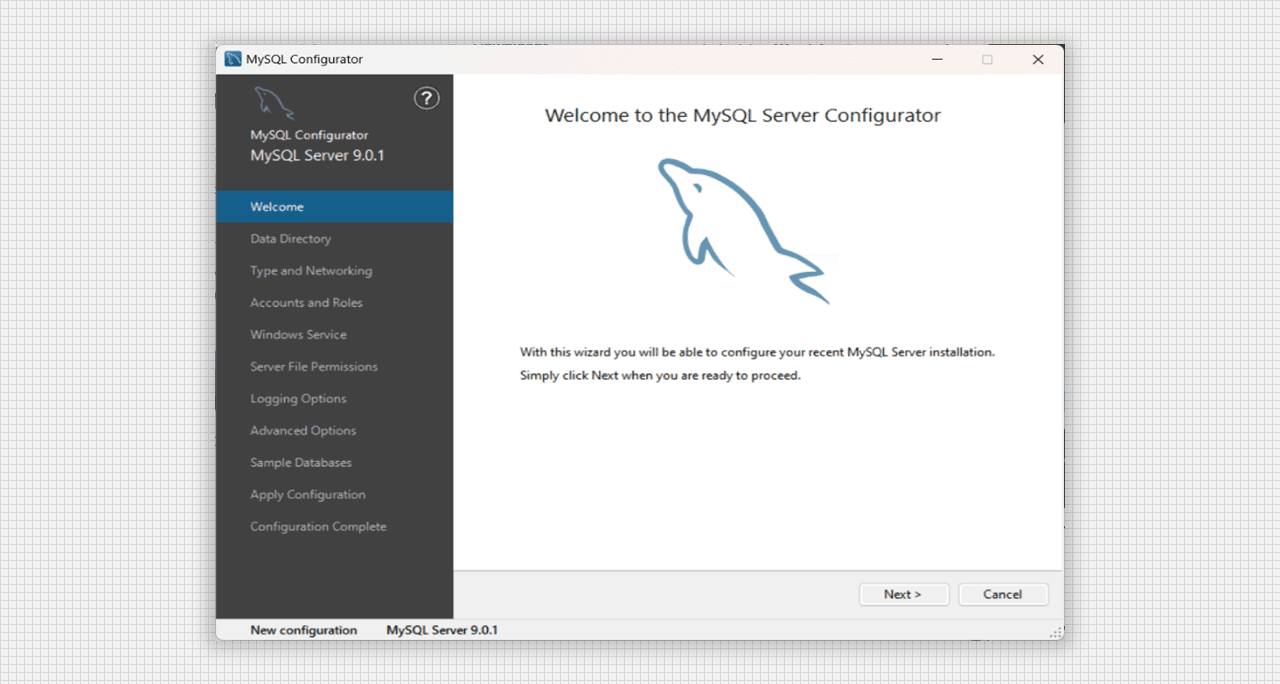
Configuration window of MySQL Server 9.0 Setup
- Data Directory contains the detail of our work path.
- Type and Networking contains the Config Type, we will go with the Development Computer with TCP/IP connectivity Port:3306 and X Protocol Port:33060.
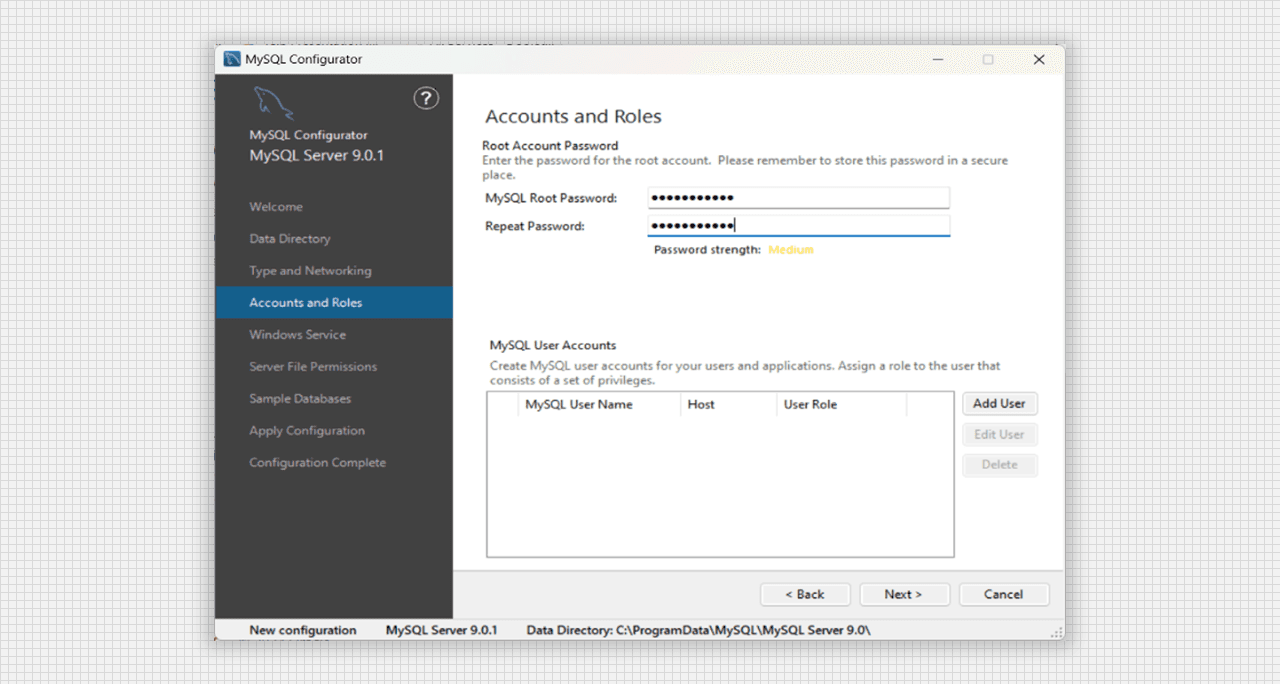
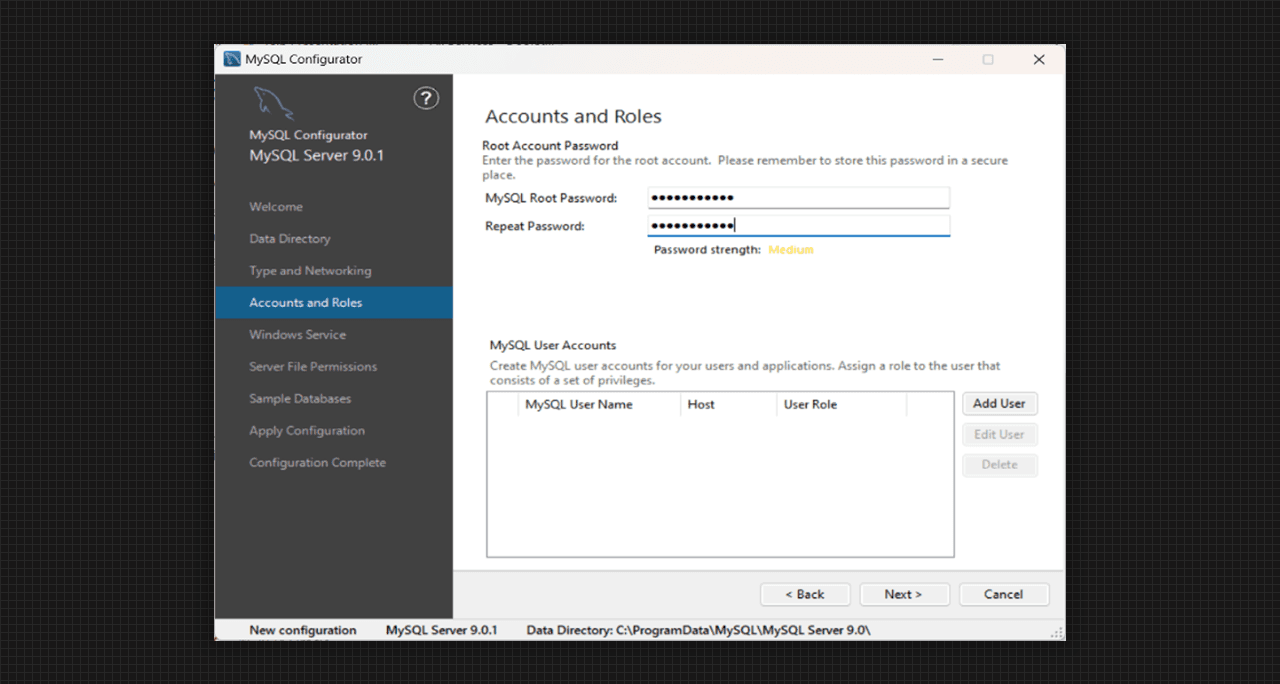
Accounts and Roles of MySQL Server 9.0 Setup
- Account and Roles contains the Password Setup for our MySQL Root server. We may also add the user here as our requirement.
- With our Username, Password and Database role we will go to the next step.
- For Windows Service, we will go with the option as our need.
- For Server File Permission, we give full access to the server.
- Sample Database contain Create Sakila Database and Create World Database, we will go with both the option.
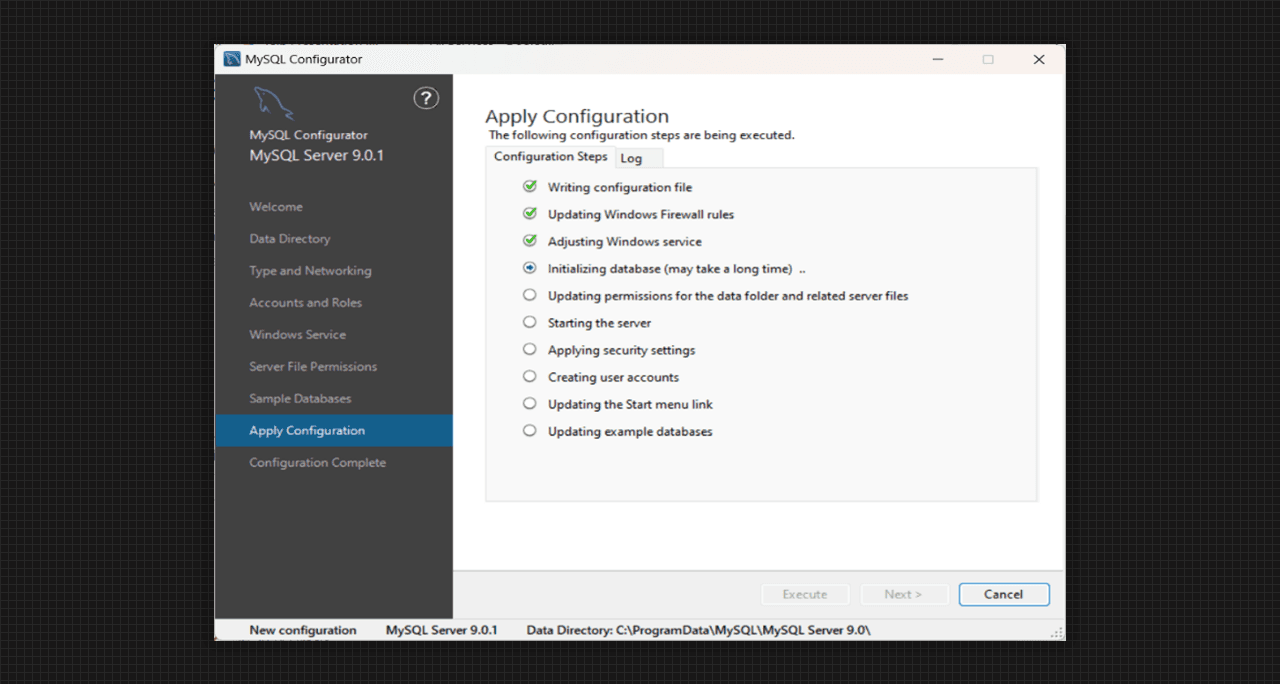
- After applying Configuration, the steps will start to be executed.
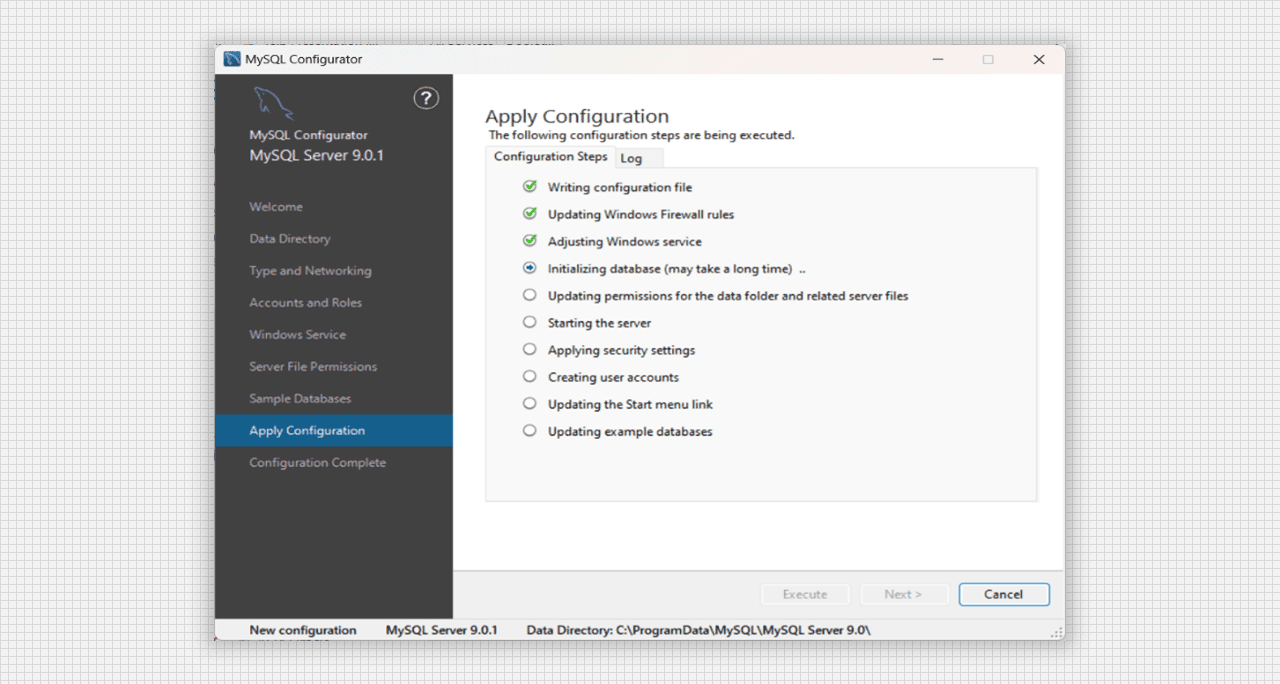
Applying Configuration for MySQL Server 9.0 Setup
- Now the Configuration completed Finish the window now by clicking on the tab.
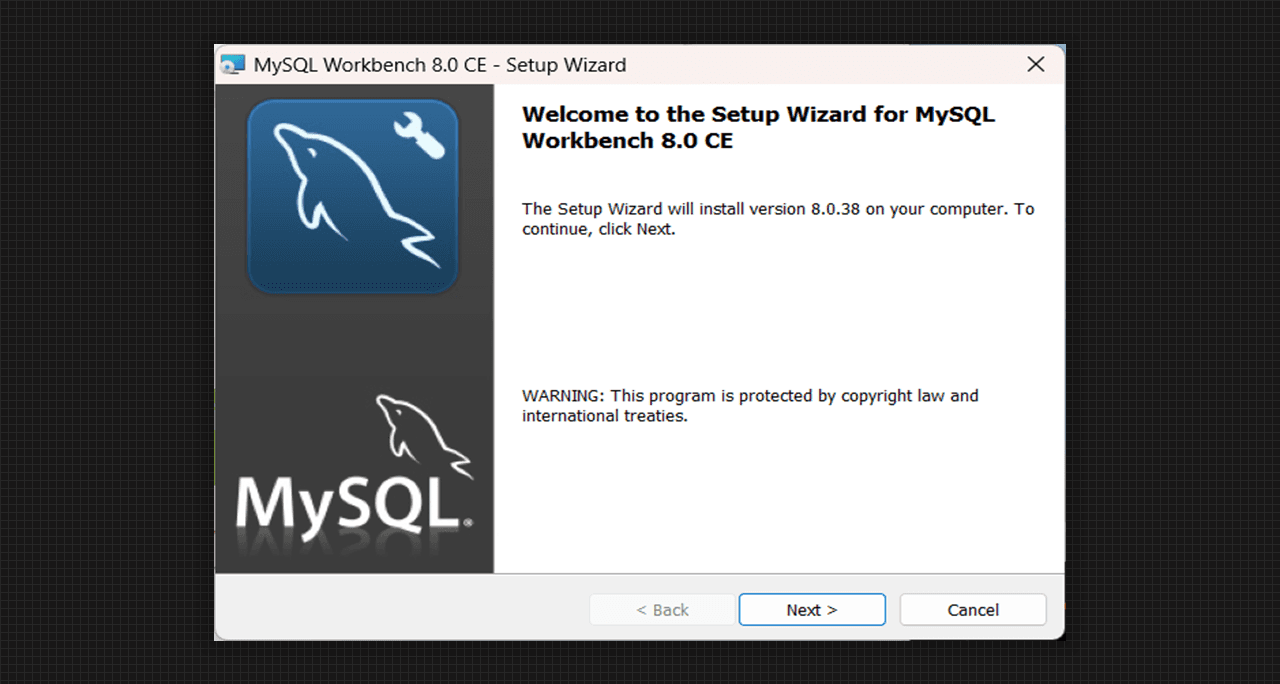
- For running the SQL Program, we have to download the MySQL Workbench in our system from the same MySQL Official site from the Community Server and select the path where we want to install the Workbench.
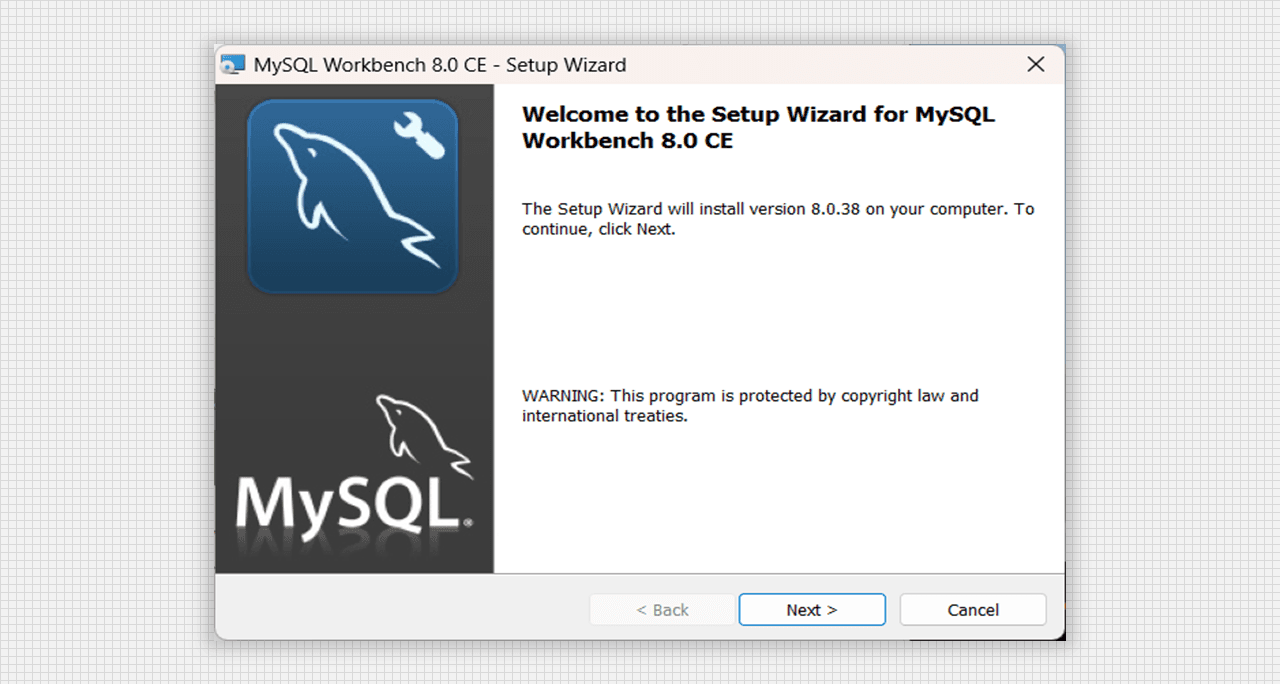
Setup for MySQL Workbench 8.0 CE
- Click on the Complete Setup type and go to the next step.
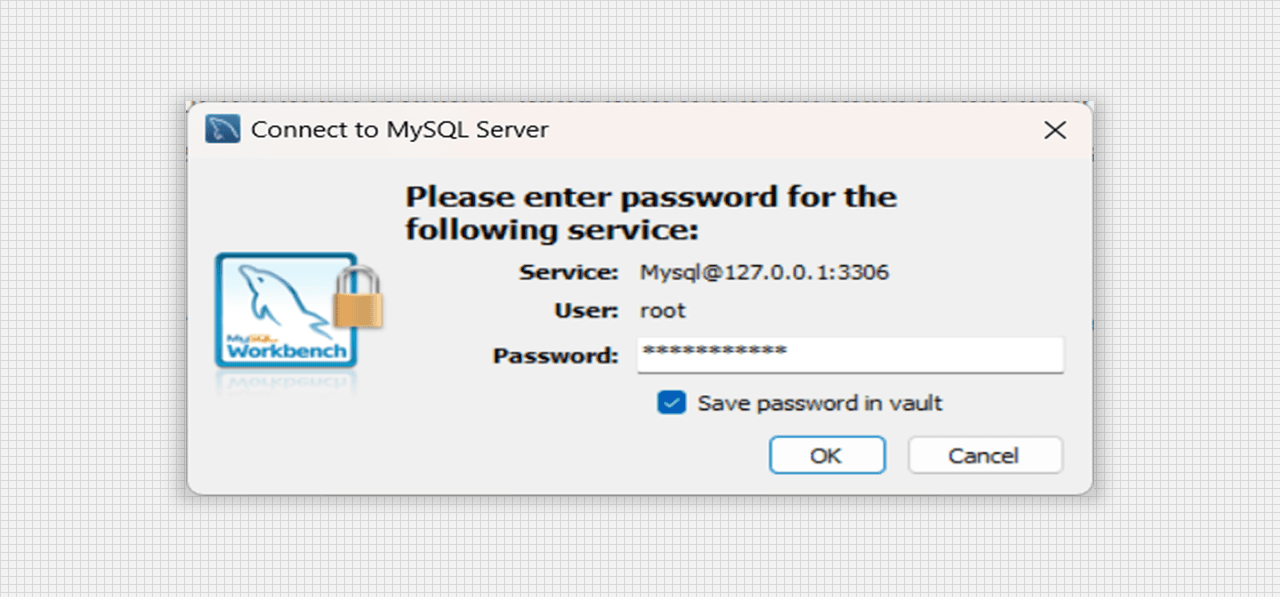
Connect to MySQL Server 9.0
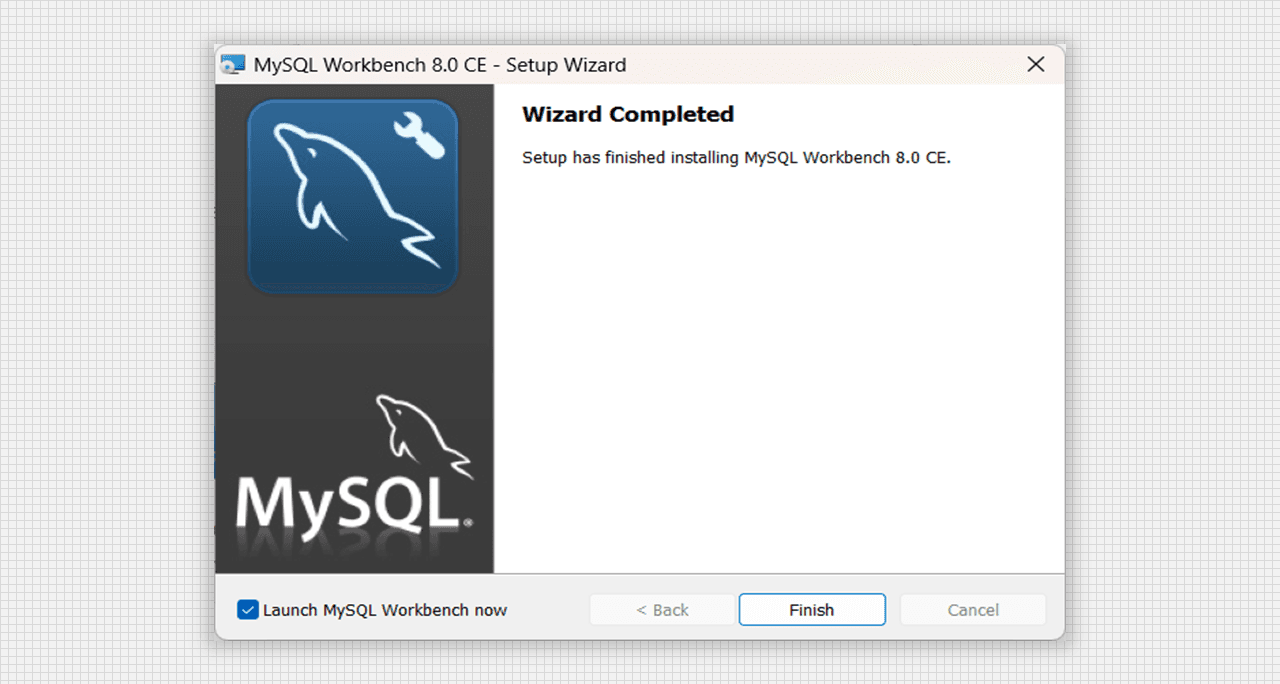
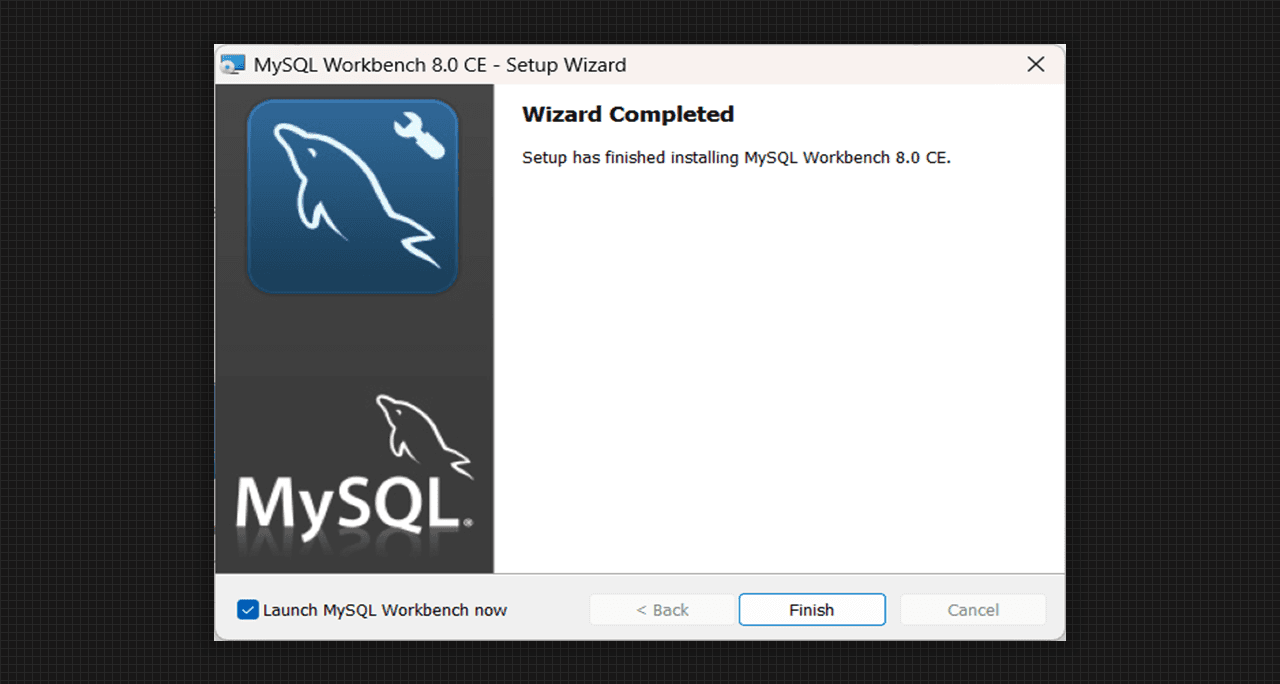
Wizard Completed for MySQL Workbench 8.0 CE
- After that MySQL Workbench is started to install in the system it will take sometime to install the data. After that the Wizard Completed has been shown in the system.
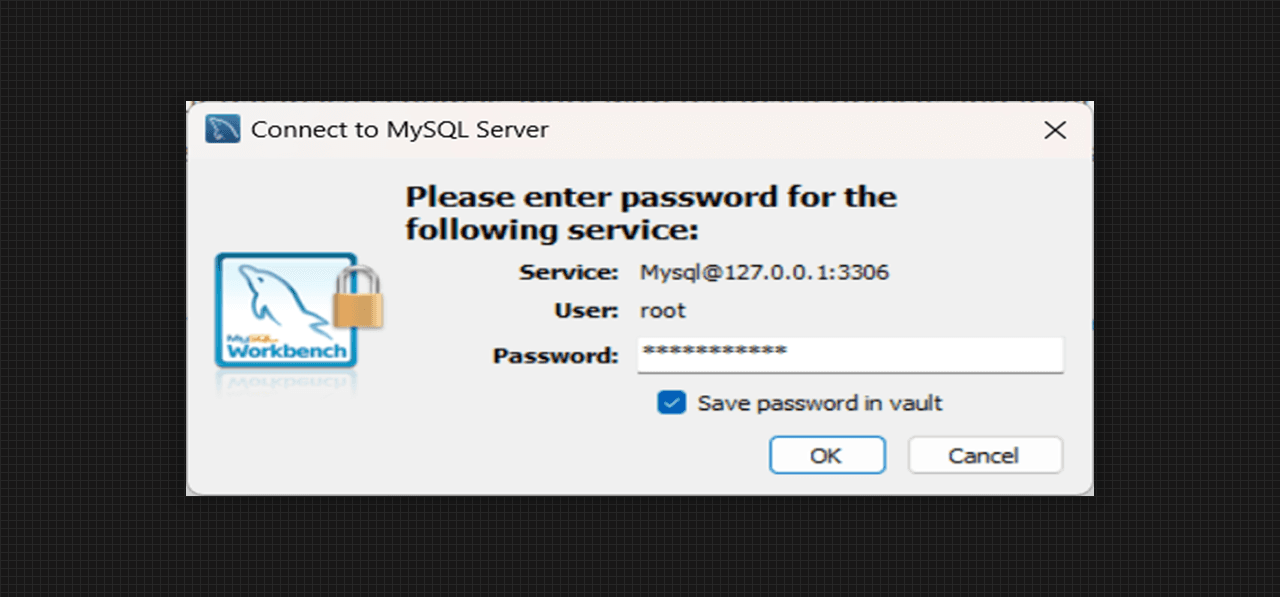
- For connecting the MySQL Server, we have to enter the Password which we created earlier to link it with the MySQL Workbench.
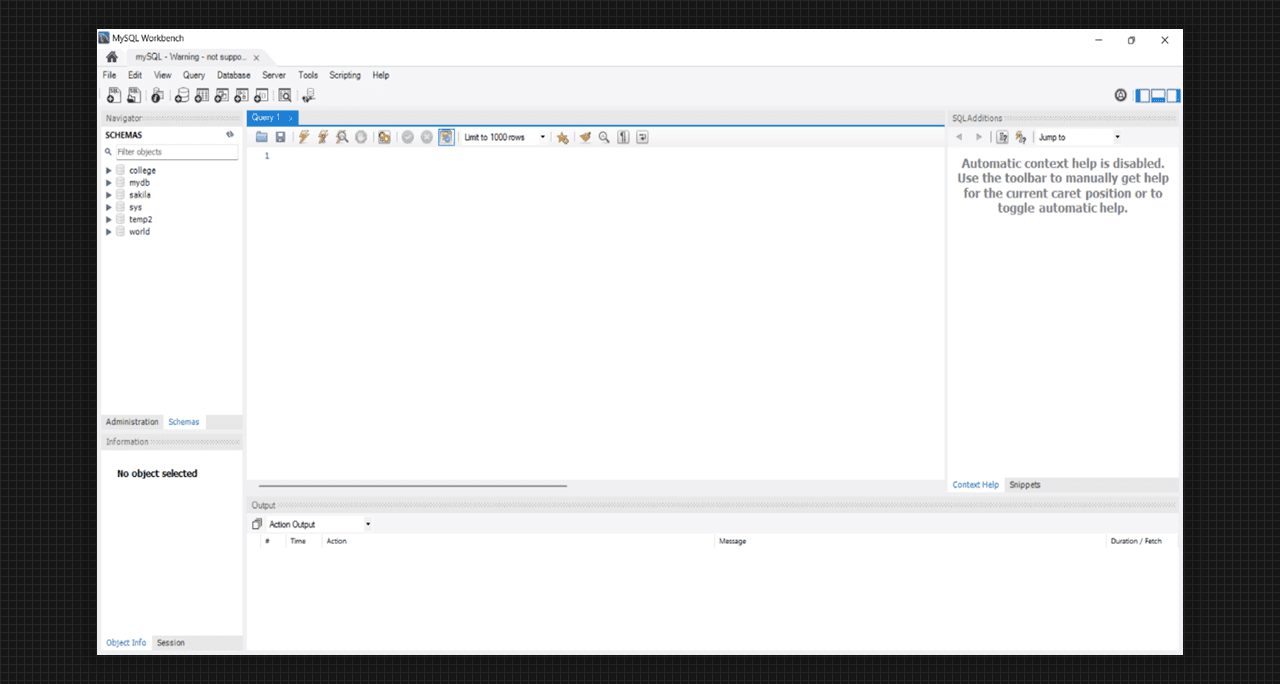
- Our SQL Workbench will look like as the below image:
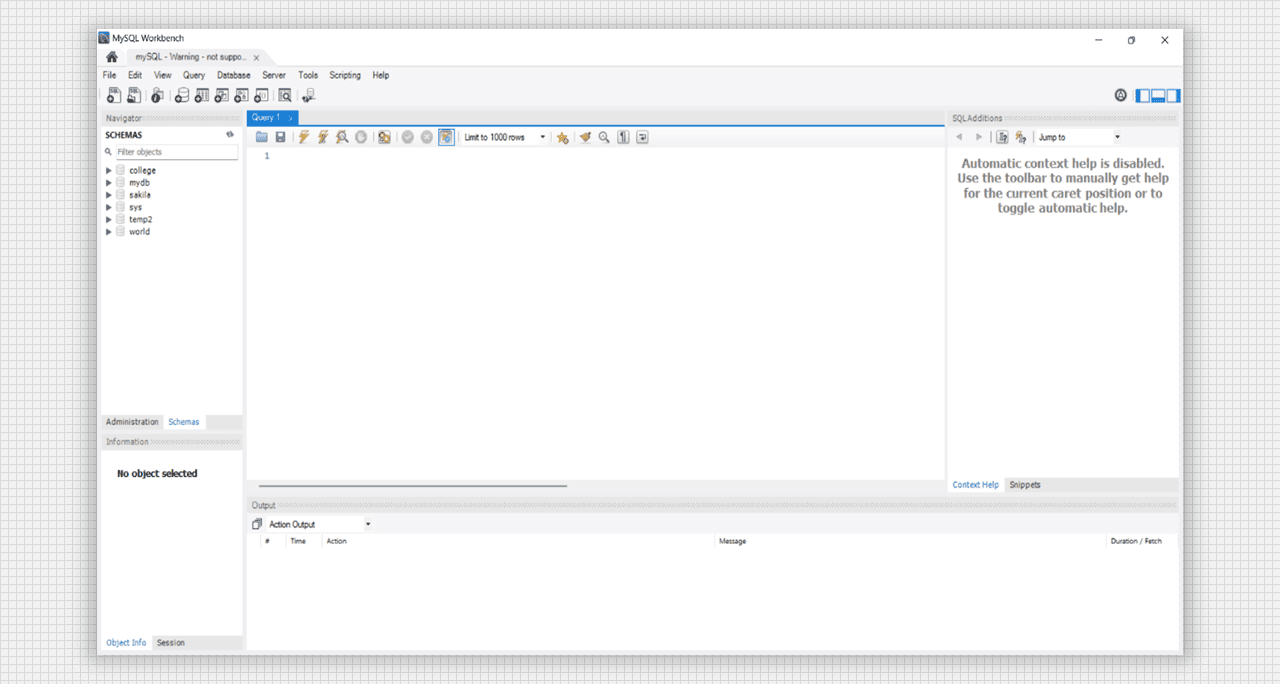
Startup Window of MySQL Workbench
- create
- insert
- select
- DESCRIBE
- SQL commands are extensively used to interact with databases, enabling users to perform a wide range of actions on database systems. Understanding these commands is crucial for effectively managing and manipulating data.
- SQL Commands are mainly categorized into five categories:
- DDL: Data Definition Language
- DQL: Data Query Language
- DML: Data Manipulation Language
- DCL: Data Control Language
- TCL: Transaction Control Language
create: Create database or its objects (table, index, function, views, store procedure, and triggers).insert: insert data into a table.select: Used to retrieve data from a database.DESCRIBE: Used to display the structure of a table, view, type, procedure, function, package, or synonym.
-- creating databse
create database mydb;

-- creating student table
create table student (
    id integer,
    roll_no integer,
    name varchar(20),
    branch varchar(20),
    section varchar(5)
);

-- insert a data in student table
insert into student (id, roll_no, name, branch, section)
value (1, 106, 'Prince Kunal', 'CSE', 'B');

select * from student;

-- delete the data where id is 1
delete from student where id= 1;

select * from student;
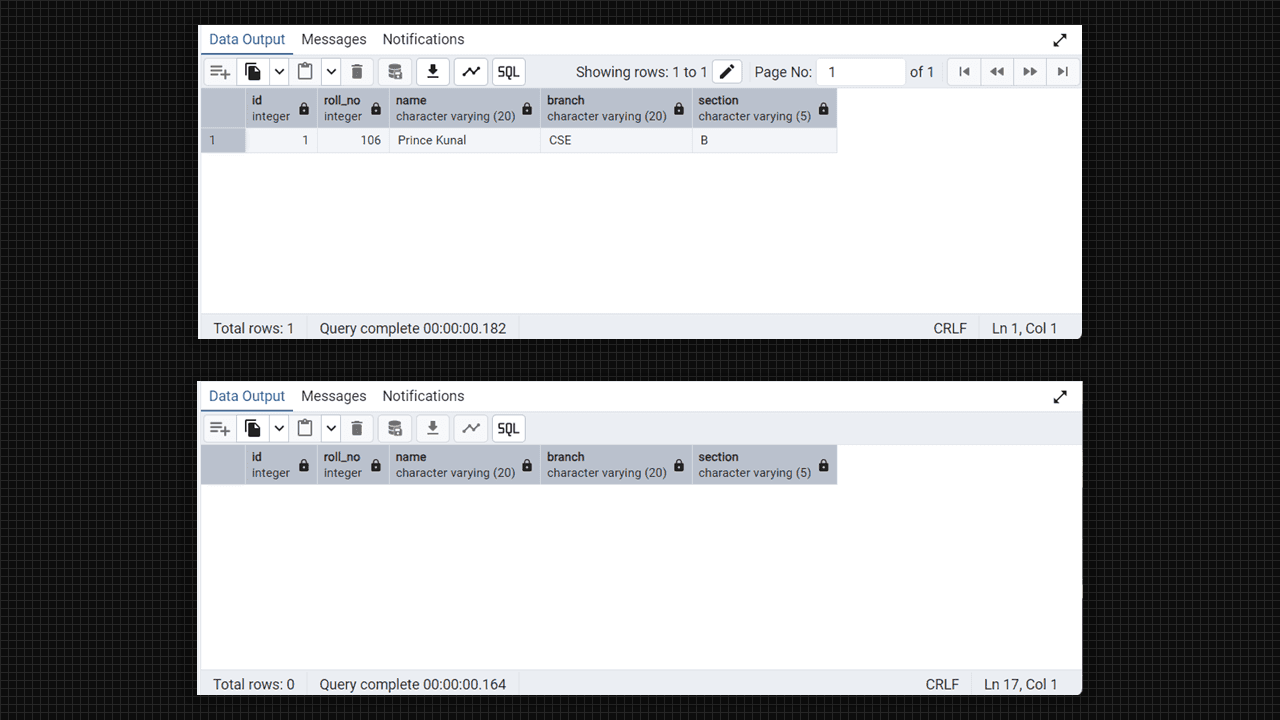
Output:
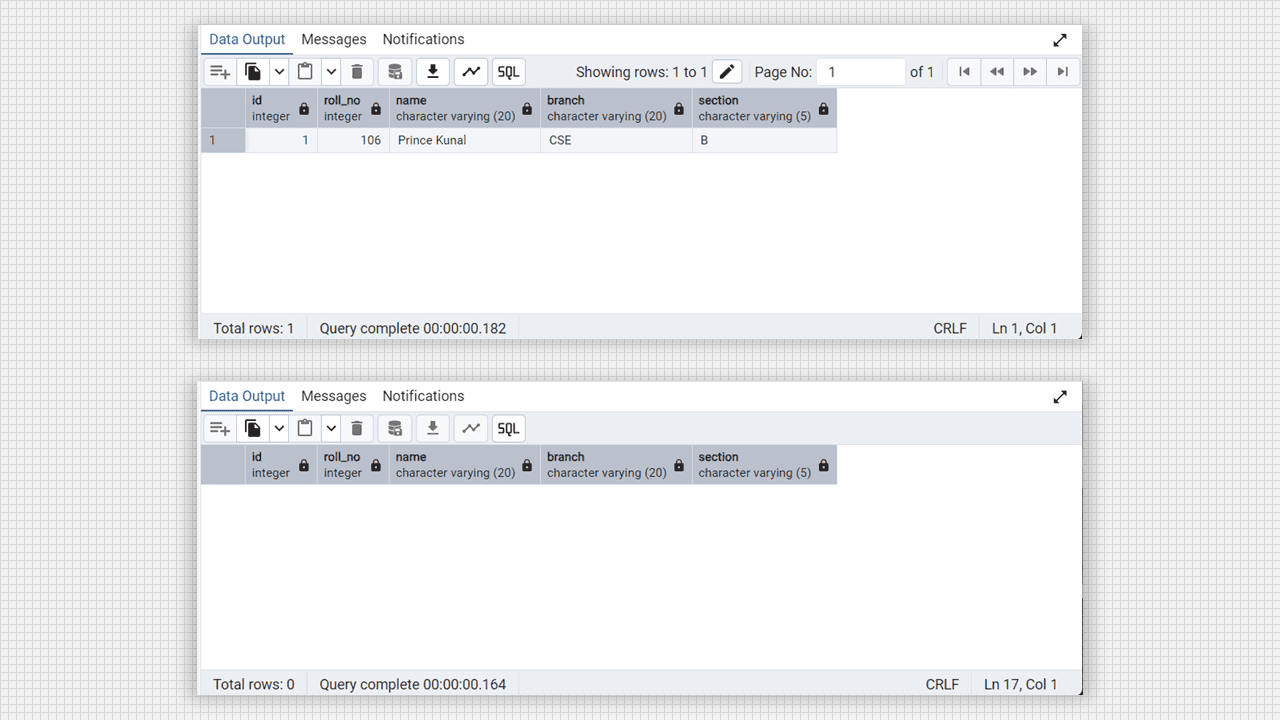
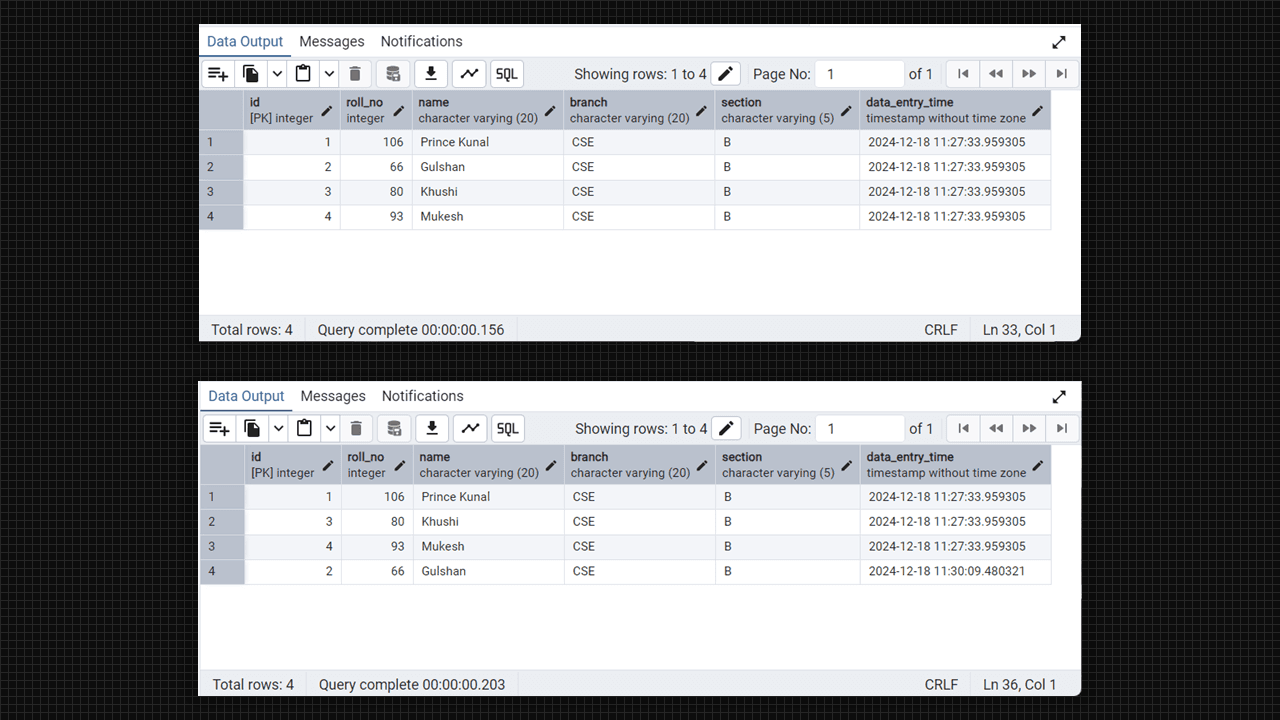
Create Table and delete data in Admin 4 (PostgreSQL).
-- creating a sequence of the id
create sequence sequence_id as integer;

-- modify the table attribute normal to primary key, not-null, auto-increment
alter table student
alter column id set default nextval('sequence_id'),
add primary key (id);

-- add a new column to set date at data-entry-time
alter table student add data_entry_time timestamp default now();

-- inserting multiple value at a time which are nessary value only.
insert student (roll_no, name, branch, section) values
(106, 'Prince Kunal', 'CSE', 'B');
(66, 'Gulshan', 'CSE', 'B'),
(80, 'Khushi', 'CSE', 'B'),
(93, 'Mukesh', 'CSE', 'B');

select * from student;

-- updating the datetime where id is 2
update student set data_entry_time = now() where id = 2;

select * from student;
Output:
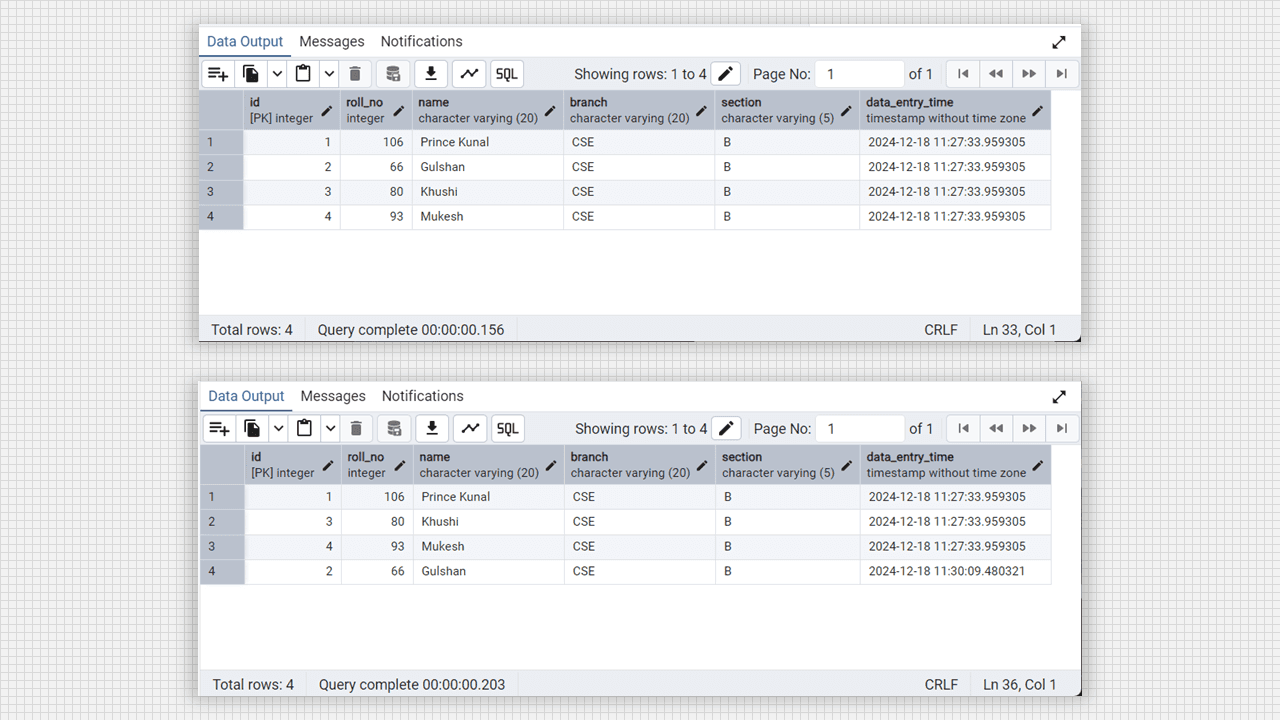
Alter column and update in Admin 4 (PostgreSQL).
Objective: Create a database using the following Aggregate Functions:
MIN()MAX()COUNT()SUM()AVG()
Theory:
- An aggregate function is a function that performs a calculation on a set of values, and returns a single value.
- Aggregate functions ignore null values (except for COUNT()).
The most commonly used SQL aggregate functions are:
min(): returns the smallest value within the selected column.max(): returns the largest value within the selected column.count(): returns the number of rows in a set.sum(): returns the total sum of a numerical column.avg(): returns the average value of a numerical column.
At first we need to create database.
-- creating databse
create database mydb;

-- creating DataTable table
create table DataTable(
    id int primary key not null auto_increment,
    roll_no integer not null,
    stdu_name varchar(20),
    class varchar(10),
    section varchar(20),
    dbms_lab integer,
    wt_lab integer,
    daa_lab integer
);

-- inserting values in DataTable table
insert into DataTable(roll_no, stdu_name, class, section, dbms_lab, wt_lab, daa_lab)
values
(106, 'Prince Kunal', 'Btech', 'B', 48, 49, 50),
(66, 'Gulshan Kumar', 'Btech', 'B', 46, 47, 48),
(81, 'Khushi Srivastva', 'Btech', 'B', 48, 49, null),
(93, 'Mukesh Kumar', 'Btech', 'B', 49, null, 48),
(103, 'Pratishtha', 'Btech', 'B', 48, 49, 50),
(80, 'Khushi', 'Btech', 'B', 45, 46, 49);

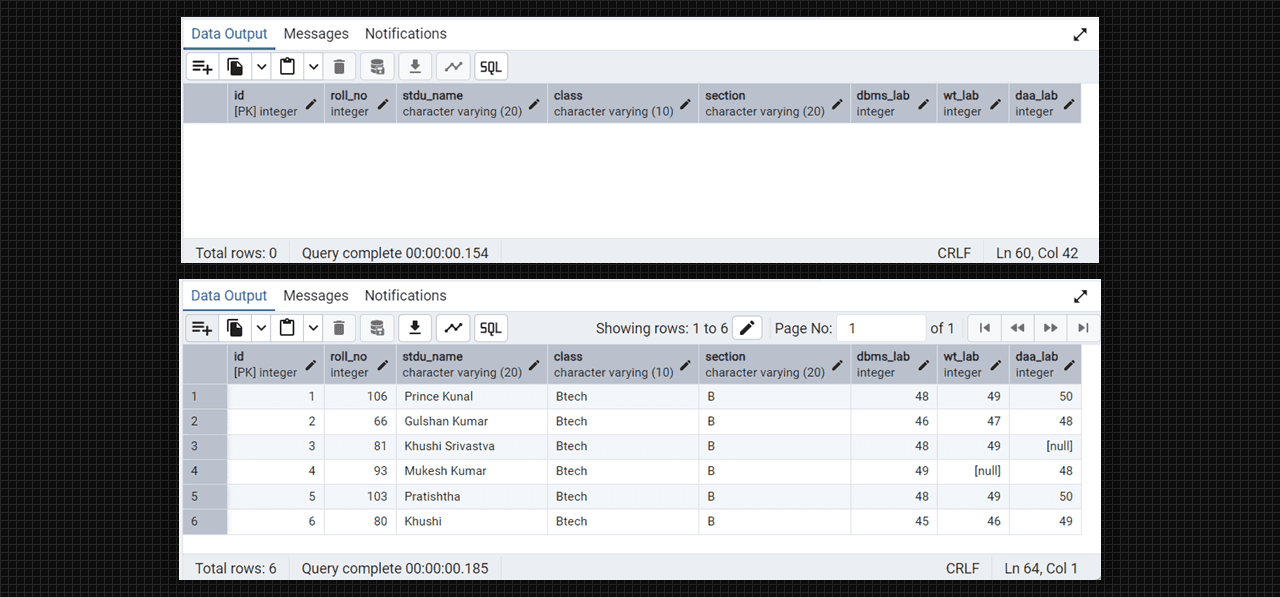
select * from DataTable;

-- count() function
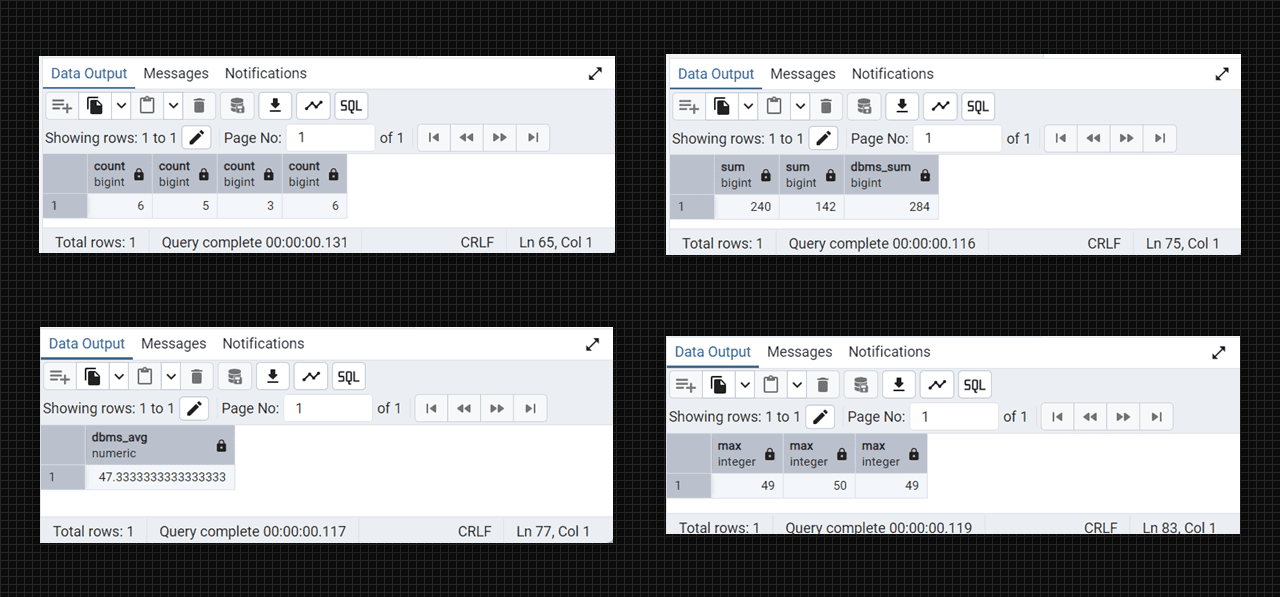
select count(*), count(wt_lab), count(distinct daa_lab), count(dbms_lab) from DataTable;

-- sum() function
select sum(wt_lab), sum(distinct wt_lab), sum(dbms_lab) as dbms_sum from DataTable;

-- avg() function
select avg(dbms_lab) as dbms_avg from DataTable;

-- max() function
select max(dbms_lab), max(daa_lab), max(wt_lab) from DataTable;

-- special function which works on string
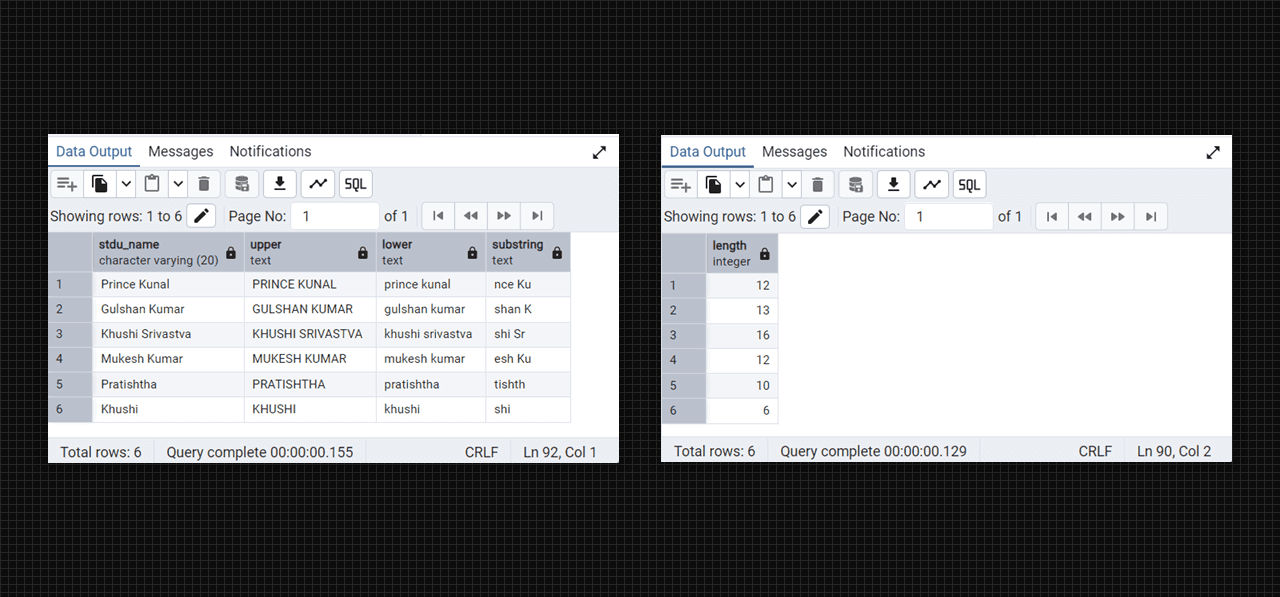
select stdu_name, upper(stdu_name), lower(stdu_name), substring(stdu_name, 4, 6) from DataTable;

-- length() function
select length(stdu_name) from DataTable;
Output:
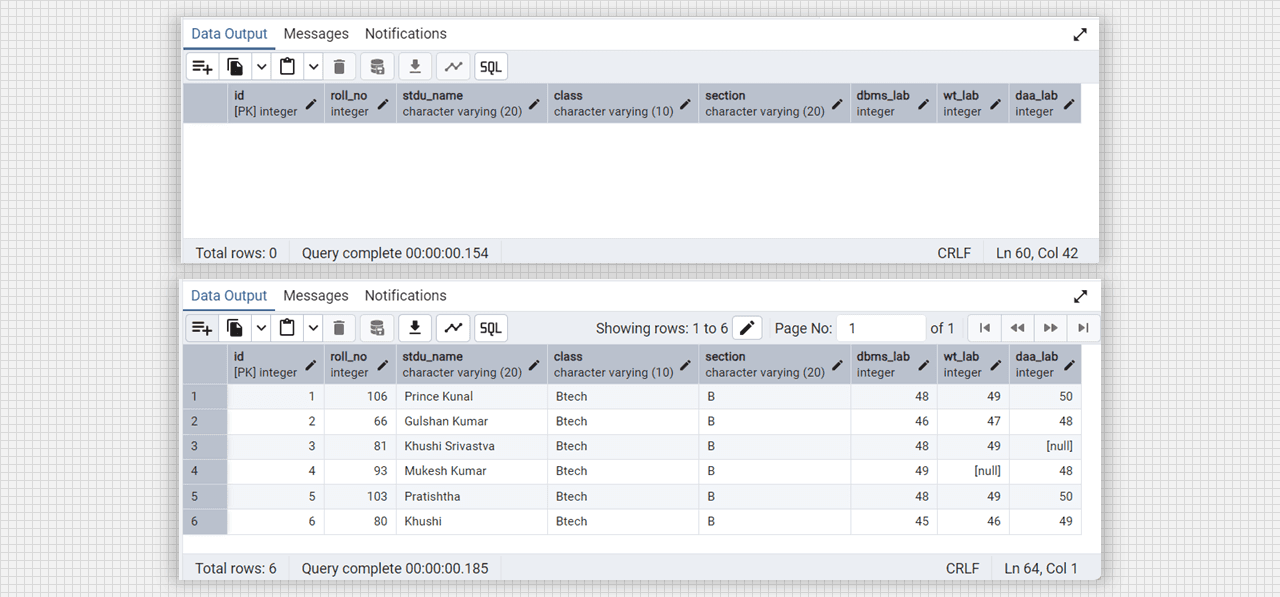
Alter column and update in Admin 4 (PostgreSQL).
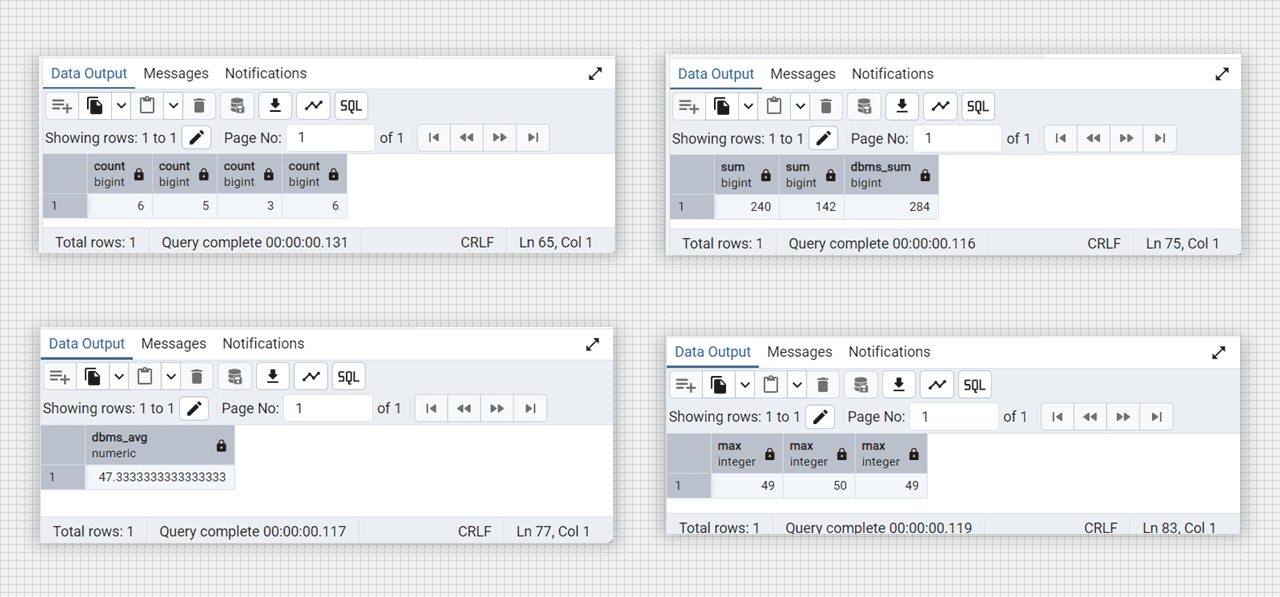
Alter column and update in Admin 4 (PostgreSQL).
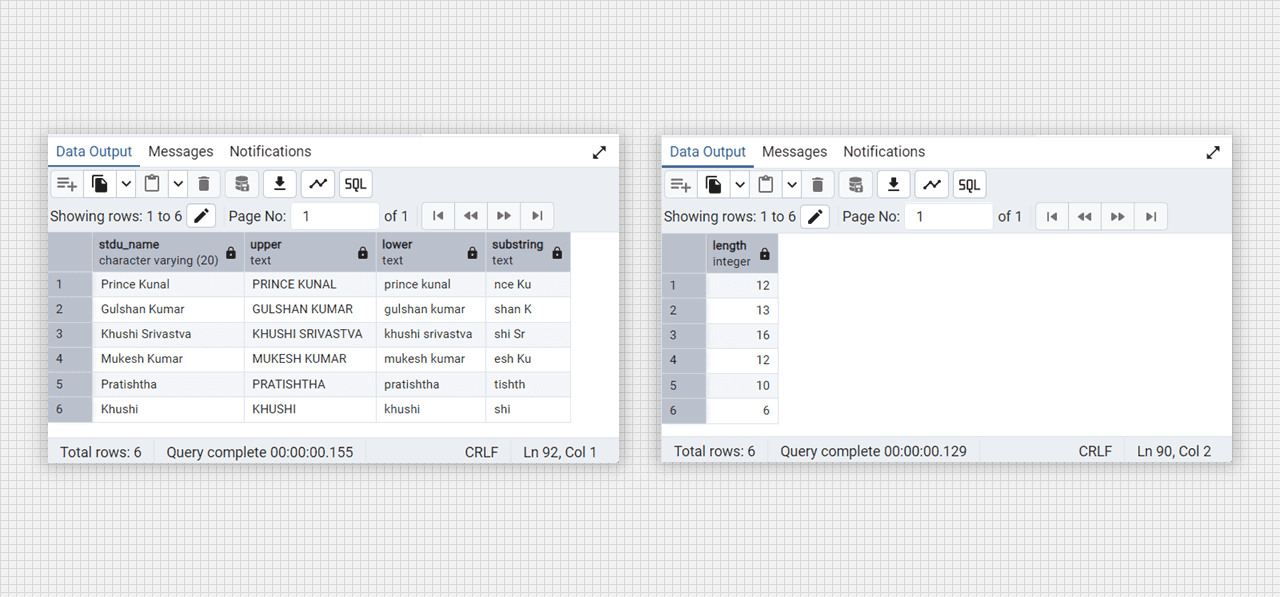
Alter column and update in Admin 4 (PostgreSQL).
Objective: Create a database using the following SQL Clauses:
- ORDER BY
- GROUP BY
- HAVING Clause
Theory:
SQL clauses help us to retrieve a set or bundles of records from the table. SQL clauses help us to specify a condition on the columns or the records of a table.
- The
ORDER BYkeyword is used to sort the result-set in ascending or descending order. - The
GROUP BYstatement groups rows that have the same values into summary rows, like "find the number of customers in each country". TheGROUP BYstatement is often used with aggregate functionsCOUNT(),MAX(),MIN(),SUM(),AVG()to group the result-set by one or more columns. - The
HAVINGclause was added to SQL because the WHERE keyword cannot be used with aggregate functions
-- working on privious database and table

-- arrange into ascending order with the roll_no value
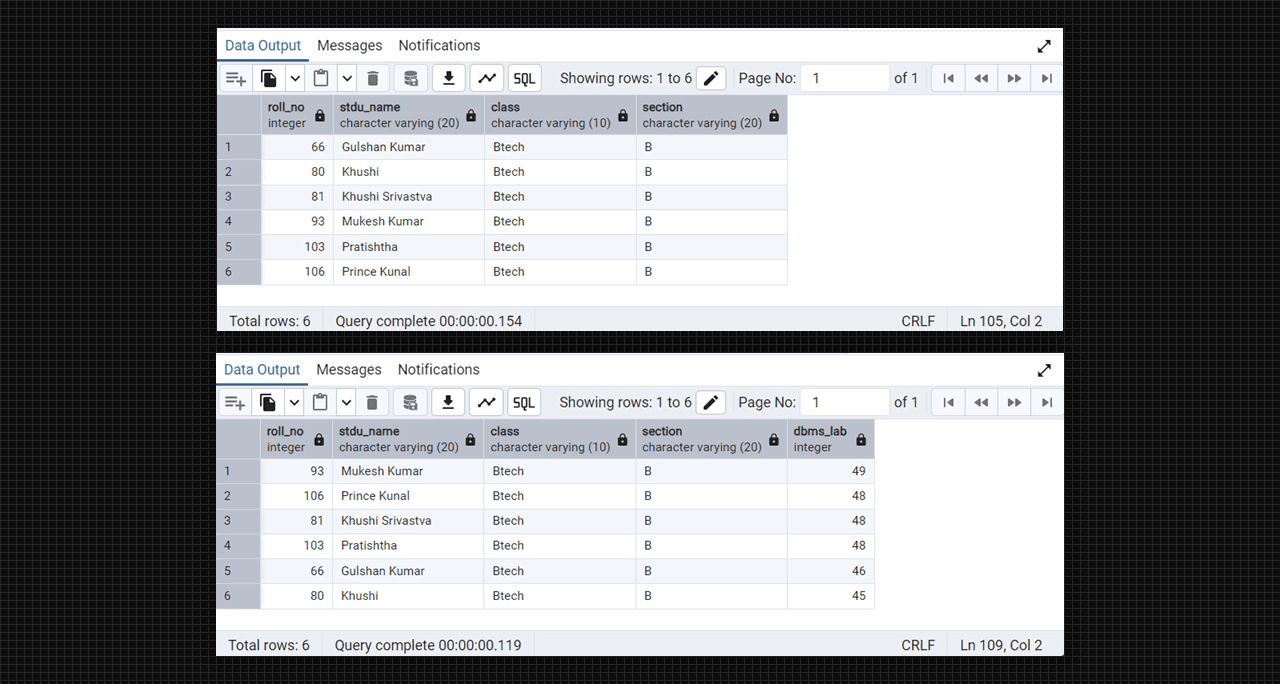
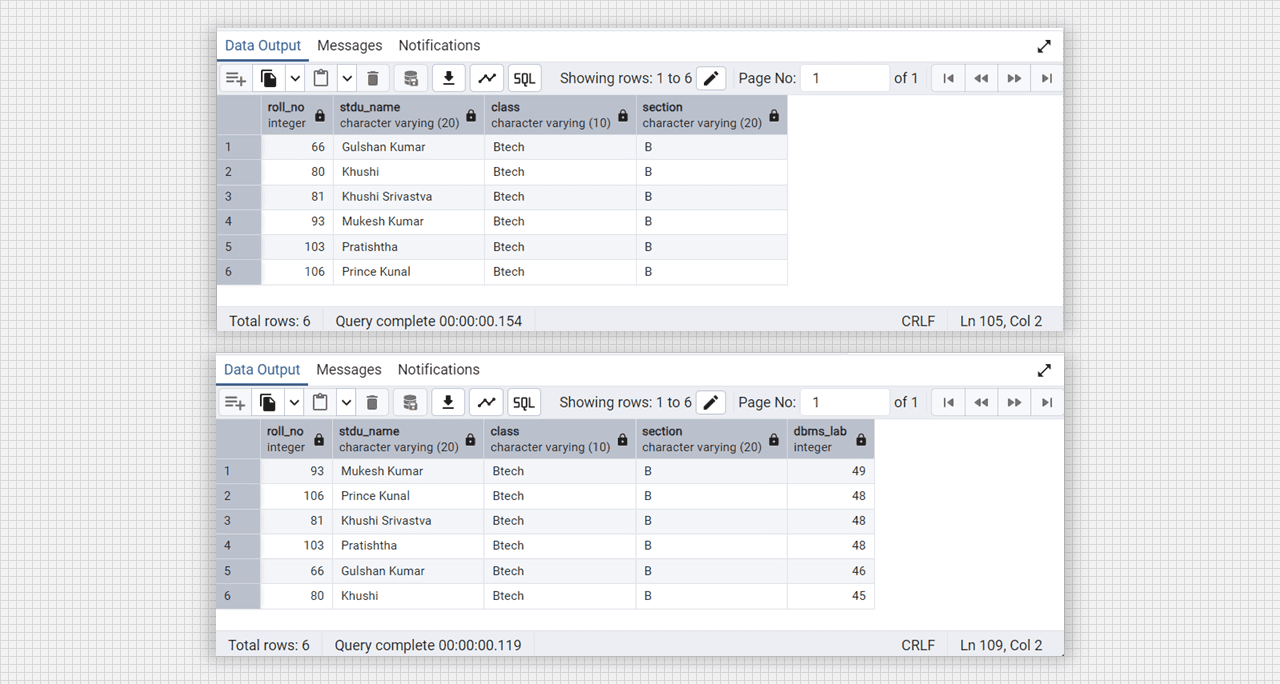
select roll_no, stdu_name, class, section from DataTable
order by roll_no asc;

-- arrange into descending order with the dbms_lab value
select roll_no, stdu_name, class, section, dbms_lab from DataTable
order by dbms_lab desc;

-- group min() and max() with roll_no and stdu_name
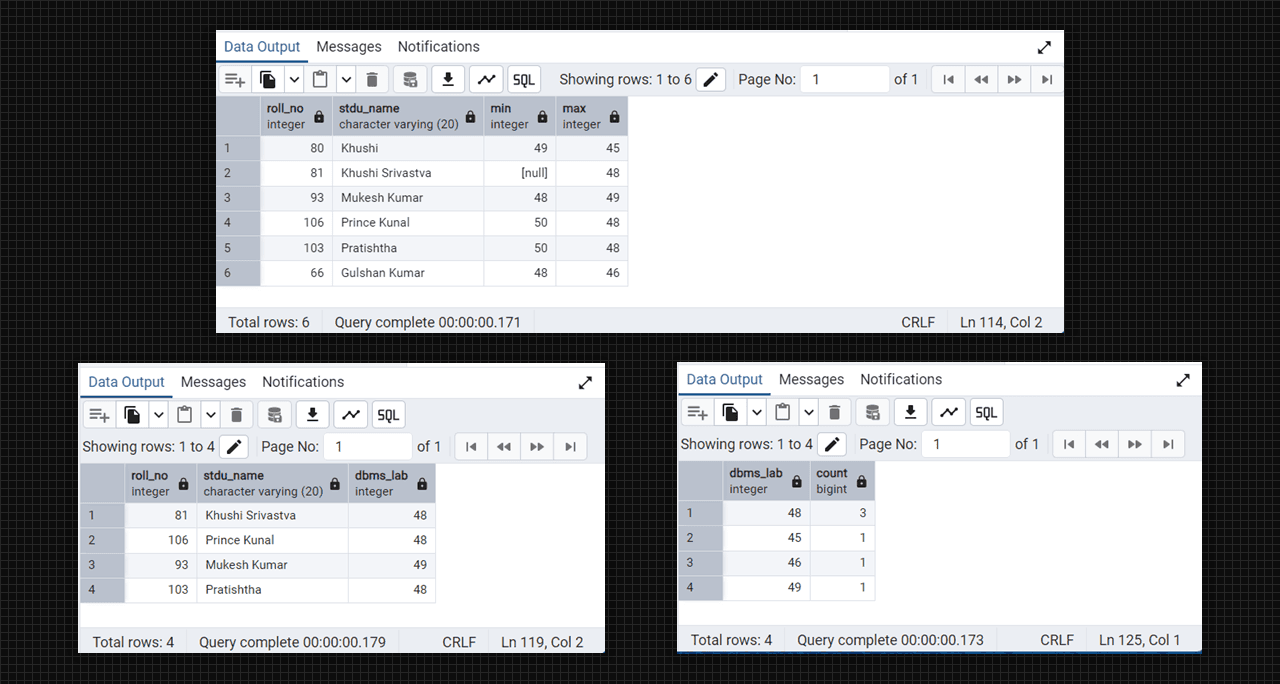
select roll_no, stdu_name, min(dbms_lab), max(dbms_lab) from DataTable
group by roll_no, stdu_name;

-- group by dbms_lab: how many numbers are same
select dbms_lab count(dbms_lab) from DataTable group by dbms_lab;

-- group dbms_lab values which have more then >=47 with roll_no
select roll_no, dbms_lab from DataTable group by roll_no having max(dbms_lab)>=47;
Output:
SQL clause max min function in Admin 4 (PostgreSQL).
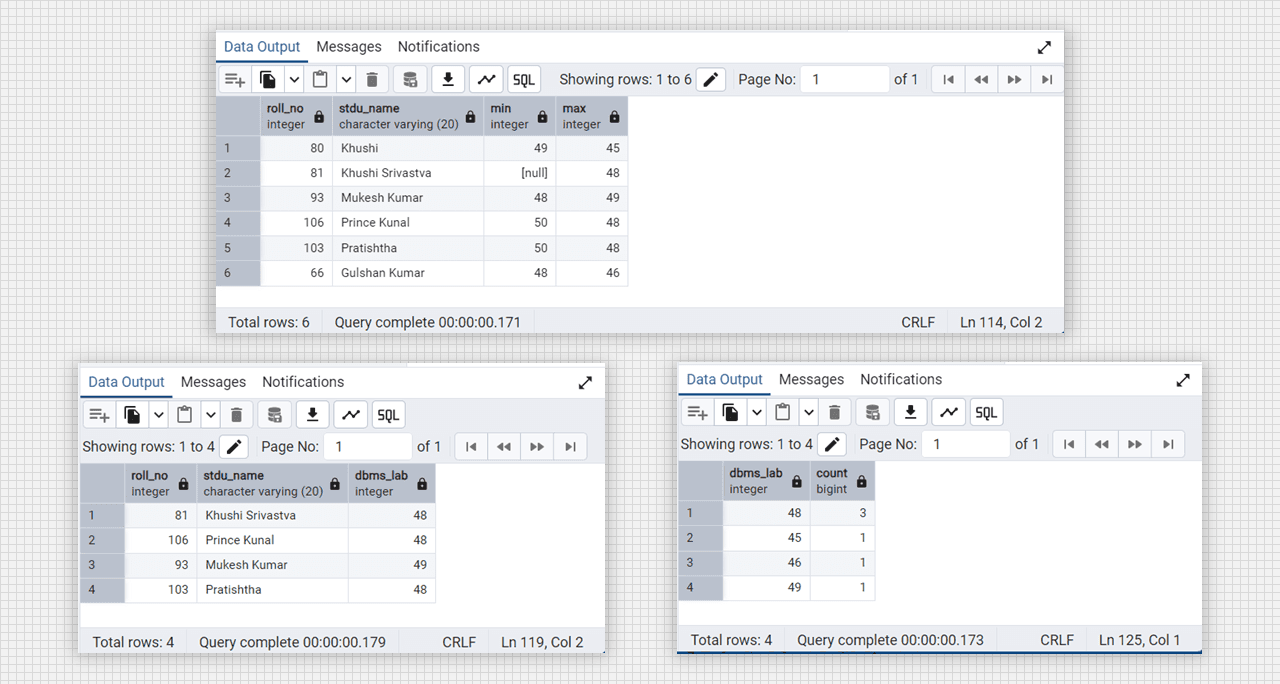
SQL clause count function in Admin 4 (PostgreSQL).
Objective: Create a database using JOIN SQL Commands.
Theory:
A SQL JOIN clause is used to combine rows from two or more tables, based on a related column between them. Types of SQL JOINs
inner join: Returns records that have matching values in both tables.left join: Returns all records from the left table, and the matched records from the right table.right join: Returns all records from the right table, and the matched records from the left table.full outer join: Returns all records when there is a match in either left or right table.
-- creating database
create database college_db;
use college_db;

-- creating student table
create table students (
    student_id serial primary key,
    first_name varchar(50),
    last_name varchar(50),
    age int
    enrollment_date date
);

-- creating course table
create table courses (
    course_id int primary key,
    course_name varchar(20),
    credits int
);

-- creating enrollment table
create table enrollments (
    enrollment_id serial primary key,
    student_id int,
    course_id int,
    enrollment_date date,
    grade double precision,
    foreign key (student_id) references students(student_id),
    foreign key (course_id) references courses(course_id)
);

-- inserting data into students table
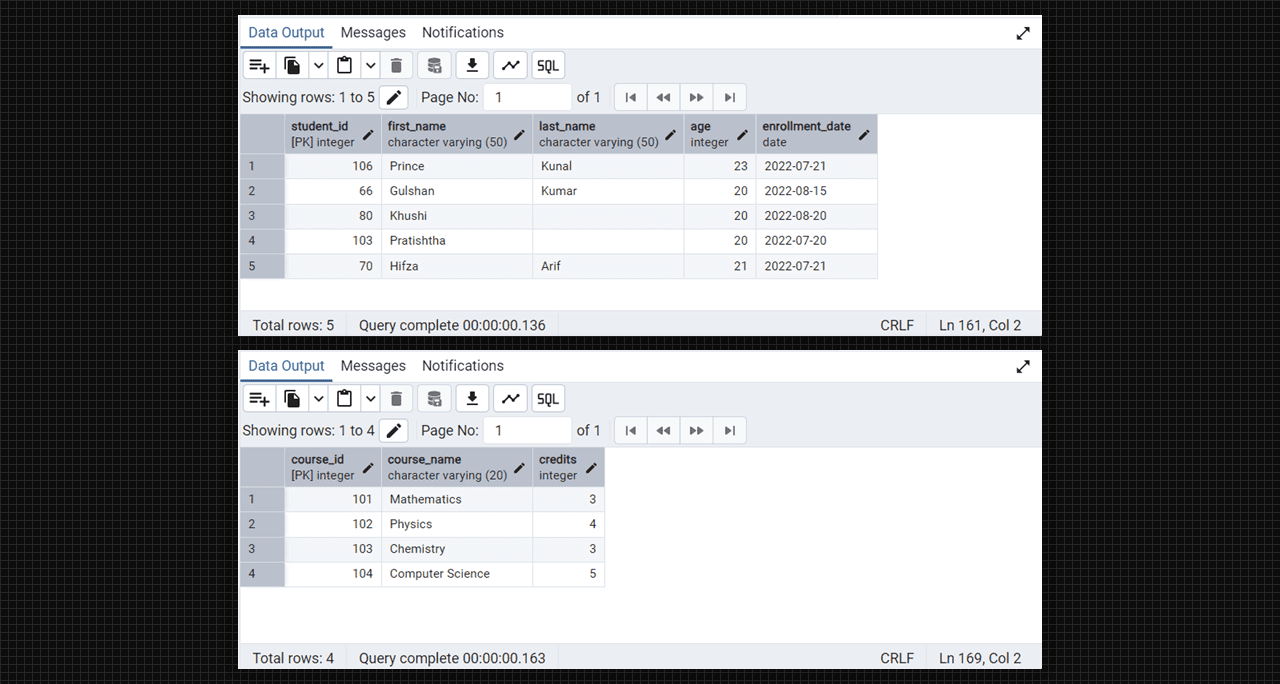
insert into students (student_id, first_name, last_name, age, enrollment_date) values
(106, 'Prince', 'Kunal', 23, '2022-07-21'),
(066, 'Gulshan', 'Kumar', 20, '2022-08-15'),
(080, 'Khushi', '', 20, '2022-08-20'),
(103, 'Pratishtha', '', 20, '2022-07-20'),
(070, 'Hifza', 'Arif', 21, '2022-07-21');

select * from students;

-- inserting data into course table
insert into courses (course_id, course_name, credits) values
(101, 'Mathematics', 3),
(102, 'Physics', 4),
(103, 'Chemistry', 3),
(104, 'Computer Science', 5);

select * from courses;

-- inserting data into enrollmetn table
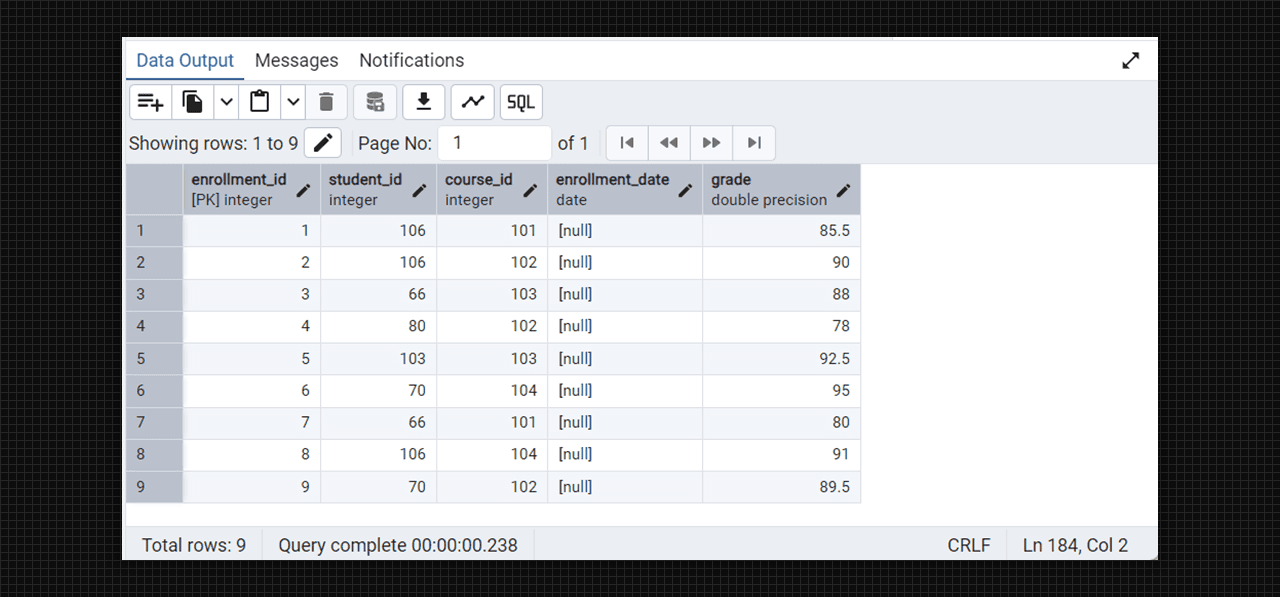
insert into enrollments (enrollment_id, student_id, course_id, Grade) values
(1, 106, 101, 85.50),
(2, 106, 102, 90.00),
(3, 66, 103, 88.00),
(4, 80, 102, 78.00),
(5, 103, 103, 92.50),
(6, 70, 104, 95.00),
(7, 66, 101, 80.00),
(8, 106, 104, 91.00),
(9, 70, 102, 89.50);

select * from enrollments;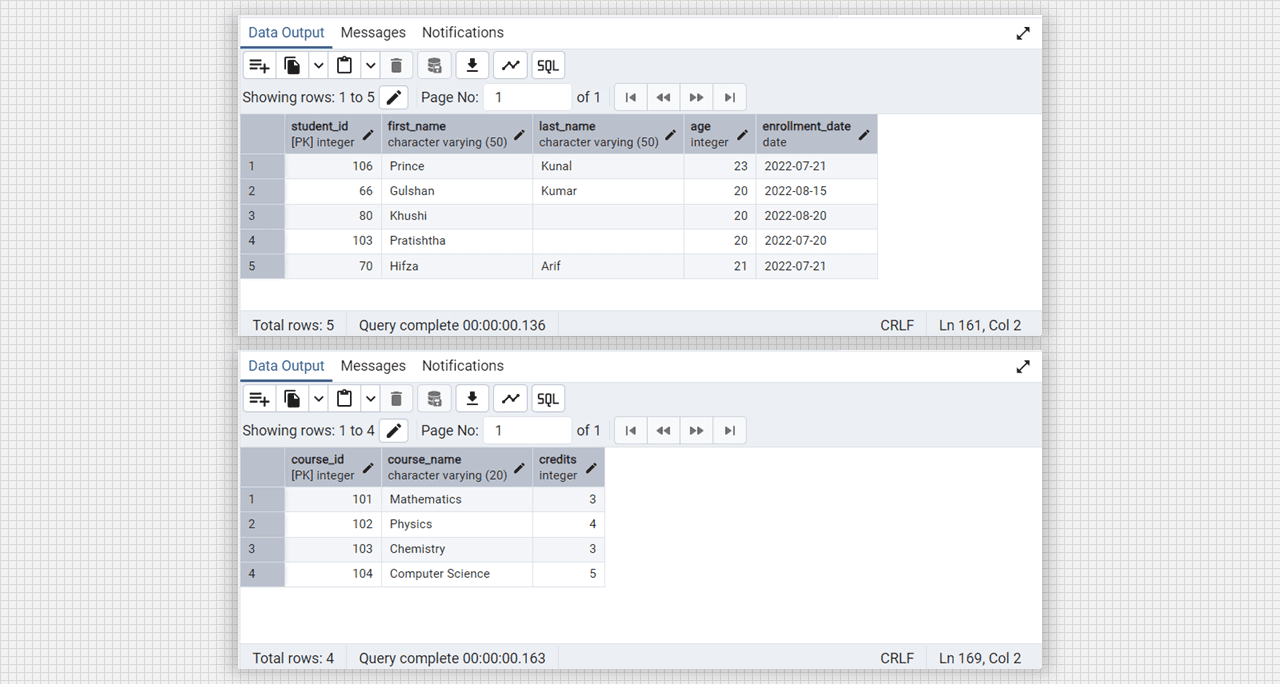
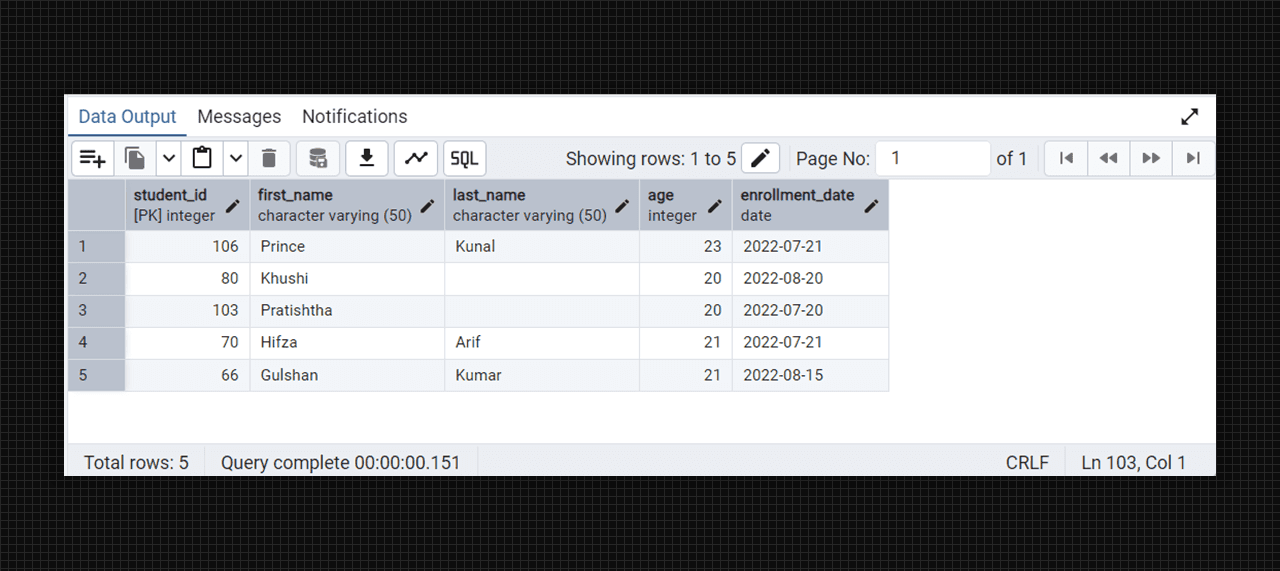
Students and Course table in Admin 4 (PostgreSQL).
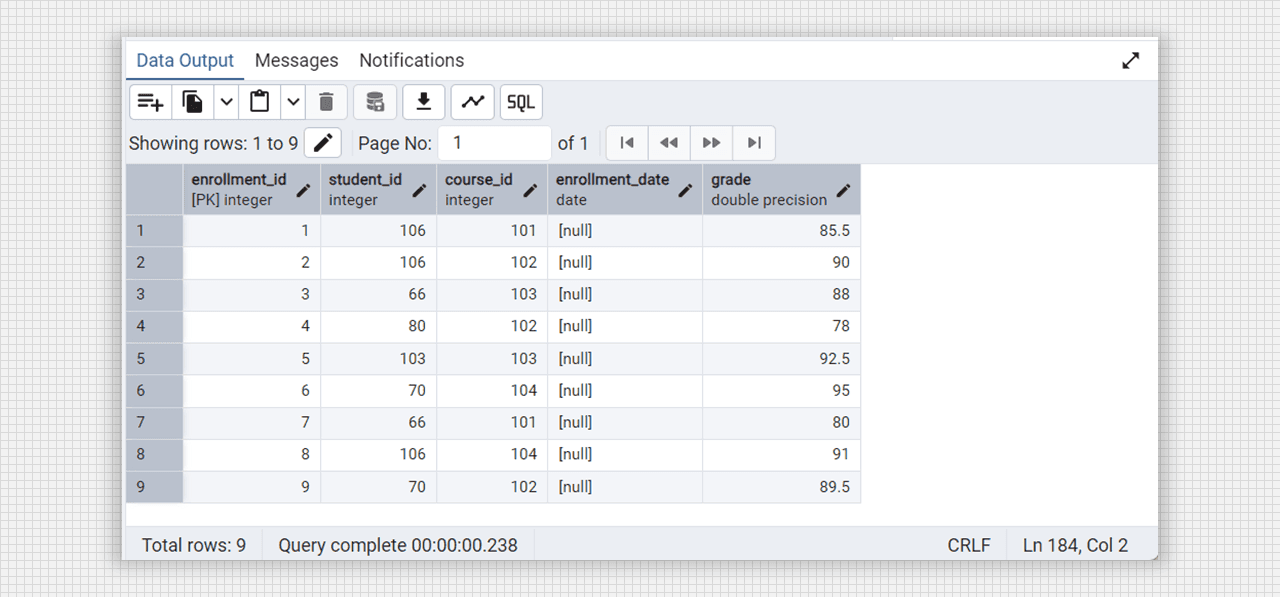
Enrollment table with foreign key in Admin 4 (PostgreSQL).
-- inner join
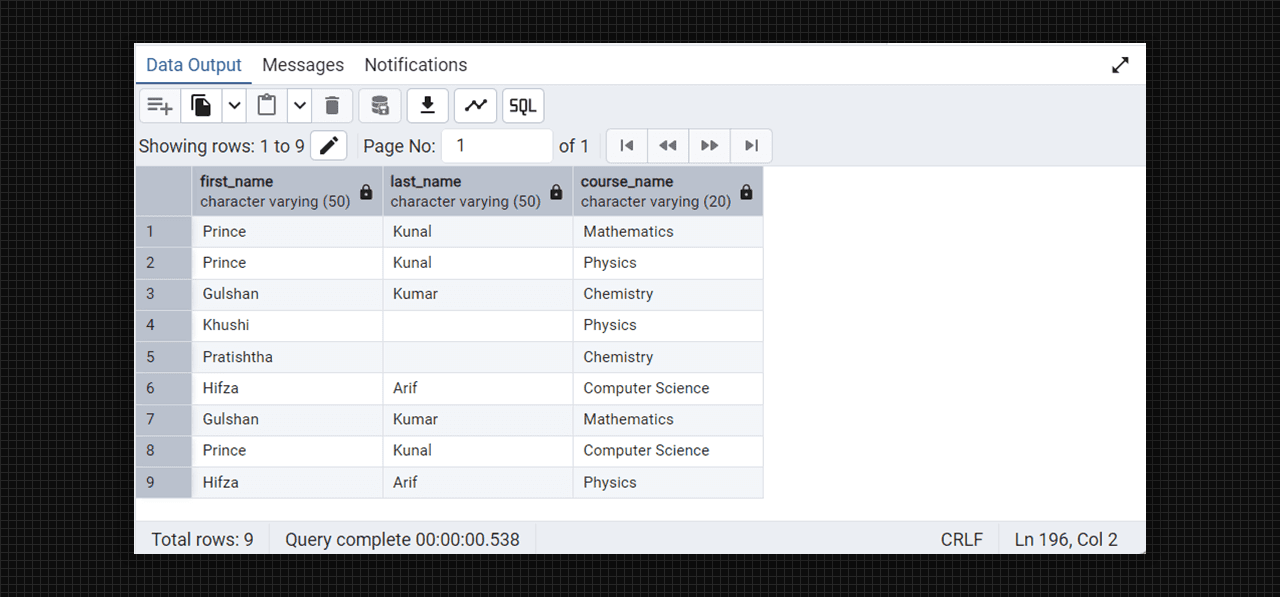
select students.first_name, students.last_name, courses.course_name
from students
inner join enrollments on students.student_id = enrollments.student_id
inner join courses on enrollments.course_id = courses.course_id;

-- left join
select students.first_name, students.last_name, courses.course_name
from students
left join enrollments on students.student_id = enrollments.student_id
left join courses on enrollments.course_id = courses.course_id;

-- right join
select students.first_name, students.last_name, courses.course_name
from students
right join enrollments on students.student_id = enrollments.student_id
right join courses on enrollments.course_id = courses.course_id;

-- full outer join
select students.first_name, students.last_name, courses.course_name
from students
full outer join enrollments on students.student_id = enrollments.student_id
full outer join courses on enrollments.course_id = courses.course_id;

-- cross join
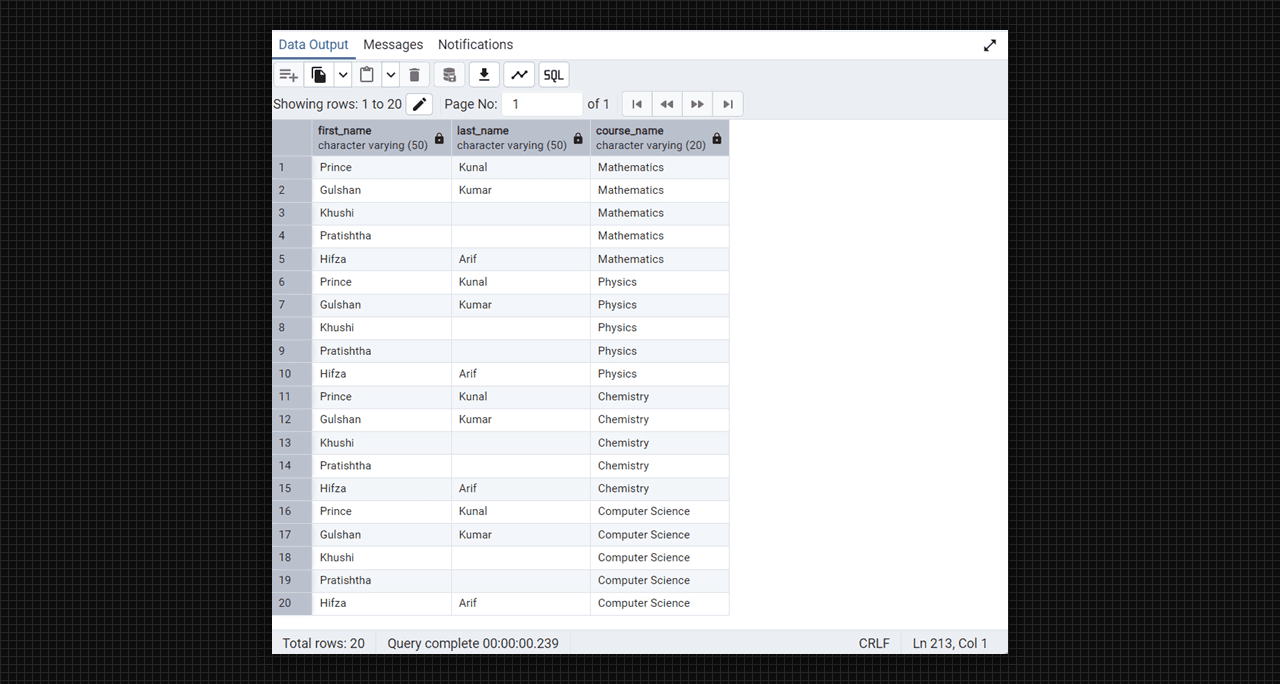
select students.first_name, students.last_name, courses.course_name
from students
cross join courses;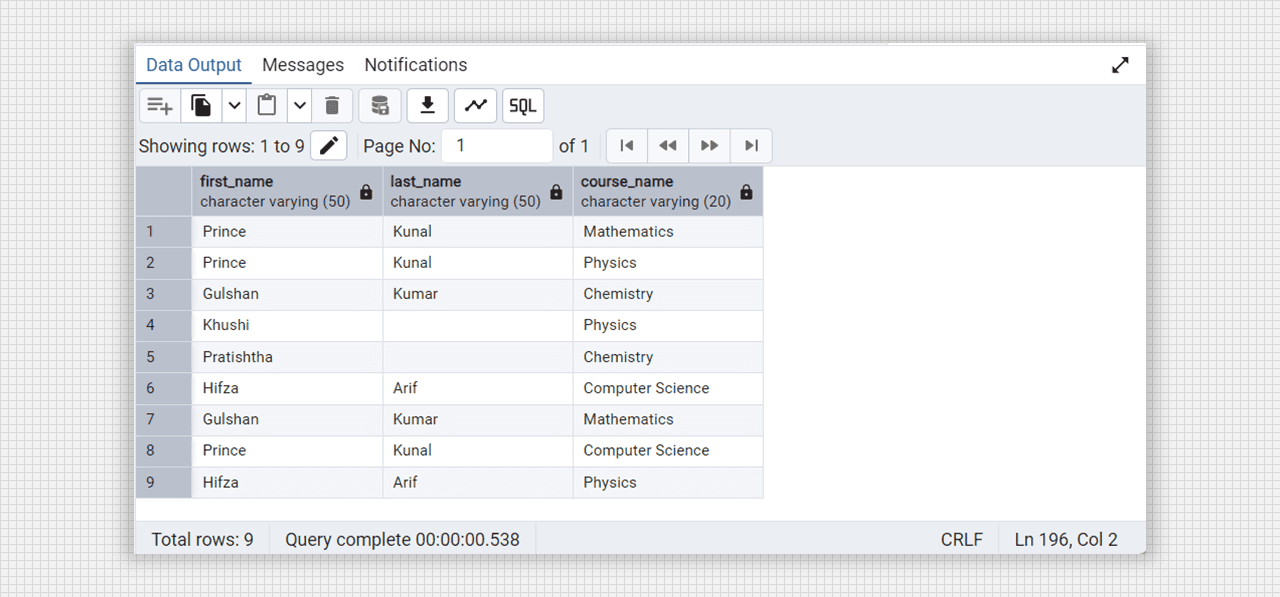
All joins are same except cross join using Admin 4 (PostgreSQL).
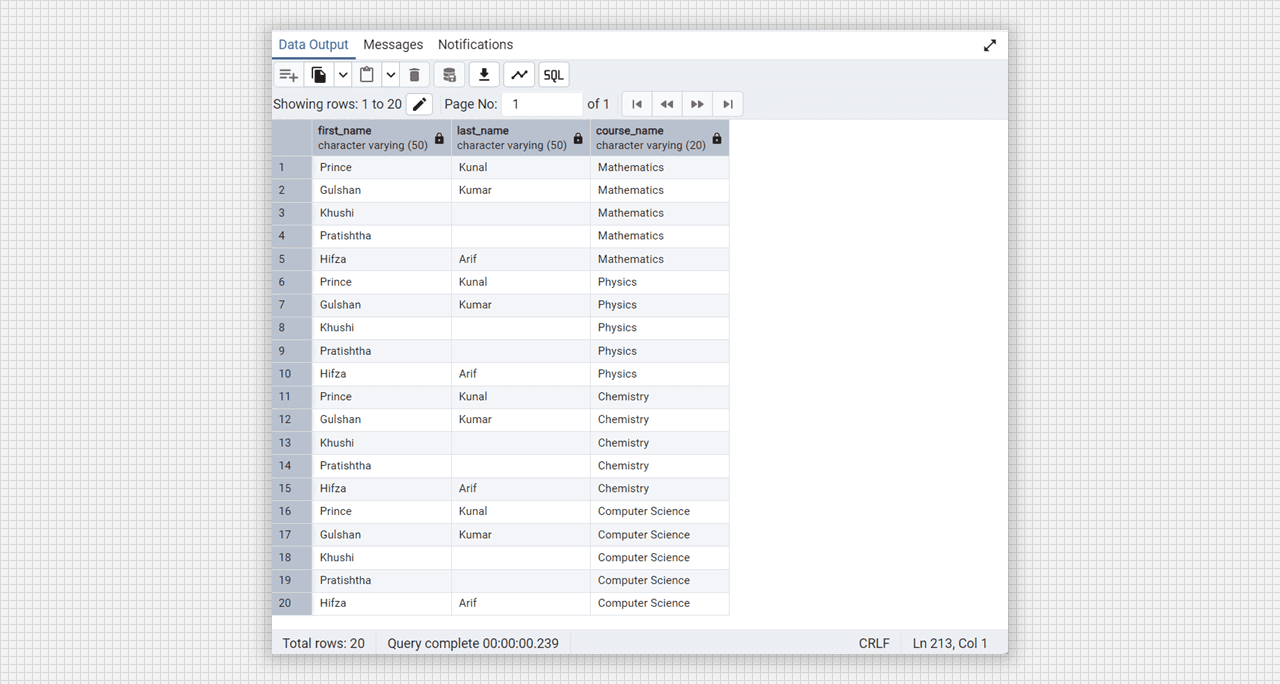
Cross join using Admin 4 (PostgreSQL).
Objective: Creating Entity-Relationship Diagram.
Theory:
An Entiry-Relationship Diagram (ERD) is a visual representaion of the entities within a database and the relationships betweeen those entities. It is an essential art of database design as it provides a clear and organized structure for the data to be stored, ensuring data integrity and facilitating efficient data retrieval.
There are the following steps to create E-R diagram in Visual Studio (VS) code given below—
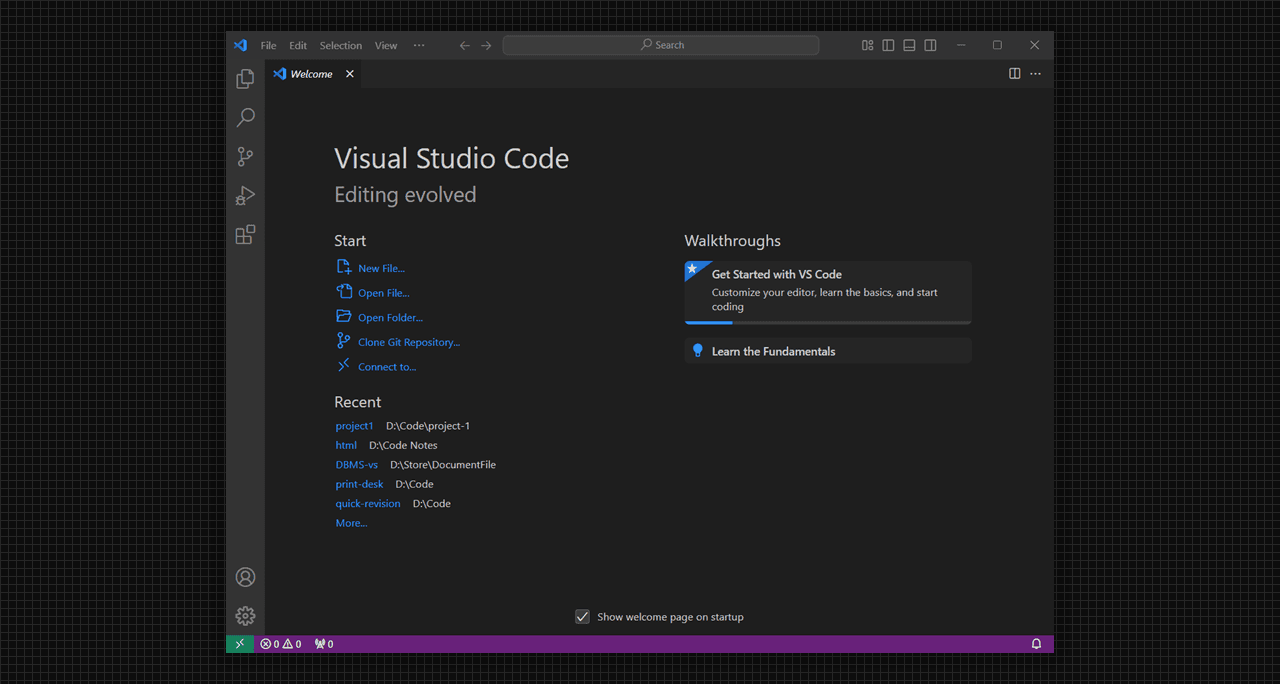
- Open vs code in the System.
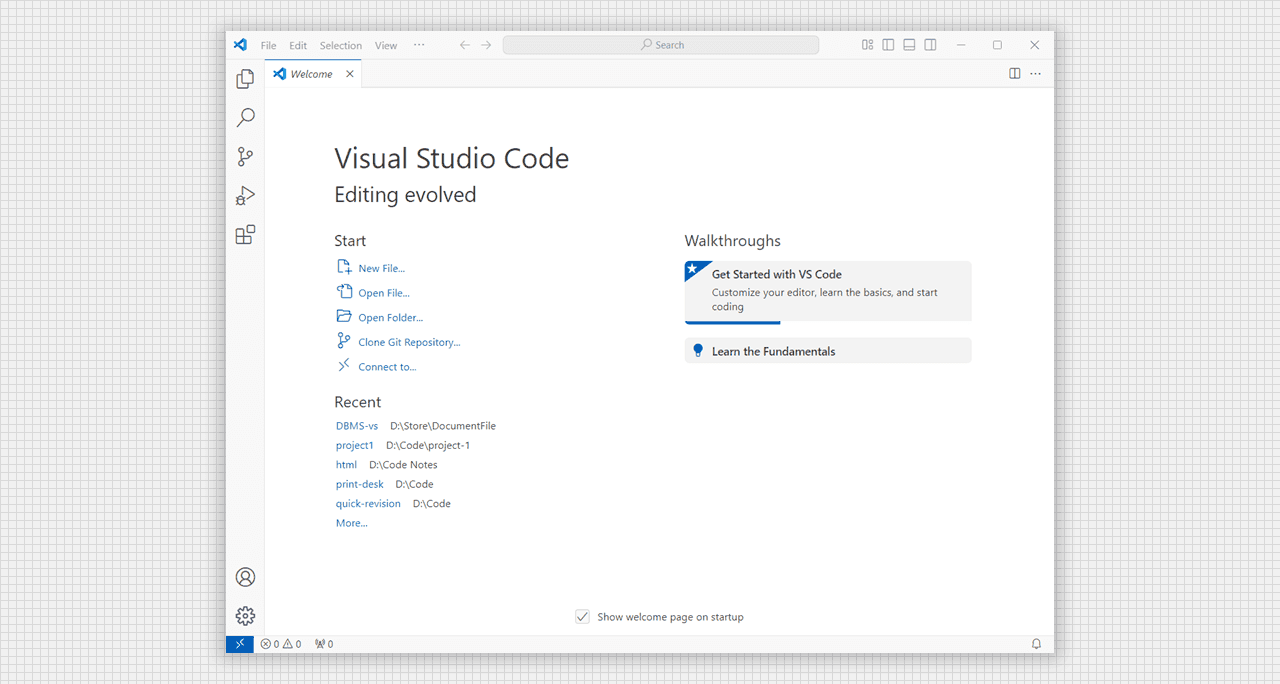
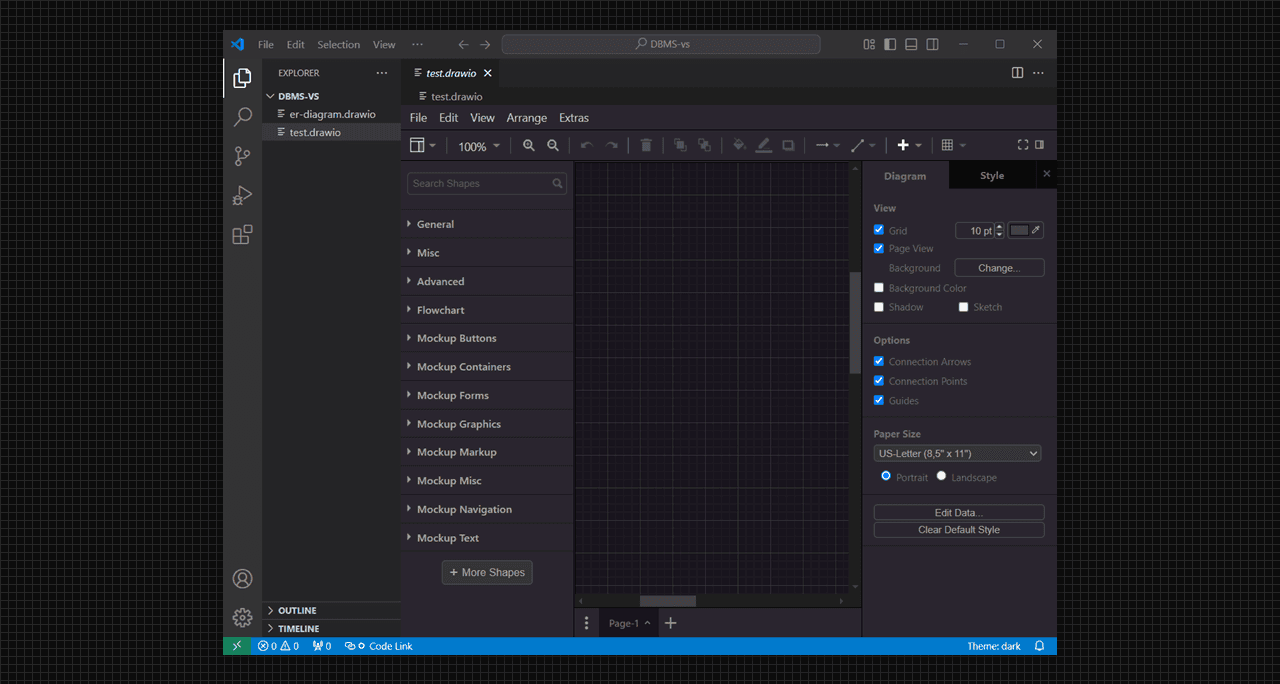
Opening Visual Studio (vs) Code.
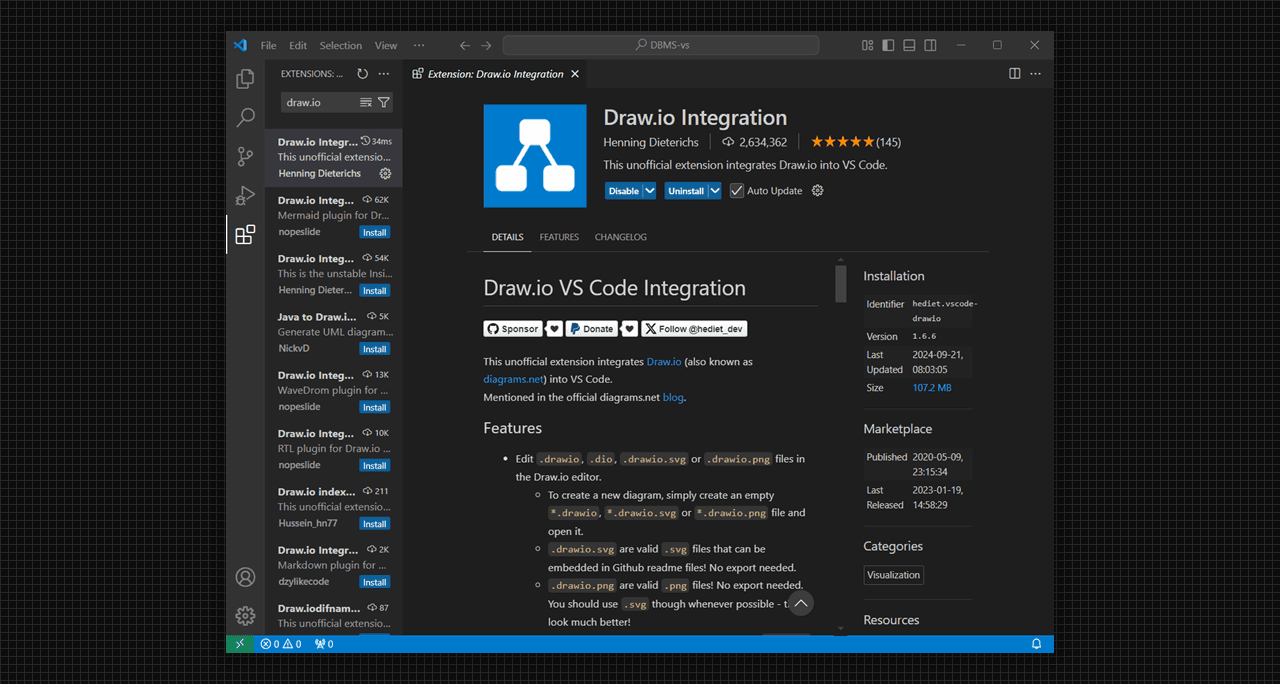
- Go to extentions tab. Search draw.io and install in vs code.
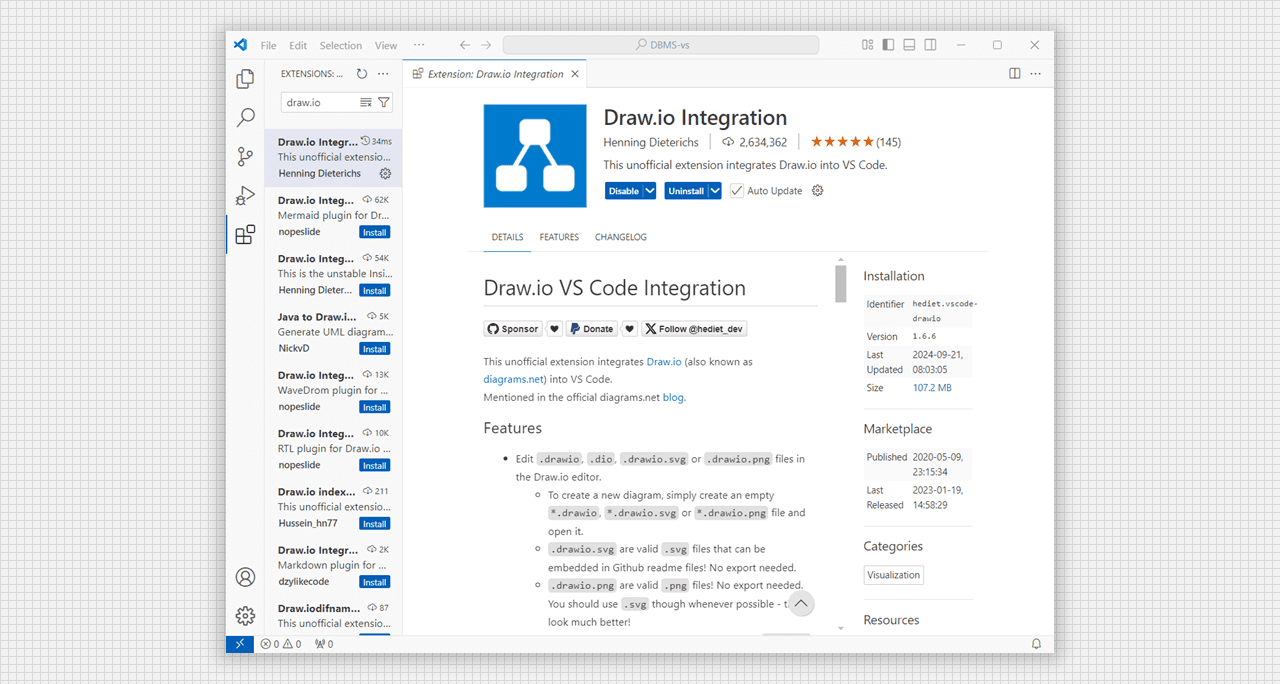
Install Draw.io Extension in vs code.
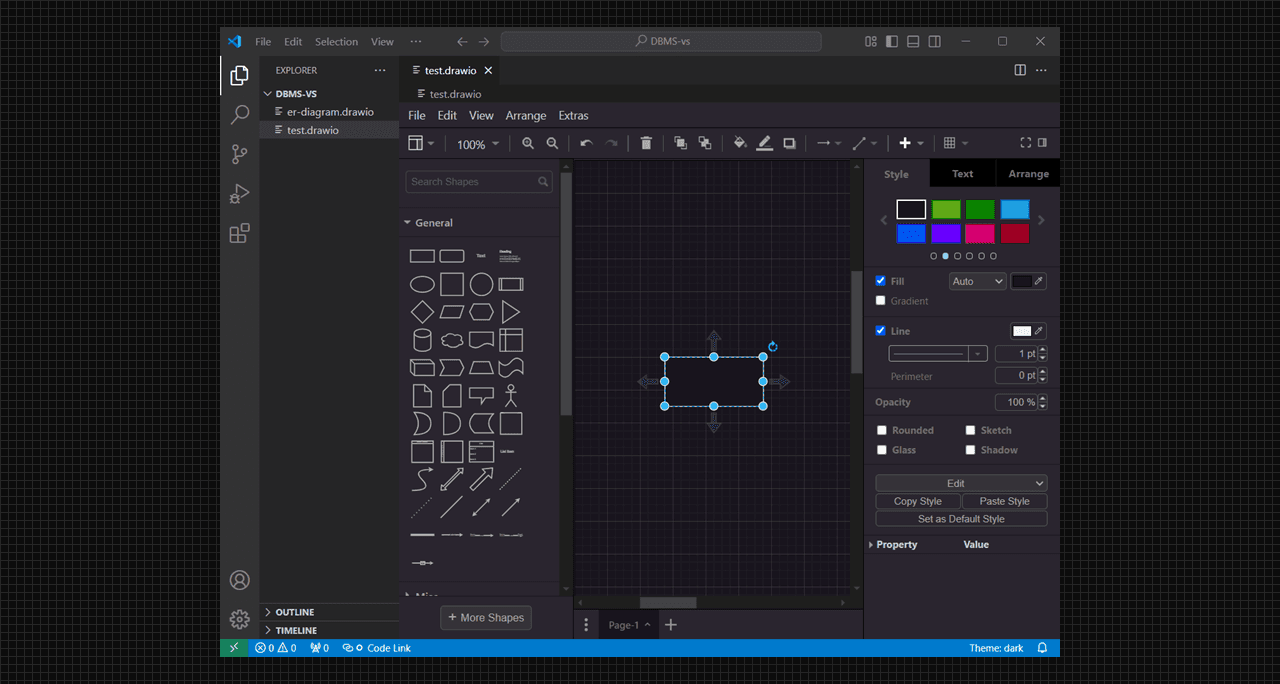
- Create a file with extenstion
.drawio. e.g. test.drawio. A canva and tools automatically open.
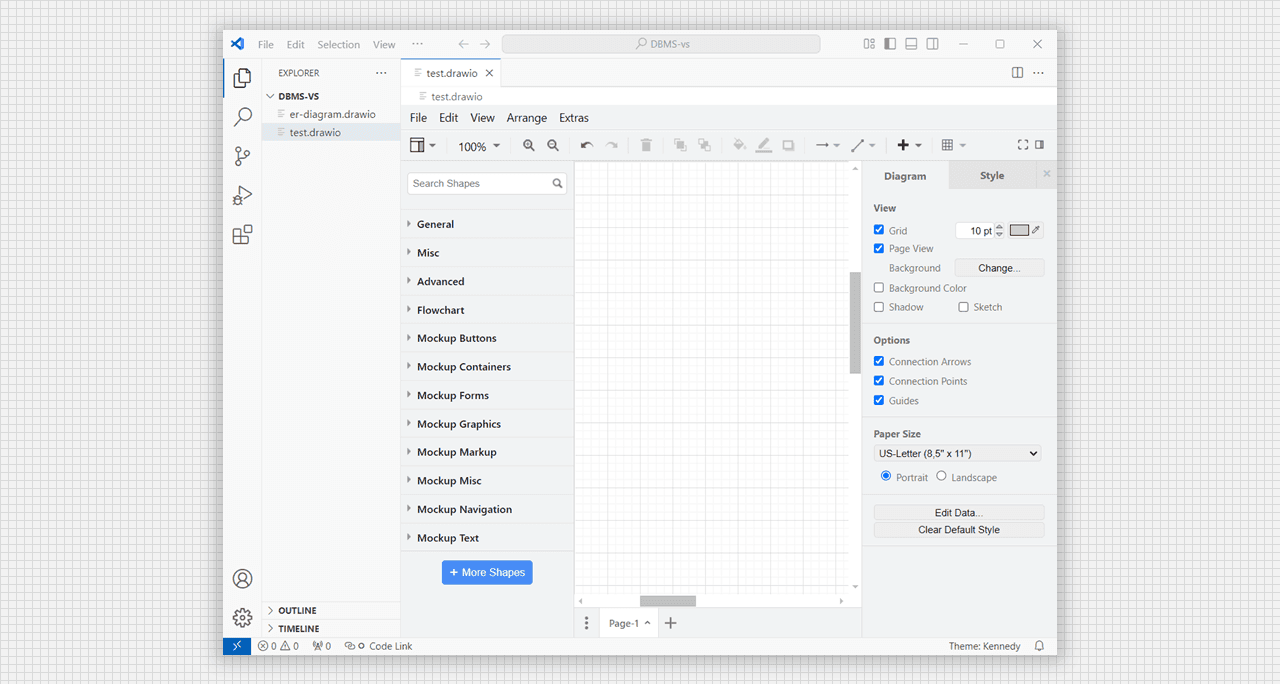
Create as .drawio Extension file to open Canva.
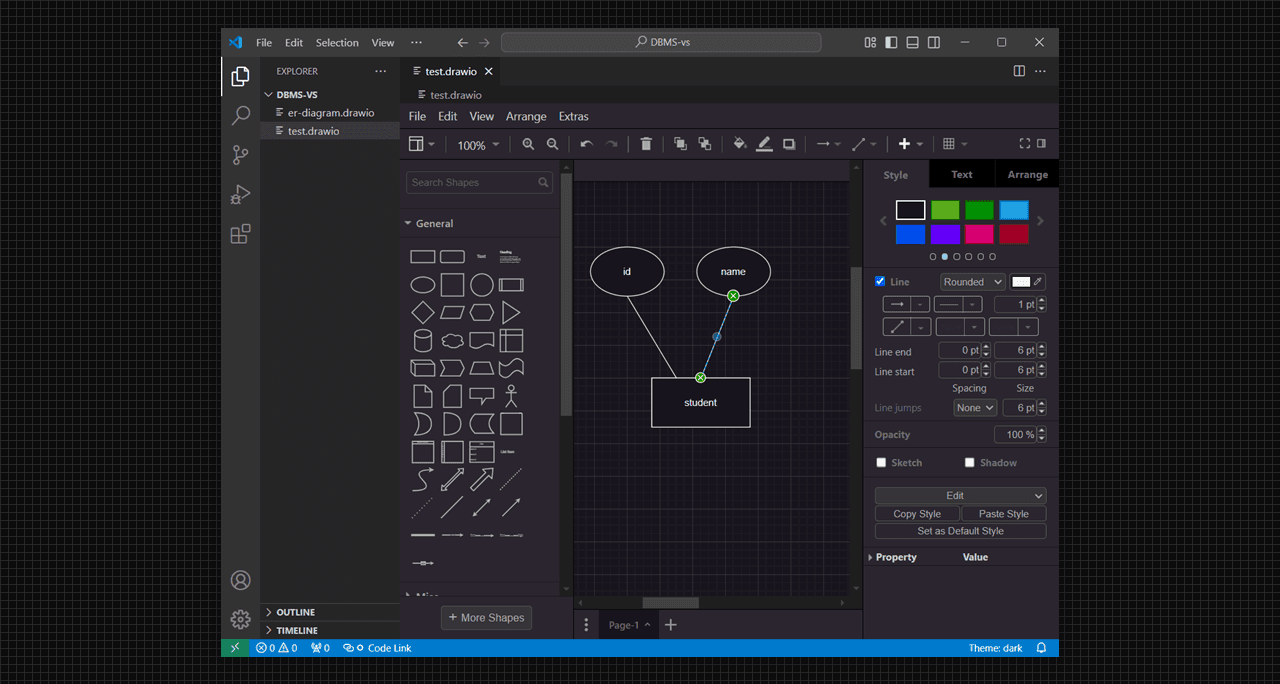
- Choose the particular section and use the given shapes to create any type of diagram.
- Double tap inside the shape, text editor will be open automatically.
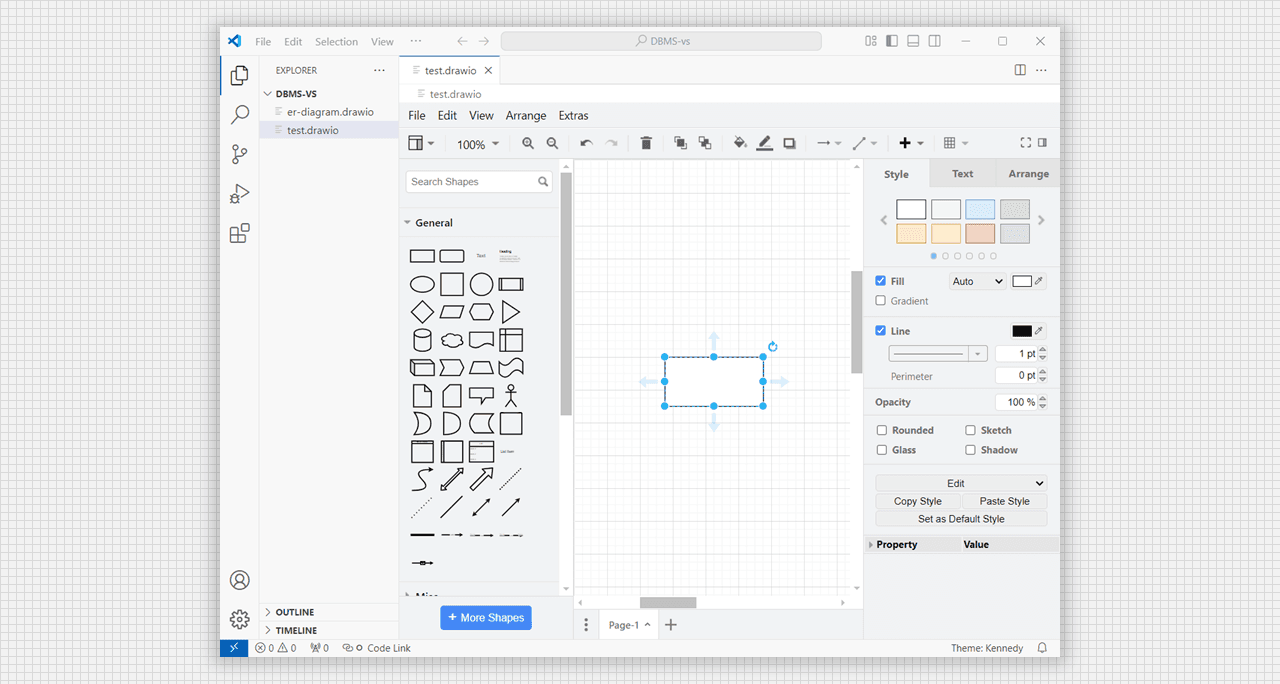
Choose different shaps in draw.io canva.
- use different shapes and tools edit to desirable diagrams.
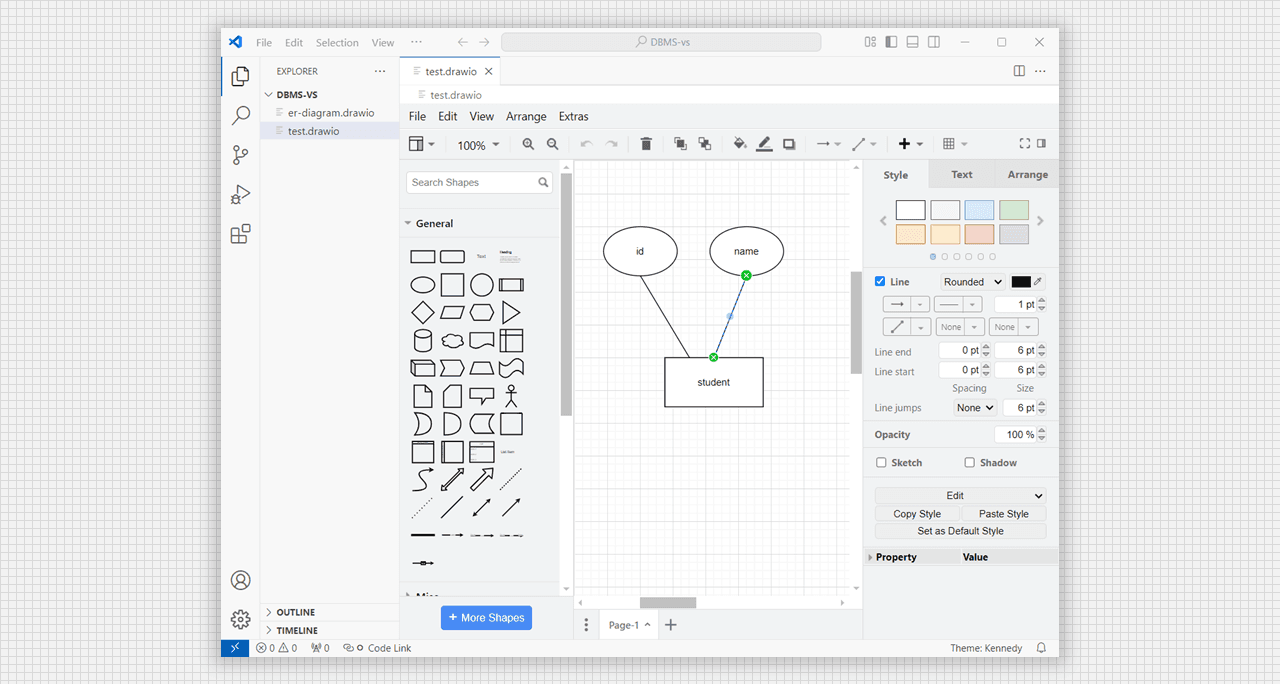
Build desirable diagram, wireframs, etc., using it.
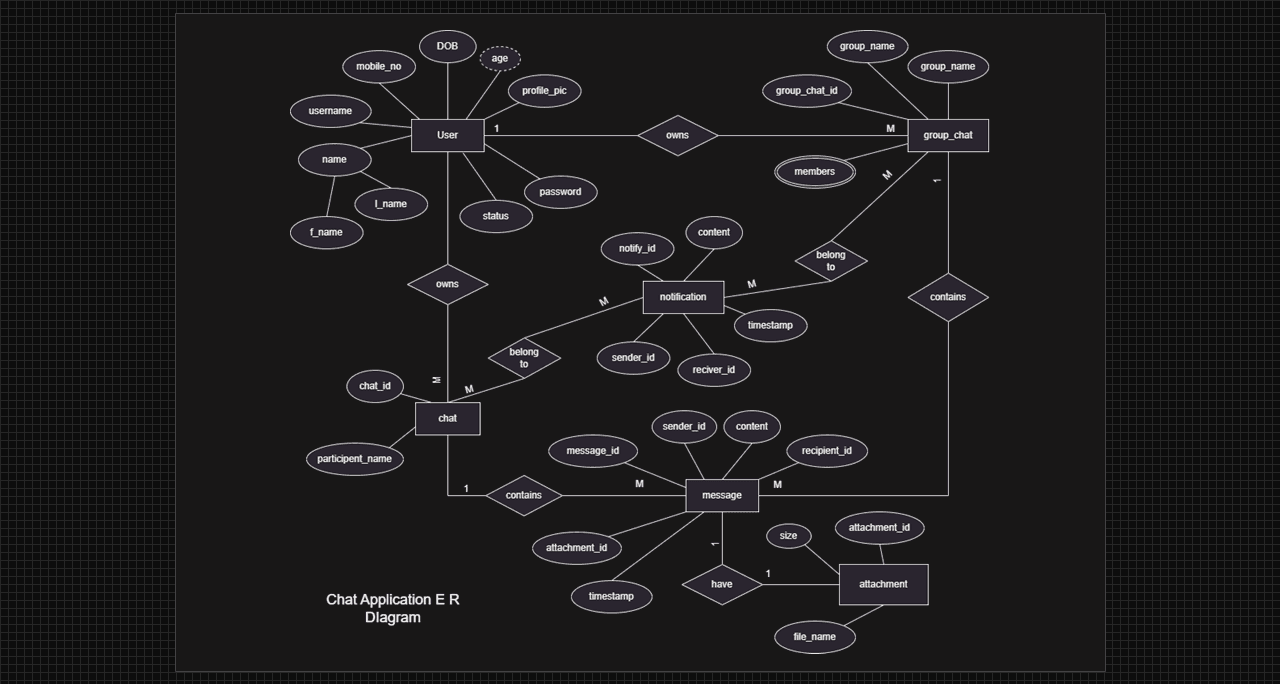
Chat Application Entity Relationship (E-R) Diagram:
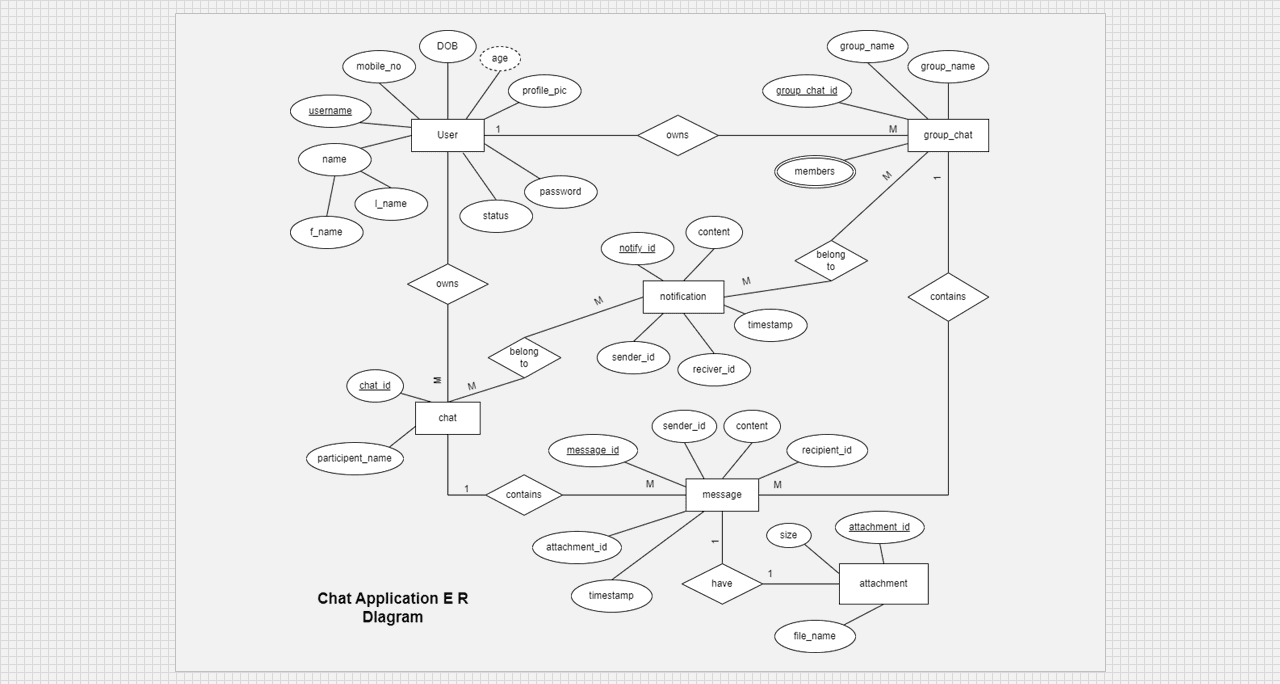
Chat Application E-R Diagram using draw.io.
Objective: Implementing Normalization.
Theory:
Normalization is the process of organizing data in a database to reduce redunedency and improve data integrity. It involves diving large tables into smaller, related tables and defining relationships between them. The main goal of normalization is to eliminate redundant data and ensure data dependencies make sense to improve the overall efficiency and integrity of the database.
Normal Forms: First Normal Form (1NF):
- for non-1NF
create table college_students (
    student_id serial primary key,
    name varchar(50),
    -- This column stores multiple values (non-atomic)
    courses varchar(100)
);

insert into college_students (name, courses) values
('Gulshan', 'DBMS-G1, DAA-G1'),
('Prince', 'WT-G2, DBMS-G2');

-- for see the college_students table
select * from college_students;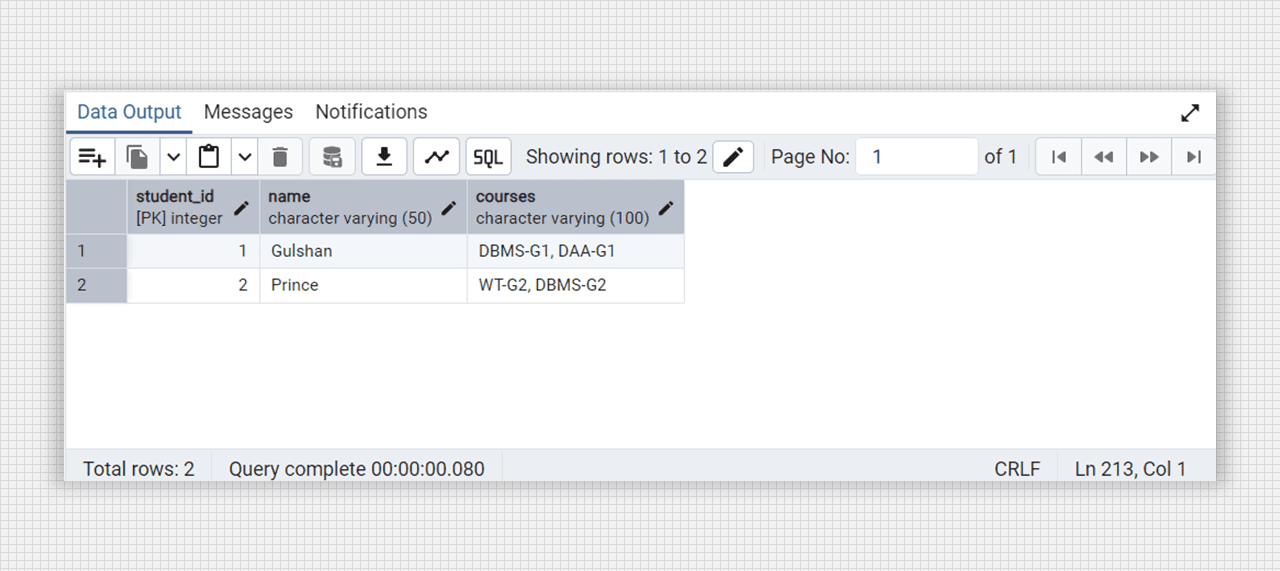
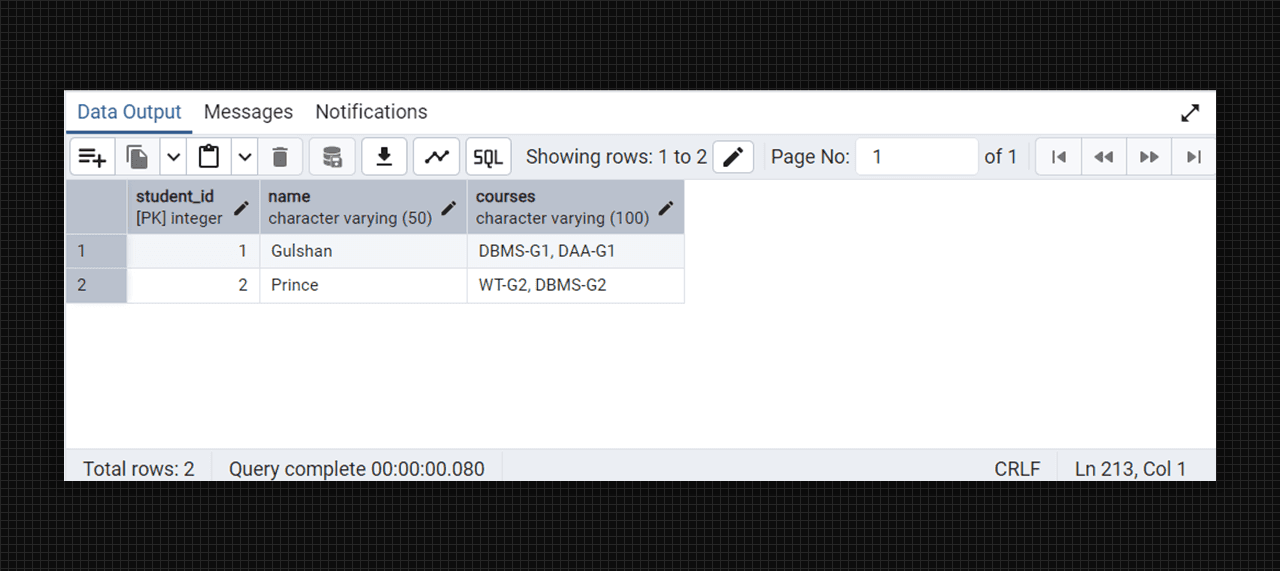
Non-1NF table fig. (Student-courses).
- Ensures that each table has a primary key.
- Remove any repeating groups or arrays.
create table college_students (
    student_id serial primary key,
    name varchar(50)
);

create table college_student_courses (
    student_id integer references students(student_id),
    course varchar(50),
    primary key (student_id, course)
);

insert into college_students (student_id, name) values
(66, 'Gulshan'),
(106, 'Prince');

insert into college_student_courses (student_id, course) values
(66, 'DBMS-G1'),
(66, 'DAA-G1'),
(106, 'WT-G2'),
(106, 'DBMS-G2');

-- for see the college_student_courses
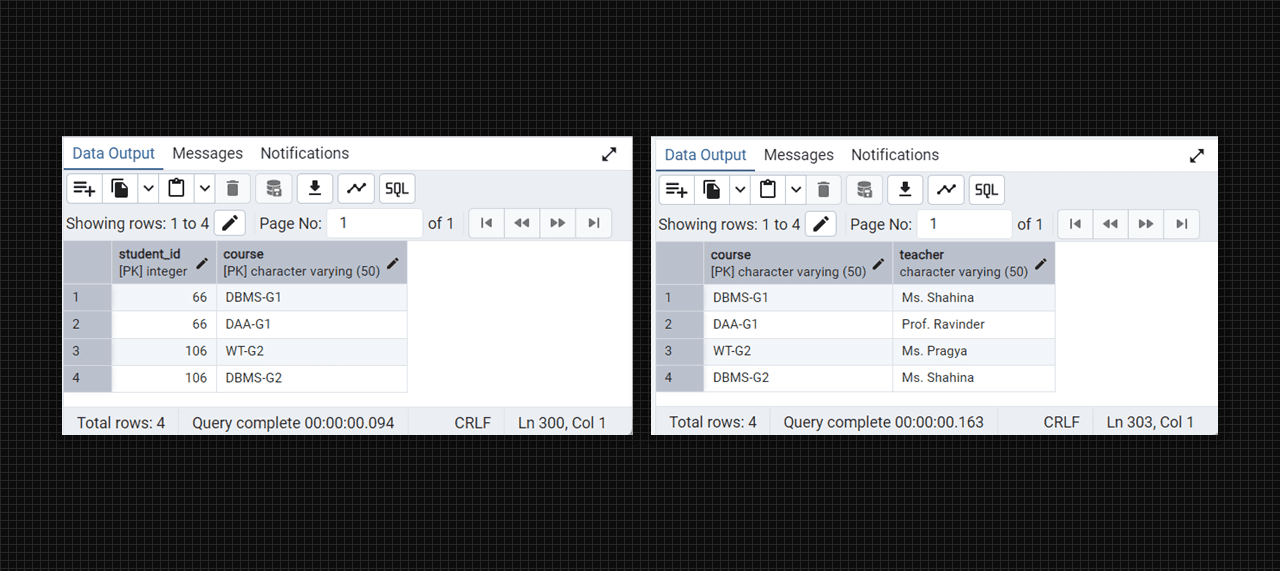
select * from college_student_courses;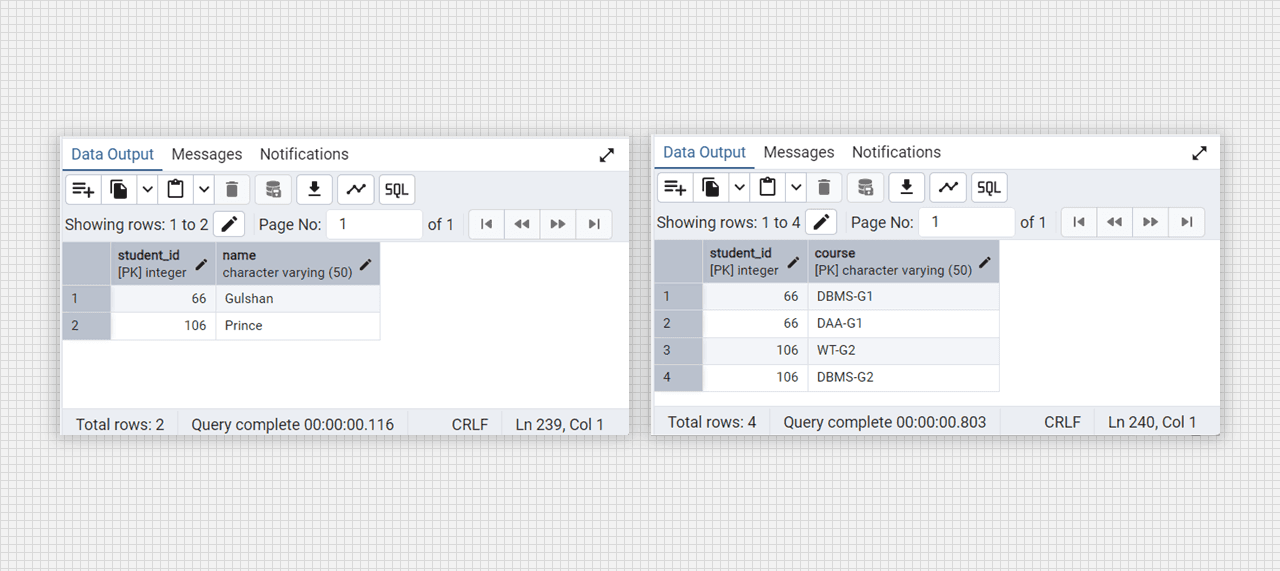
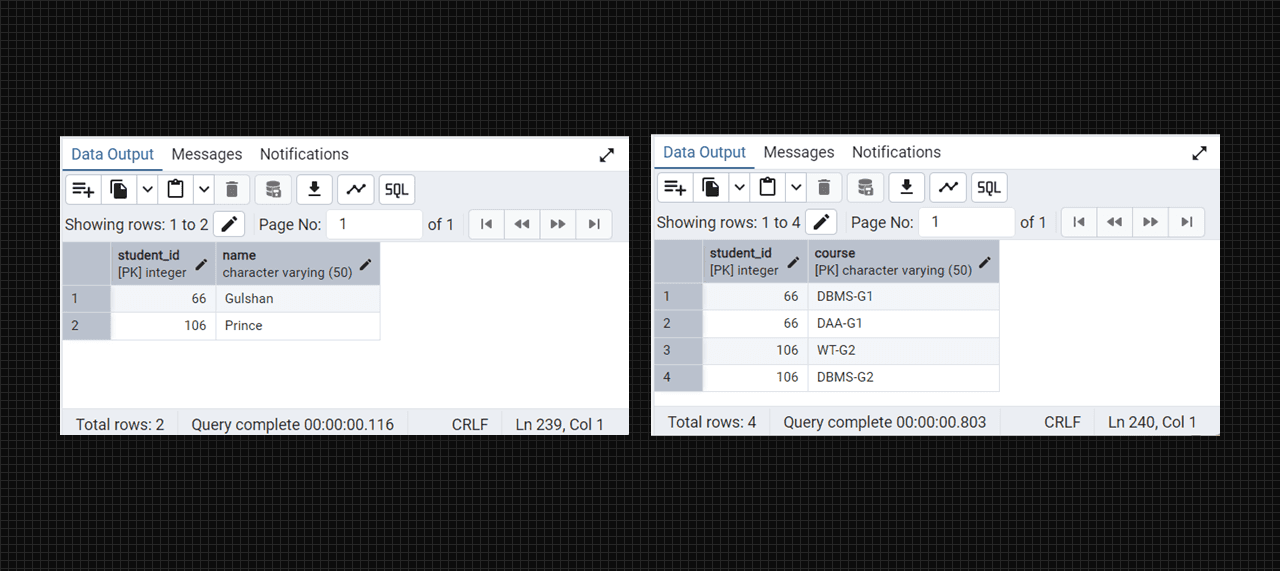
Conevrted into 1 NF table fig. (students).
Second Normal Form (2NF):
- for non-2NF
create table college_student_courses (
    student_id serial primary key,
    name varchar(50),
    course varchar(50),
    teacher varchar(50)
);

insert into college_student_courses (name, course, teacher) values
('Gulshan', 'DBMS-G1', 'Ms. Shahina'),
('Gulahan', 'DAA-G1', 'Prof. Ravinder'),
('Prince', 'WT-G2', 'Ms. Pragya'),
('Prince', 'DBMS-G2', 'Ms. Shahina');

-- for see the college_student_courses table
select * from college_student_courses;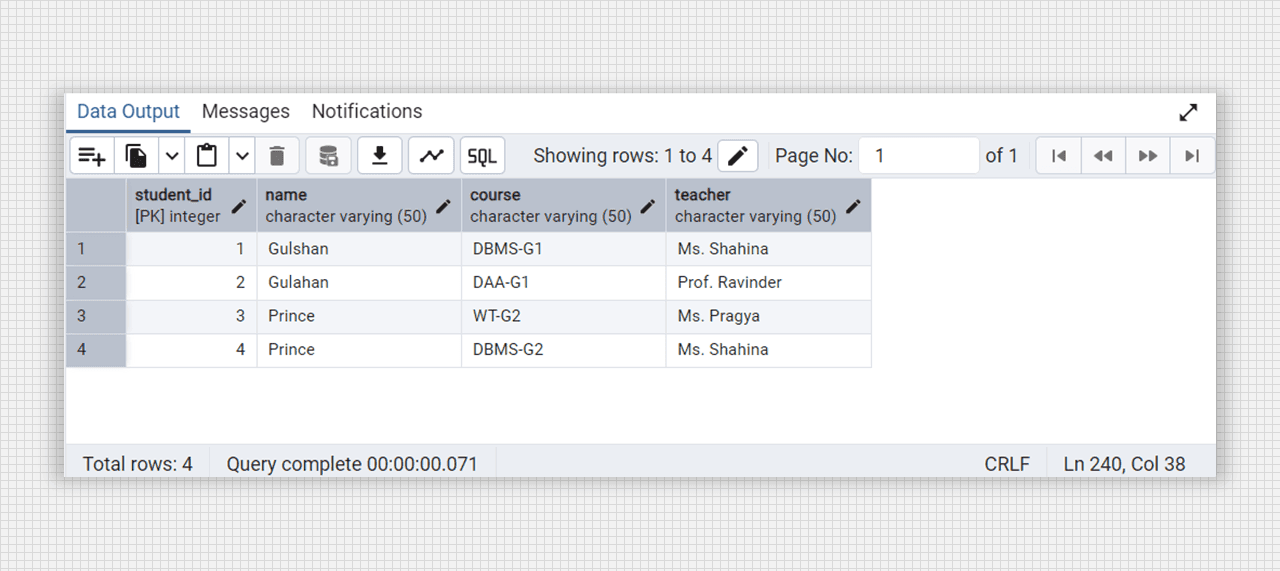
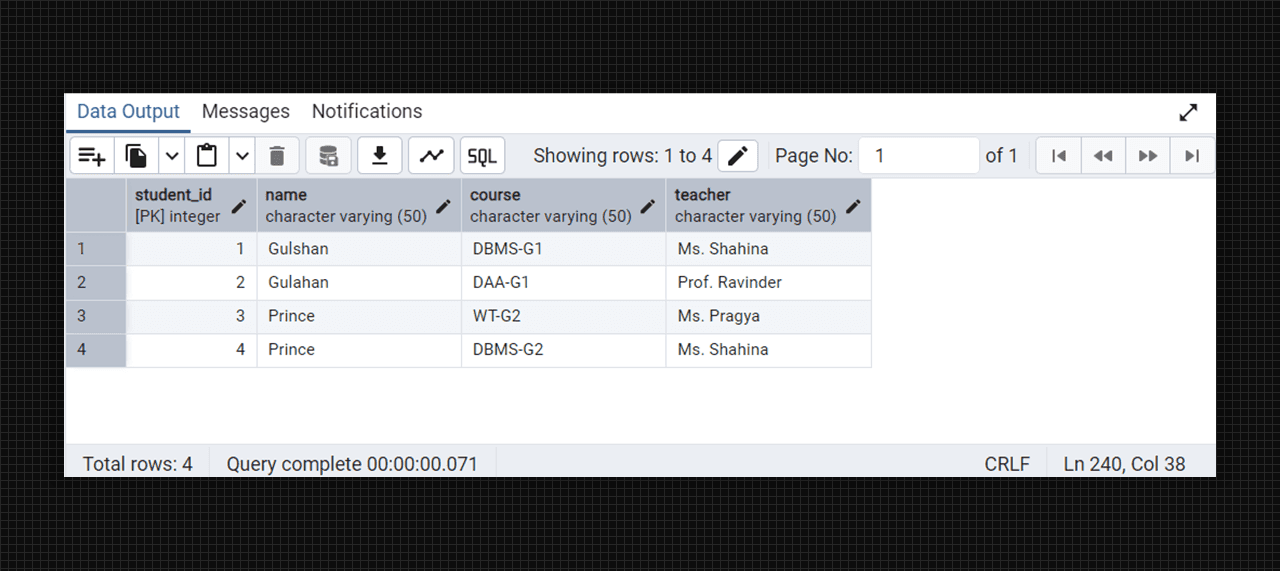
Non-2NF table fig. (Student-courses).
- Remove partial dependencies by ensuring that non-key attributes are fully dependent on the primary key.
create table college_students (
    student_id serial primary key,
    name varchar(50)
);

create table college_student_courses (
    student_id integer references students(student_id),
    course varchar(50),
    primary key (student_id, course)
);

create table college_courses (
    course varchar(50) primary key,
    teacher varchar(50)
);

insert into college_students (student_id, name) values
(66, 'Gulshan'),
(106, 'Prince');

insert into college_student_courses (student_id, course) values
(66, 'DBMS-G1'),
(66, 'DAA-G1'),
(106, 'WT-G2'),
(106, 'DBMS-G2');

insert into college_courses (course, teacher) values
('DBMS-G1', 'Ms. Shahina'),
('DAA-G1', 'Prof. Ravinder'),
('WT-G2', 'Ms. Pragya'),
('DBMS-G2', 'Ms. Shahina');

-- for see the college_students table
select * from college_students;
-- for see the college_student_courses table
select * from college_student_courses;
-- for see the college_courses table
select * from college_courses;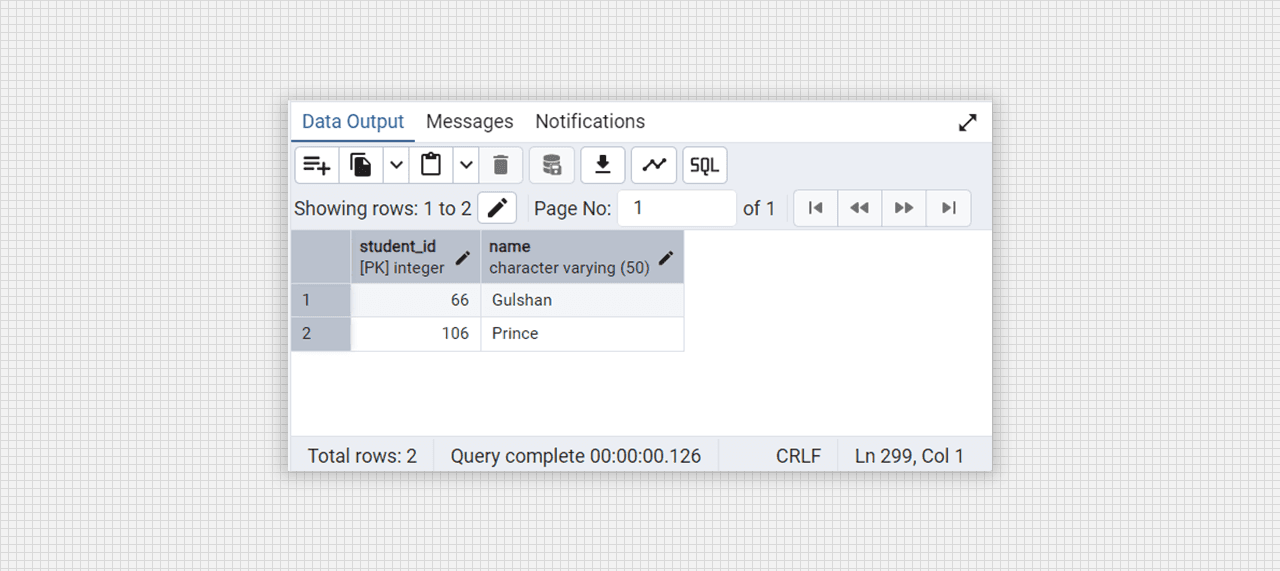
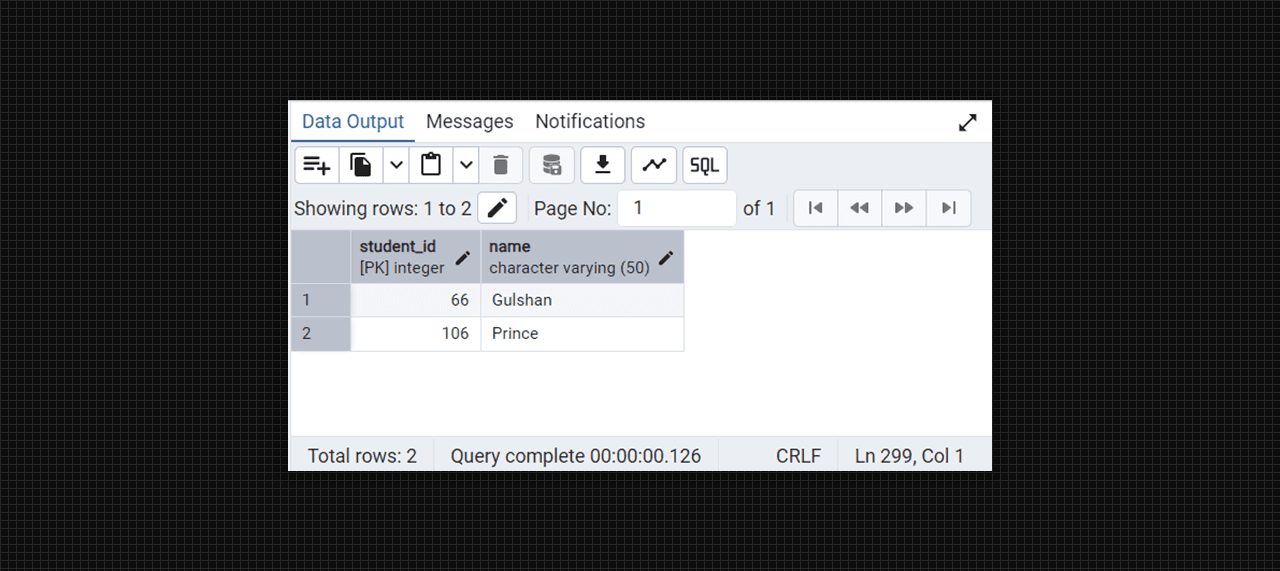
Conevrted into 2 NF table fig. (students).
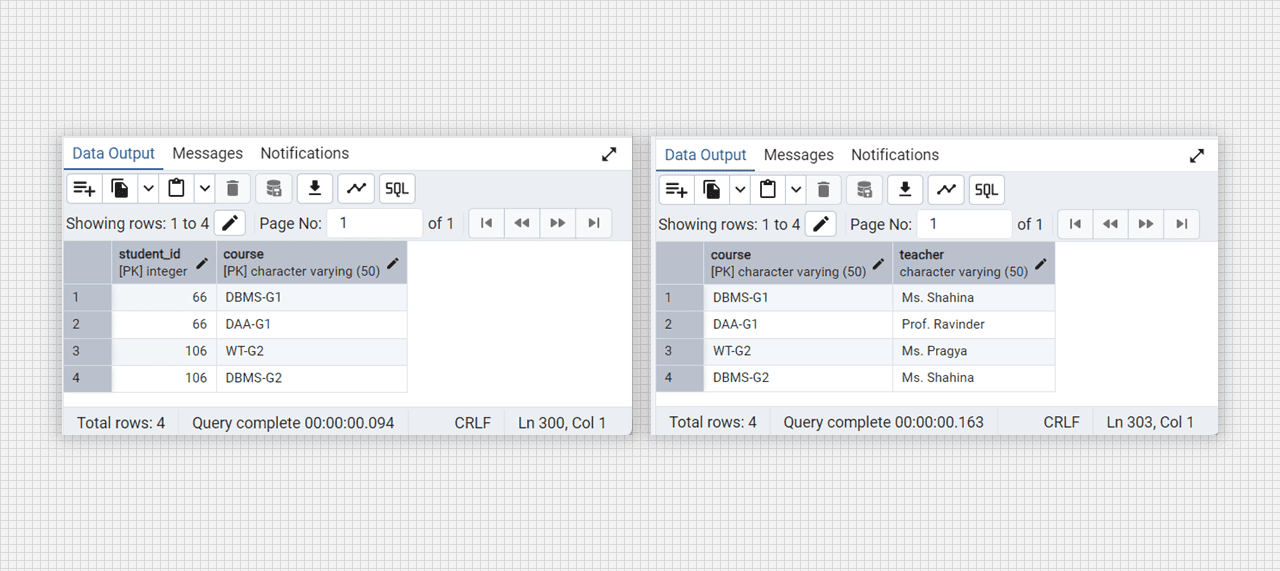
Conevrted into 2 NF table fig. (student-courses), (course-teacher).
Third Normal Form (3NF):
- for non-3NF
create table college_students (
    student_id serial primary key,
    name varchar(50),
    branch varchar(50),
    department_head varchar(50)
);

insert into college_students (name, branch, department_head) values
('Gulshan', 'CSE', 'Dr. B. Sharan'),
('Yash', 'CSE-IT', 'Prof. Vipin');

-- for see the college_students table
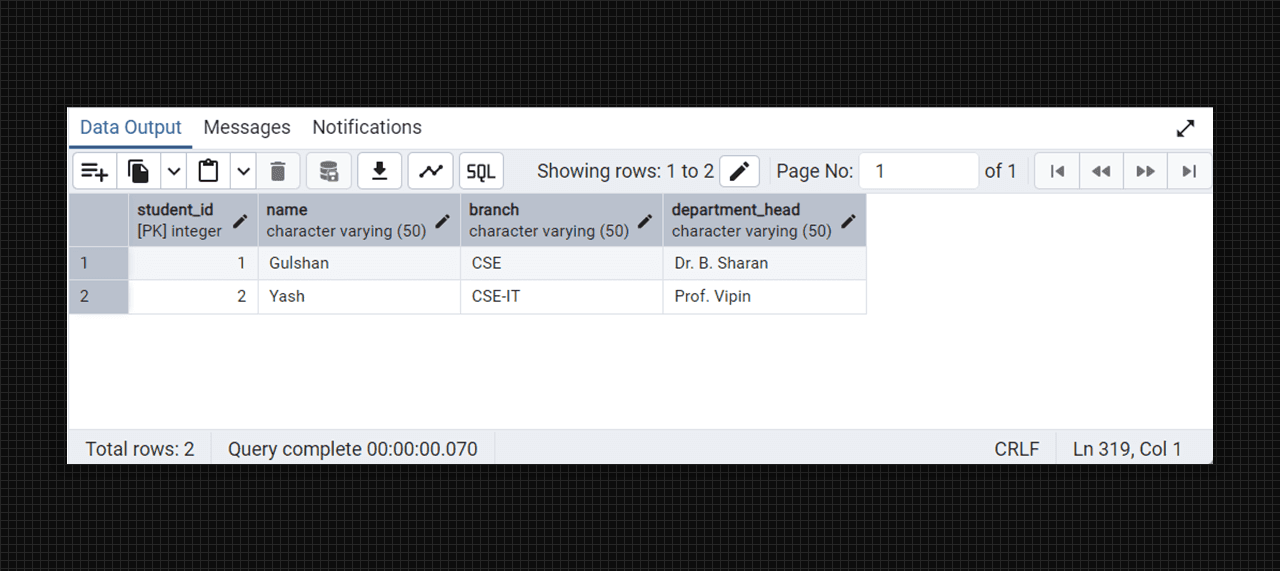
select * from college_students;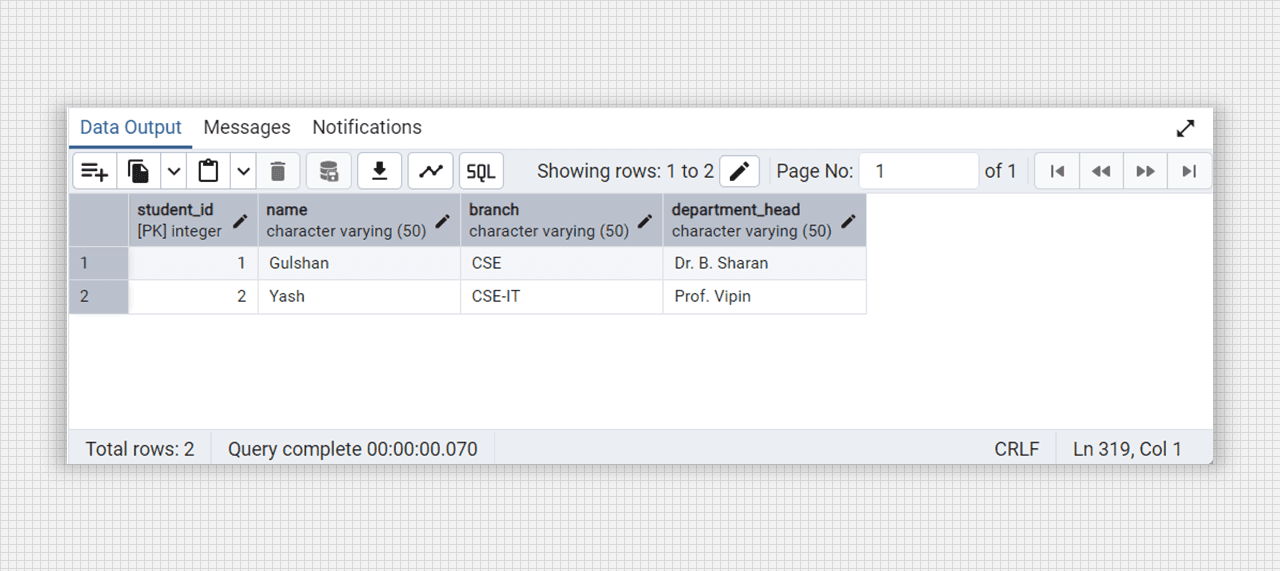
Non-3NF table fig. (Students)
- Remove transitive dependencies by ensuring that non-key attributes are not dependent on other non-key attributes.
create table college_students (
    student_id serial primary key,
    name varchar(50),
    branch varchar(50)
);

create table college_departments (
    branch varchar(50) primary key,
    department_head varchar(50)
);

insert into college_students (name, branch) values
('Gulshan', 'CSE'),
('Yash', 'CSE-IT');

insert into college_departments (branch, department_head) values
('CSE', 'Dr. B. Sharan'),
('CSE-IT', 'Prof. Vipin');

-- for see the college_students table
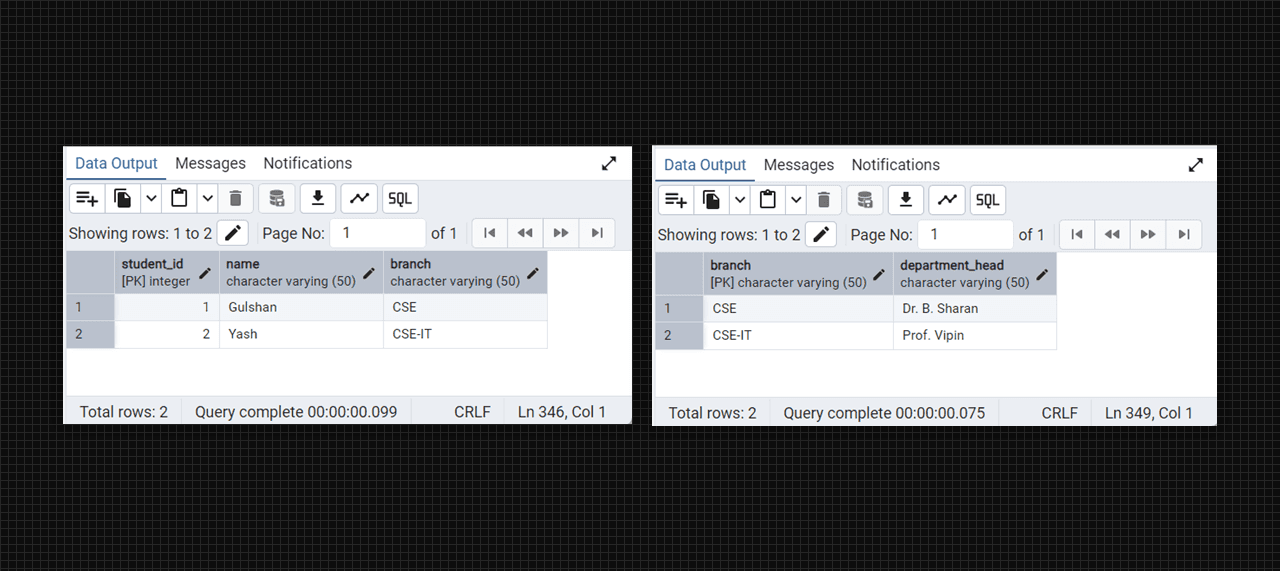
select * from college_students;

-- for see the college_departments table
select * from college_departments;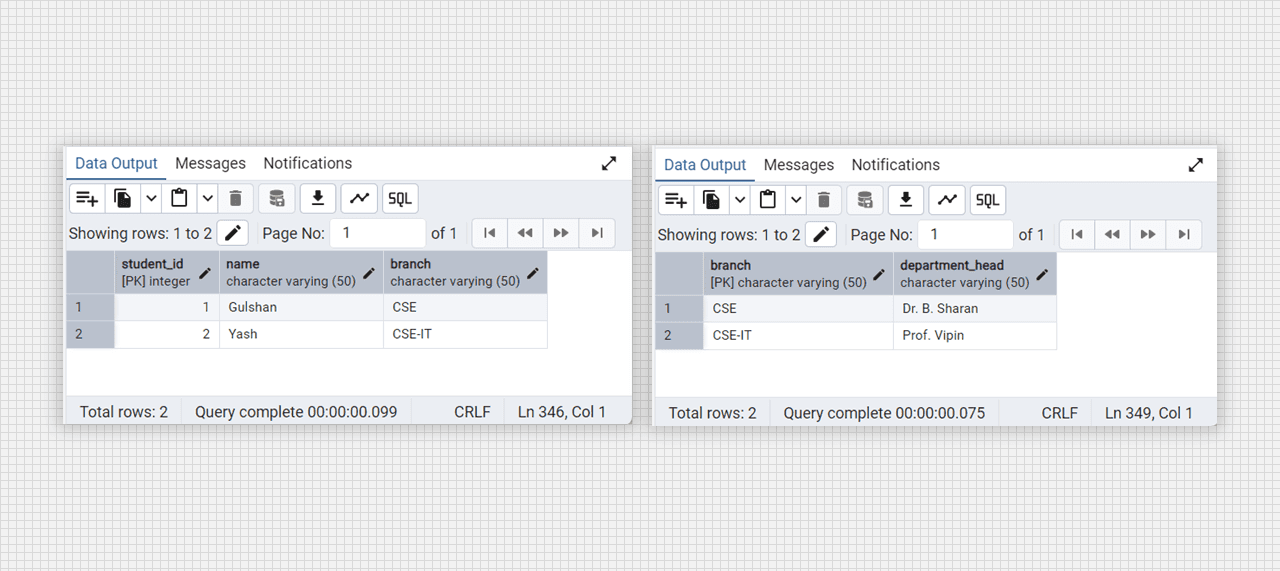
Conevrted into 3 NF table fig. (students), (branch)
Objective: Creating Cursor.
Theory:
Cursor in PL/SQL is a databse object used to retrieve and manipulate multiple rows of data in a controlled manner. It allows row-by-row processing of query results. There are two types of Cursor—
- Implicit Cursor: Automatically created by PL/SQL for single-row queries.
- Explicit Cursor: Defined by the programmer for queries that return multiple rows.
Declare a cursor: student_cursor is declared for the select query.
create or replace function fetch_student_data() return void as $$
declare
    student_record record;
    student_cursor cursor for select student_id, first_name, last_name, age from students;
begin
    -- open the cursor
    open student_cursor;

    -- fetch each row from the cursor
    loop
        fetch student_cursor into student_record;
        exit when not found;
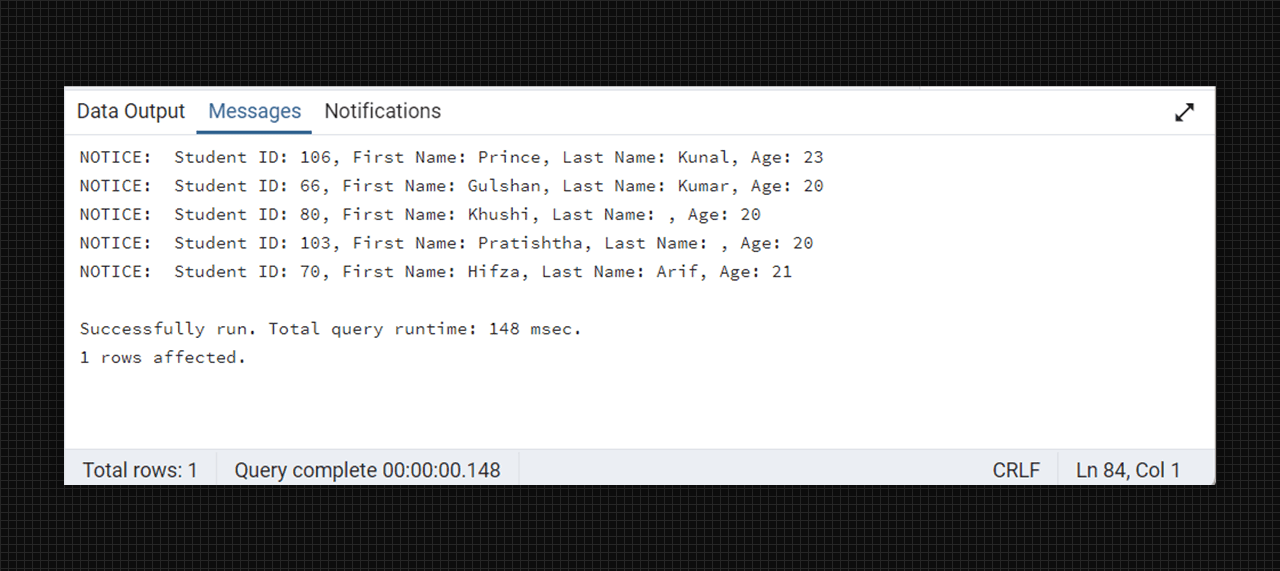
        raise notice 'Student ID: %, First Name: %, Last Name: %, Age: %',
            student_record.student_id, student_record.first_name, student_record.last_name, student_record.age;
    end loop;

    -- close the cursor
    close studnet_cursor;
end;
$$ language plpgsql;

-- execute function to see the output
select fetch_student_data();
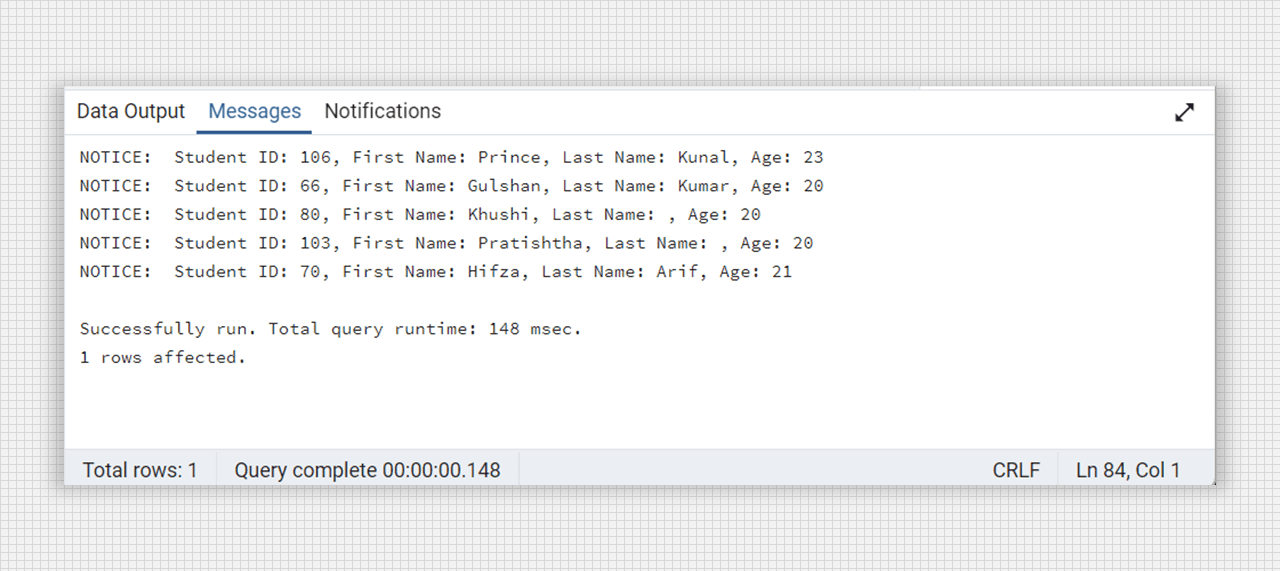
Creating a cursor for print the student record.
Objective: Creating Procedure and Functions.
Theory:
Stored Procedures and Functions are PL/SQL constructs used to encapsulate a set of operations or queries to perform specific tasks.
- Procedure: A subprogram that performs a specific action but does not return a value.
- Function: Similar to a procedure but it returns a single value.
Creating a Procedure: A procedure is a set of SQL and procedural statements that perform a task.
create or replace procedure update_student_age (
    p_student_id integer, new_age integer) as
$$
begin
    update students
    set age = new_age
    where student_id = p_student_id;
end;
$$ language plpgsql;

-- for execute the function
call update_student_age(66, 21);

-- for see the chnages in exsiting table
select * from students;
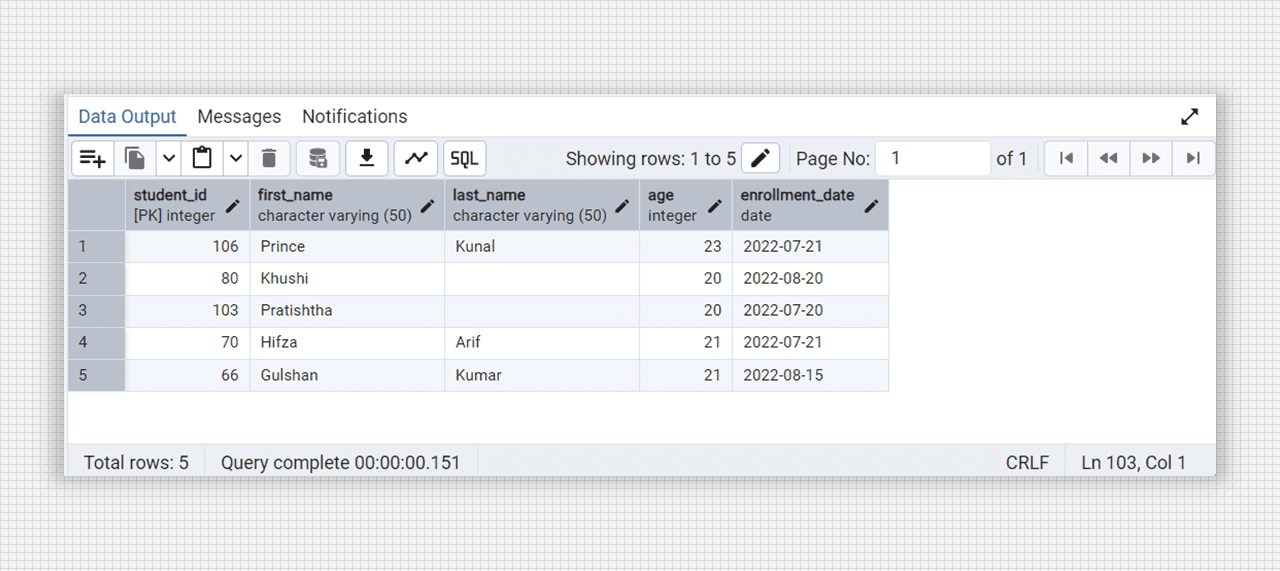
Updating the age in students table with the procedure.
Creating a Function: A function is a set of SQL and procedural statements that perform a task and return a value.
create or replace function get_student_name (
    f_student_id integer) returns varchar
language plpgsql
as $$
declare
    student_name varchar;
begin
    select concat(s.first_name, ' ', s.last_name) into student_name
    from students s where s.student_id = f_student_id;
    return student_name;
end;
$$;

-- for executing the function
select get_student_name(106);

select get_student_name(66);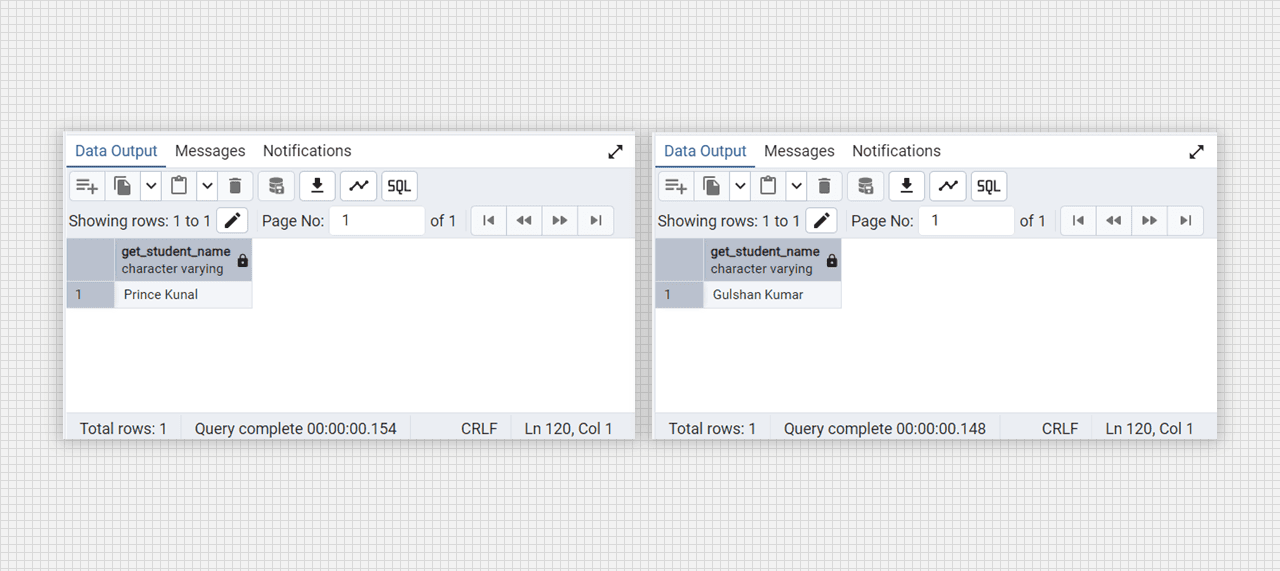
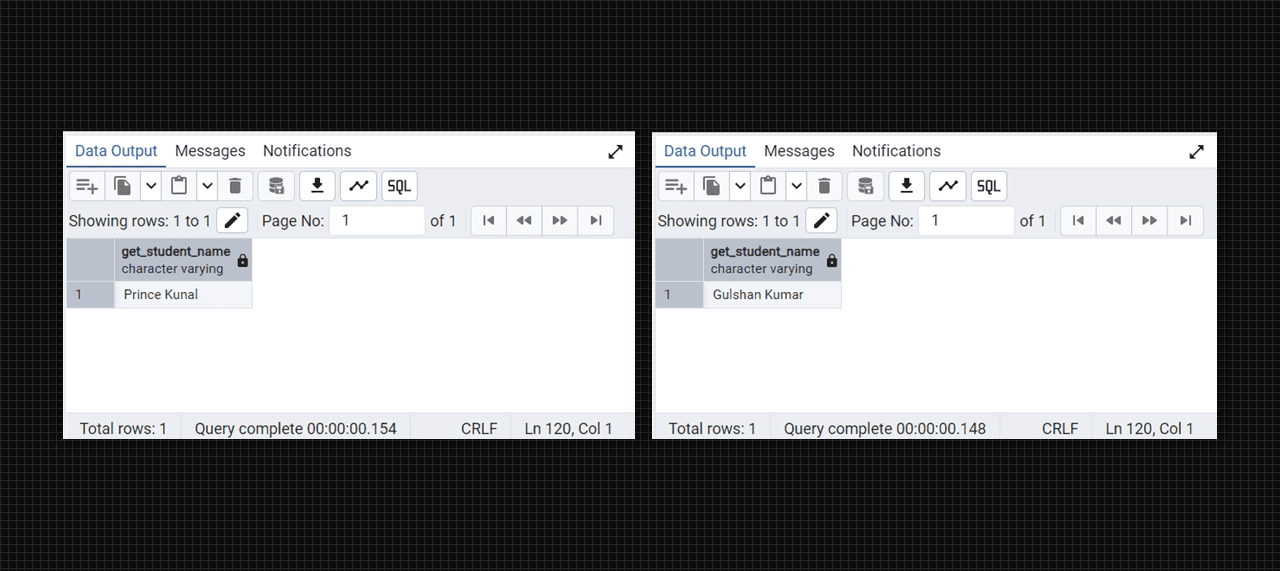
Get the student from the students table with the function.
Objective: Creating Package and Triggers.
Theory:
Packages in PL/SQL are schema objects that group logically related PL/SQL types, items, and subprograms. They consist of two parts—
- Package Specification: Declares the public items that can be referenced outside the package.
- Package Body: Defines the code for the subprograms declared in the Specification.
-- create a schema
create schema student_pkg;

-- create functions in the schema
-- function to add a student
create or replace function student_pkg.add_student(
    p_student_id integer,
    p_first_name varchar,
    p_last_name varchar,
    p_age integer
)
returns void as
$$
begin
    insert into students(student_id, first_name, last_name, age) values
    (p_student_id, p_first_name, p_last_name, p_age);
end;
$$ language plpgsql;

-- function to get a student's name
create or replace function student_pkg.get_student_name(
    p_student_id integer
)
returns varchar as
$$
declare
    v_name varchar;
begin
    select concat(s.first_name, ' ', s.last_name) into v_name from students s where student_id = p_student_id;
    return v_name;
end;
$$ language plpgsql;

-- add new student in students table using function
select student_pkg.add_student(93, 'Mukesh', 'Kumar', 19);
select * from students;

-- for extracting the name with student_id
select student_pkg.get_student_name(70);
select student_pkg.get_student_name(103);
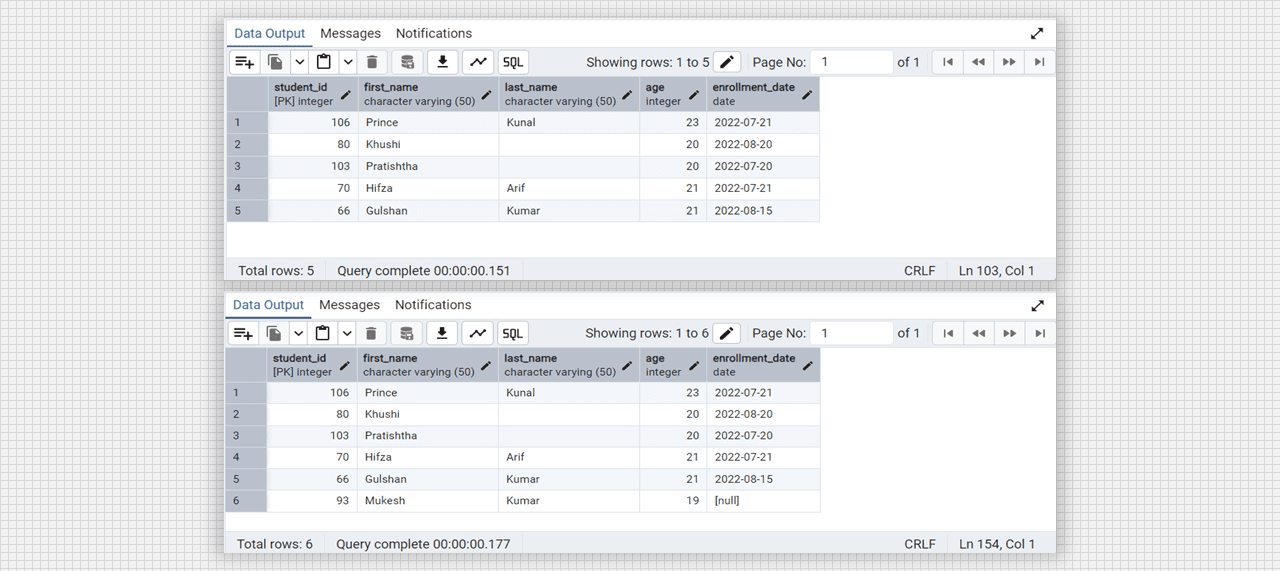
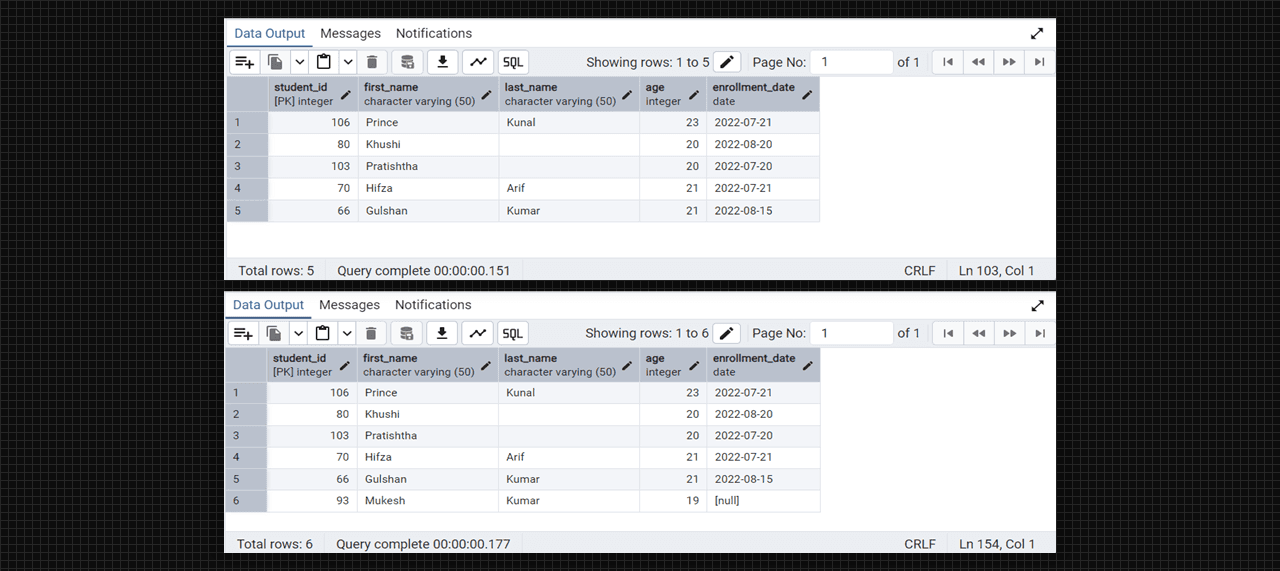
Add the data in existing table with the package function.
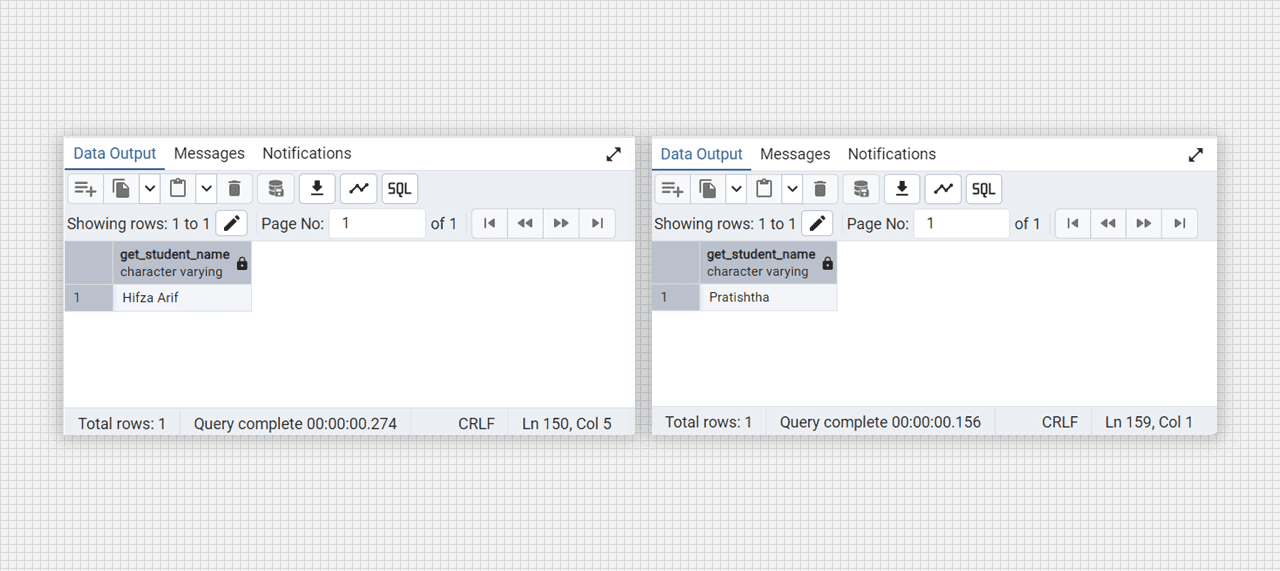
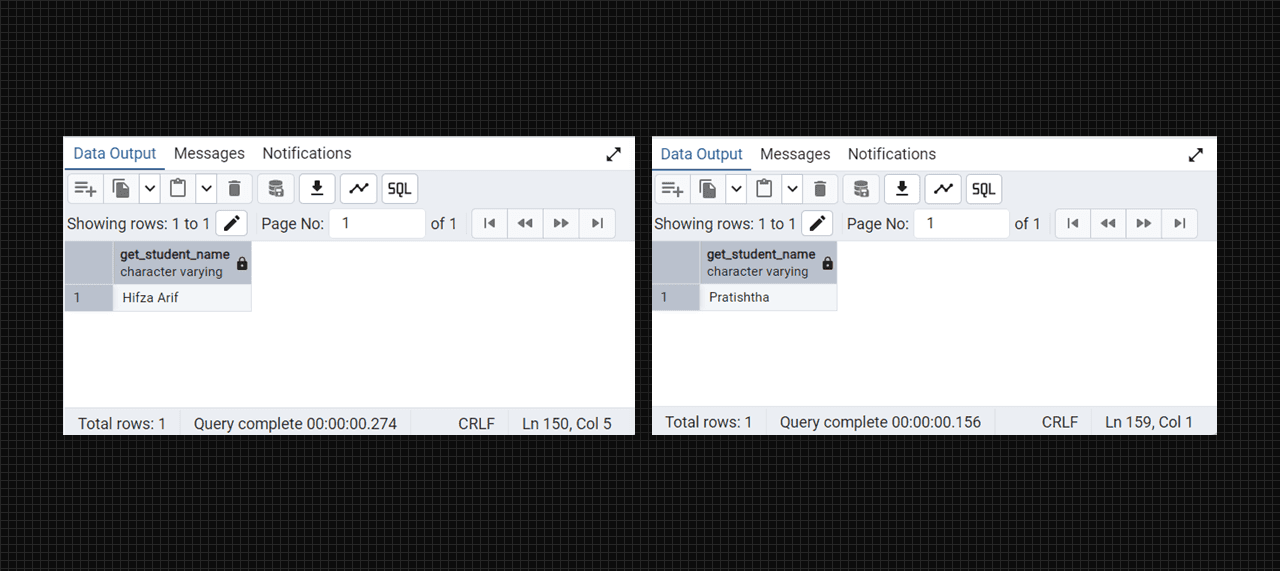
Get the name from db with the package function.
Creating a trigger:
A trigger is a stored procedure that automatically executes when certain events occur in the database, such as insert, update, or delete.
- The trigger
BeforeInsertStudentis defined to execute before aninsertoperation on thestudentstable. - The trigger body checks a record into the
studentstable,new.student_idis null or not. If null then returnraise_application_error.
-- create student_change_log table
create table student_changes_log (
    change_id serial primary key,
    student_id integer,
    old_age integer,
    new_age integer,
    change_date timestamp default current_timestamp
);

-- defining the trigger's function
create or replace function log_major_change() returns trigger as $$
begin
    if old.age is distinct from new.age then
        insert into student_changes_log (student_id, old_age, new_age)
        values (old.student_id, old.age, new.age);
    end if;
    return new;
end;
$$ language plpgsql;

-- create trigger to the function log_major_change()
create trigger after_major_update
after update on students
for each row
execute function log_major_change();

-- update the students table with change_date
update students get age = 21 where student_id = 80;

-- see the changes items
select * from student_changes_log;
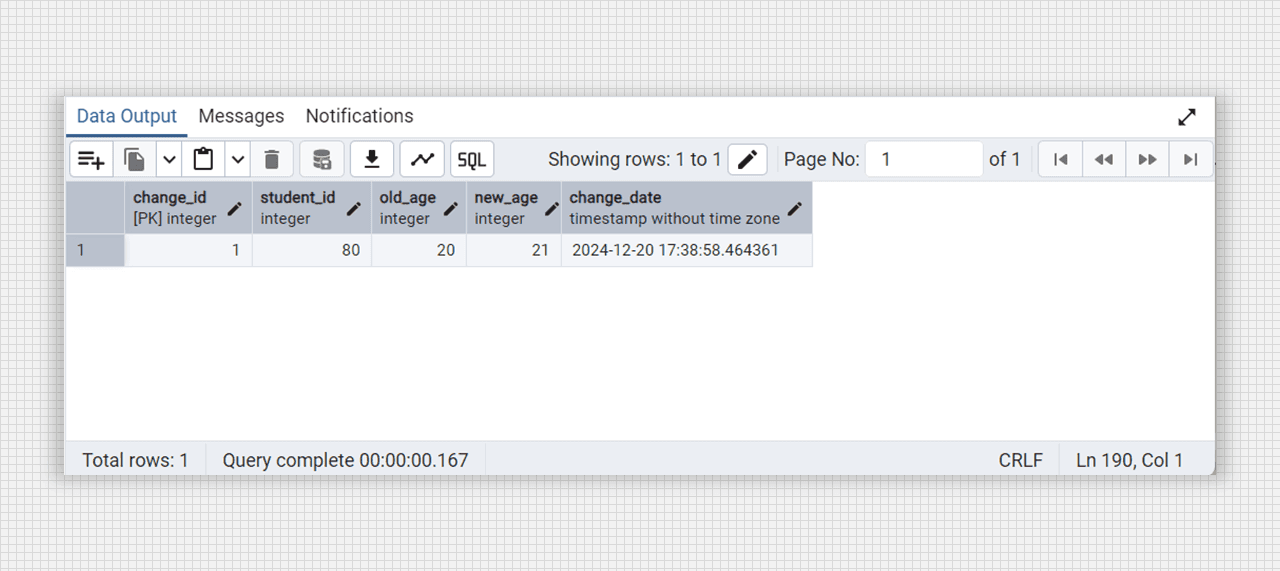
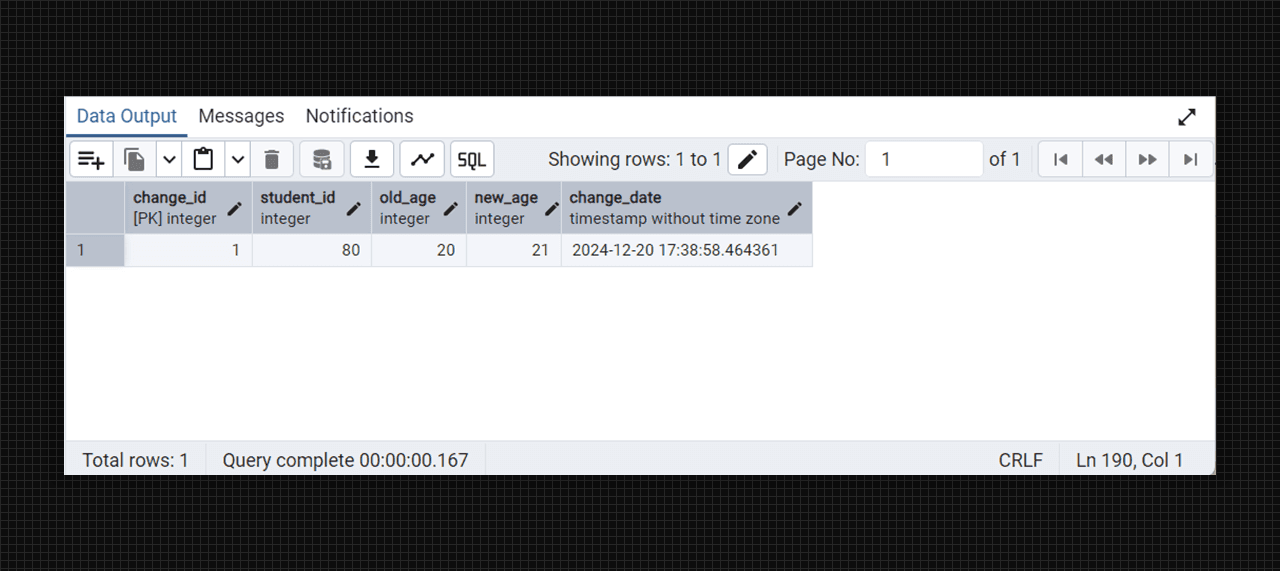
After changes on students table creating a student_changes_log table.
□ □ □
